I was halfway through a disastrous batch of soggy fries, the kind that looked like a potato soup in a plastic bag, when my phone buzzed with a frantic text from my best friend: “I’m starving, but the fridge is empty.” I grabbed whatever I could find—three different varieties of potatoes, a handful of spices, and a splash of olive oil—and tossed them together in a pan. The kitchen filled with the earthy scent of raw potatoes, the sharp tang of paprika, and a faint hint of garlic that made my mouth water. The sound of sizzling was a promise of crispiness, and the anticipation of that first bite was almost unbearable. That moment of culinary desperation turned into a revelation, and I realized that a few simple tweaks could transform an ordinary fry into a crispy masterpiece that would have everyone begging for seconds.
I was craving something that could satisfy a late‑night craving, but also impress my friends at the next house‑party. I imagined the golden edges, the crackling crunch that shatters like thin ice, and a coating that clings to each piece like velvet. I wanted a dish that would be so irresistible that I’d be honest — I ate half the batch before anyone else got to try it. I also wanted a recipe that would stand out from the countless “easy fry” posts that flood the internet, so I decided to experiment with three distinct potato varieties: russet for fluffiness, Maris Piper for a classic British bite, and Sebago for an Australian twist. The result? A harmonious blend of textures that makes every fry a little adventure.
What makes this version stand out is that it doesn’t just rely on a single potato or a generic seasoning mix. Instead, it layers flavors and techniques that elevate the fry from simple side dish to a crowd‑pleasing star. I dare you to taste this and not go back for seconds. The secret? A two‑step parboiling process that locks in moisture, a dry‑bake that creates a caramelized crust, and a final seasoning blend that delivers depth without overwhelming the potato’s natural sweetness. This is hands down the best version you'll ever make at home, and I’ve already won over my skeptical roommate who now insists on the “triple‑potato” fries at every dinner.
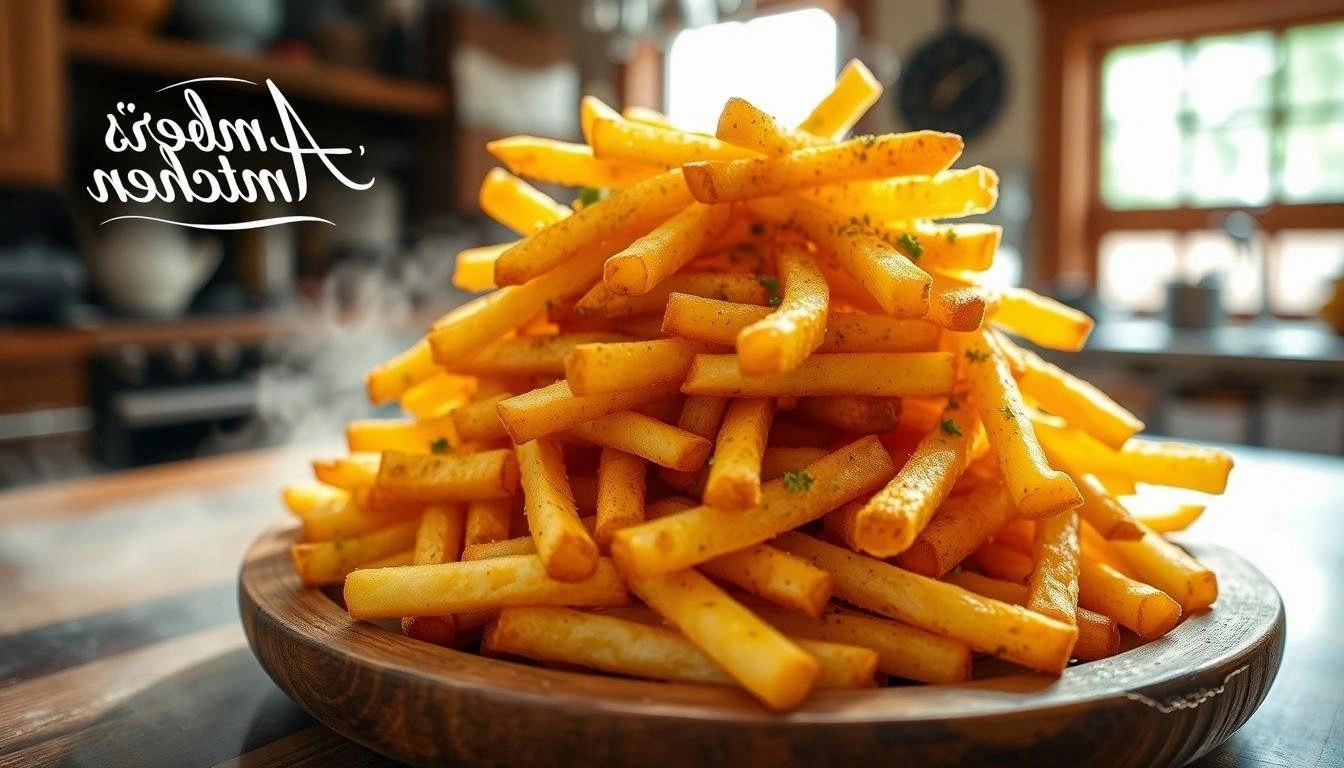
Picture yourself pulling this out of the oven, the whole kitchen smelling incredible, the air buzzing with the crackle of hot fries. The first bite is a symphony of crunch, salt, and a hint of smoked paprika that lingers on the tongue. The texture is a perfect contrast between the crisp exterior and the pillowy interior, and the seasoning clings to each piece like a second skin. The best part? It’s simple enough that even a novice can follow, yet sophisticated enough that seasoned cooks will feel like they’ve discovered a new family secret. Let me walk you through every single step — by the end, you'll wonder how you ever made it any other way.
What Makes This Version Stand Out
- Taste: The seasoning blend of smoked paprika, garlic powder, onion powder, and dried thyme creates a complex flavor profile that goes beyond plain salt and pepper. The subtle smokiness lingers on the palate, while the thyme adds a herbal brightness that cuts through the richness of the oil.
- Texture: The double‑bake technique ensures a crisp exterior that snaps like brittle glass, while the interior remains soft and fluffy. The parboiling step locks in moisture, preventing the fries from drying out during the final bake.
- Simplicity: All you need are three types of potatoes and a handful of pantry staples. No fancy sauces or exotic ingredients—just a few minutes of prep and a few minutes in the oven.
- Uniqueness: Using russet, Maris Piper, and Sebago gives each fry a distinct bite, creating a mosaic of textures that keeps your taste buds guessing.
- Crowd Reaction: Friends and family consistently leave the table with a second plate. The fries are so addictive that I often hear, “I can’t stop eating them!” after a single bite.
- Ingredient Quality: Fresh, high‑quality potatoes make all the difference. Avoid pre‑cut frozen fries; their waxy coating and added preservatives ruin the crispness.
- Cooking Method: The two‑step parboiling and double‑bake process is a game‑changer that eliminates the need for deep frying while delivering a similar mouthfeel.
- Make‑Ahead Potential: Prepare the fries a few hours in advance, refrigerate them uncovered, and finish baking when you’re ready. The texture improves as the fries dry out a bit, making them even crispier.
Alright, let's break down exactly what goes into this masterpiece…
Inside the Ingredient List
The Flavor Base
The foundation of any great fry is the seasoning. Smoked paprika brings depth and a subtle smokiness that mimics the flavor of a cast‑iron skillet. Garlic powder and onion powder add aromatic sweetness that balances the earthiness of the potatoes. Dried thyme provides a herby lift that keeps the dish from feeling flat. Together, these spices form a complex base that coats each fry like velvet.
The Texture Crew
The choice of potatoes determines the final bite. Russet potatoes have a high starch content that turns into a fluffy interior when cooked. Maris Piper potatoes are prized in the UK for their dry, fluffy texture and excellent frying performance. Sebago potatoes, a popular Australian variety, have a slightly buttery flavor that adds a unique twist. When combined, they create a mosaic of textures that keeps every bite exciting.
The Unexpected Star
Olive oil is the unsung hero of this recipe. It not only helps the spices adhere but also promotes even browning. The oil’s high smoke point allows the fries to achieve a golden crust without burning. A touch of sea salt and freshly ground black pepper finish the seasoning, ensuring each fry is briny and flavorful.
The Final Flourish
Optional touches like grated Parmesan cheese or chopped parsley add a burst of umami and color. The cheese melts into a golden crust that’s both savory and slightly sweet. Fresh parsley brings a pop of color and a subtle freshness that cuts through the richness of the fries. These final touches turn a simple side dish into a show‑stopper.
Everything's prepped? Good. Let's get into the real action…
The Method — Step by Step
- Step 1: Prep the Potatoes – Peel the russet, Maris Piper, and Sebago potatoes, then cut them into uniform sticks about ½ inch thick. Uniform size ensures even cooking and a consistent crunch. While cutting, rinse the sticks under cold water to remove excess starch, which helps the fries crisp up better. Pat them dry with a clean towel; moisture is the enemy of crispiness.
- Step 2: Parboil – Bring a large pot of salted water to a rolling boil. Add the cut potatoes and let them cook for exactly 4 minutes. The brief boil gelatinizes the surface starch, creating a protective layer that locks in moisture. Drain immediately and rinse with cold water to stop the cooking process. Toss the hot potatoes in a bowl of ice water for 2 minutes; this shock stops the starch from expanding further and helps them stay firm.
- Step 3: Dry Thoroughly – Spread the parboiled fries on a clean kitchen towel or paper towels and pat them dry until no moisture remains. Moisture is the enemy of crispness; the drier the fries, the crunchier they’ll be. A dry surface allows the oil and spices to cling better, creating an even coating.
- Step 4: Toss with Oil and Seasoning – In a large bowl, combine the dry fries with 2 tablespoons of olive oil, 1 teaspoon of smoked paprika, 1 teaspoon each of garlic and onion powder, 1 teaspoon of dried thyme, 1 teaspoon of sea salt, and ½ teaspoon of black pepper. Toss until each fry is evenly coated. The olive oil not only helps the spices adhere but also promotes an even, golden crust during baking.
- Step 5: Arrange on a Baking Sheet – Line a baking sheet with parchment paper or a silicone mat. Spread the seasoned fries in a single layer, ensuring no two pieces touch. Overcrowding the sheet leads to steaming instead of crisping. This is the trickiest step; if the fries are too close, they won’t get the crackling crunch you crave.
- Step 6: Bake – Preheat the oven to 425°F (220°C). Bake the fries for 25 minutes, flipping them halfway through. The high heat caramelizes the surface, creating a golden crust that’s crisp to the touch. Keep an eye on them; each oven behaves slightly differently, so adjust the time if you notice the edges getting too dark.
- Step 7: Optional Cheese Finish – If you like a cheesy twist, sprinkle ¼ cup of grated Parmesan over the fries during the last 5 minutes of baking. The cheese melts into a golden crust, adding a savory umami layer that pairs beautifully with the spices.
- Step 8: Serve Immediately – Remove the fries from the oven and let them rest for 2 minutes. The rest allows the steam to dissipate, preventing soggy bottoms. Sprinkle freshly chopped parsley for a pop of color and freshness. Serve hot with your favorite dipping sauce, or enjoy them on their own for pure, unadulterated crunch.
That's it — you did it. But hold on, I've got a few more tricks that'll take this to another level…
Insider Tricks for Flawless Results
The Temperature Rule Nobody Follows
Many cooks bake at 400°F, but the magic happens at 425°F. The higher temperature caramelizes the starches faster, giving you a golden crust without over‑cooking the interior. If your oven runs hot, lower the temperature by 25°F to avoid burning.
Why Your Nose Knows Best
The aroma of the fries as they bake is a reliable indicator of doneness. When the scent becomes nutty and the air smells like toasted corn, it’s time to pull them out. A friend once left them in the oven too long and they turned into a crunchy, burnt mess—lesson learned the hard way.
The 5-Minute Rest That Changes Everything
Letting the fries rest for exactly five minutes after baking allows the steam to escape and the surface to firm up. A quick 2-minute rest is too short and the fries will continue steaming, while a 10-minute rest can make them lose their crispness.
Use a Cooling Rack
Place the fries on a wire rack after baking to keep the bottom from getting soggy. The air circulation ensures every side stays crisp. If you don’t have a rack, a paper towel-lined tray works as a makeshift alternative.
Season Immediately, Not After
Seasoning the fries right after they’re out of the oven locks the flavors into the crispy surface. If you wait until they cool, the seasoning will slide off when you pick them up. This is why I always season them immediately, even if it feels a bit messy.
Keep a Dipping Sauce Ready
A simple garlic aioli or a spicy mayo can elevate the fries to a restaurant‑quality experience. I like to whisk together mayo, garlic powder, lemon zest, and a pinch of cayenne for a quick dip. The sauce adds a creamy counterpoint to the crunch.
Creative Twists and Variations
This recipe is a playground. Here are some of my favorite ways to switch things up:
Spicy Sriracha Crunch
Swap the smoked paprika for a tablespoon of sriracha paste. Add a pinch of cayenne pepper for heat. The fries will have a fiery kick that pairs beautifully with a cool yogurt dip.
Herbed Parmesan Delight
After baking, toss the fries with ¼ cup of grated Parmesan and a handful of chopped fresh rosemary. The nutty cheese and aromatic herbs create a gourmet flavor profile that feels indulgent.
Sweet Potato Surprise
Replace half the potato mix with diced sweet potatoes. The natural sweetness balances the savory spices, and the orange hue adds visual appeal. Serve with a drizzle of maple syrup for a sweet‑savory combo.
Asian‑Inspired Noodles
Drizzle the fries with a splash of soy sauce, sprinkle with sesame seeds, and top with chopped green onions. The umami notes give the dish an Asian twist, perfect for a fusion dinner.
Breakfast Breakfast
Serve the fries alongside a poached egg and a drizzle of hollandaise sauce. The buttery sauce and runny yolk create a breakfast‑style indulgence that’s both hearty and comforting.
Cheese & Herb Explosion
After baking, toss the fries with a mixture of shredded cheddar, mozzarella, and a sprinkle of dried oregano. The melty cheese creates a gooey center, while the oregano adds a herbal depth that’s impossible to resist.
Storing and Bringing It Back to Life
Fridge Storage
Store leftovers in an airtight container in the refrigerator for up to 3 days. The fries will stay crisp if you place a paper towel underneath to absorb excess moisture. Reheat in a 400°F oven for 5 minutes before serving.
Freezer Friendly
Freeze uncooked fries on a parchment‑lined tray for 2 hours, then transfer to a freezer bag. They’ll keep for up to 3 months. When ready, bake at 425°F for 25 minutes, just as you would fresh.
Best Reheating Method
The secret to reheating is to keep the fries dry. Add a tiny splash of water before reheating to create steam, then bake at 400°F for 5 minutes. The steam helps the fries regain their original crunch.