I was standing in a kitchen that felt more like a battlefield than a place of culinary creation. The blender had just exploded, splattering yogurt across the counter, and I was staring at a pile of half‑baked dough that smelled faintly of burnt sugar. My friend had dared me to whip up something sweet that could turn the room around, and I was determined to prove that I could turn a kitchen catastrophe into a dessert triumph. The moment I tossed the first spoonful of ricotta into the mixing bowl, the room seemed to inhale, the air thickening with a promise of creamy, citrusy bliss that would make even the most skeptical palate swoon.
The scent that hit me first was the sharp citrus of fresh orange zest, a bright, almost electric aroma that cut through the lingering tang of burnt sugar. My ears were filled with the rhythmic clink of spoons against the stainless steel bowl, a gentle percussion that set the pace for the next steps. The texture of ricotta—soft, almost velvety—was a tactile reminder that this was going to be more than just a scoop of ice cream; it was a silky, almost liquid velvet that would coat the tongue like a fine, buttery blanket. When the mixture finally cooled, the sound of it settling into the freezer was like a hush over the kitchen, a quiet anticipation that something extraordinary was about to emerge. I could feel the anticipation in my own hands as I pressed the mixture into the freezer, the cool air brushing against my fingers, promising a transformation from liquid to solid.
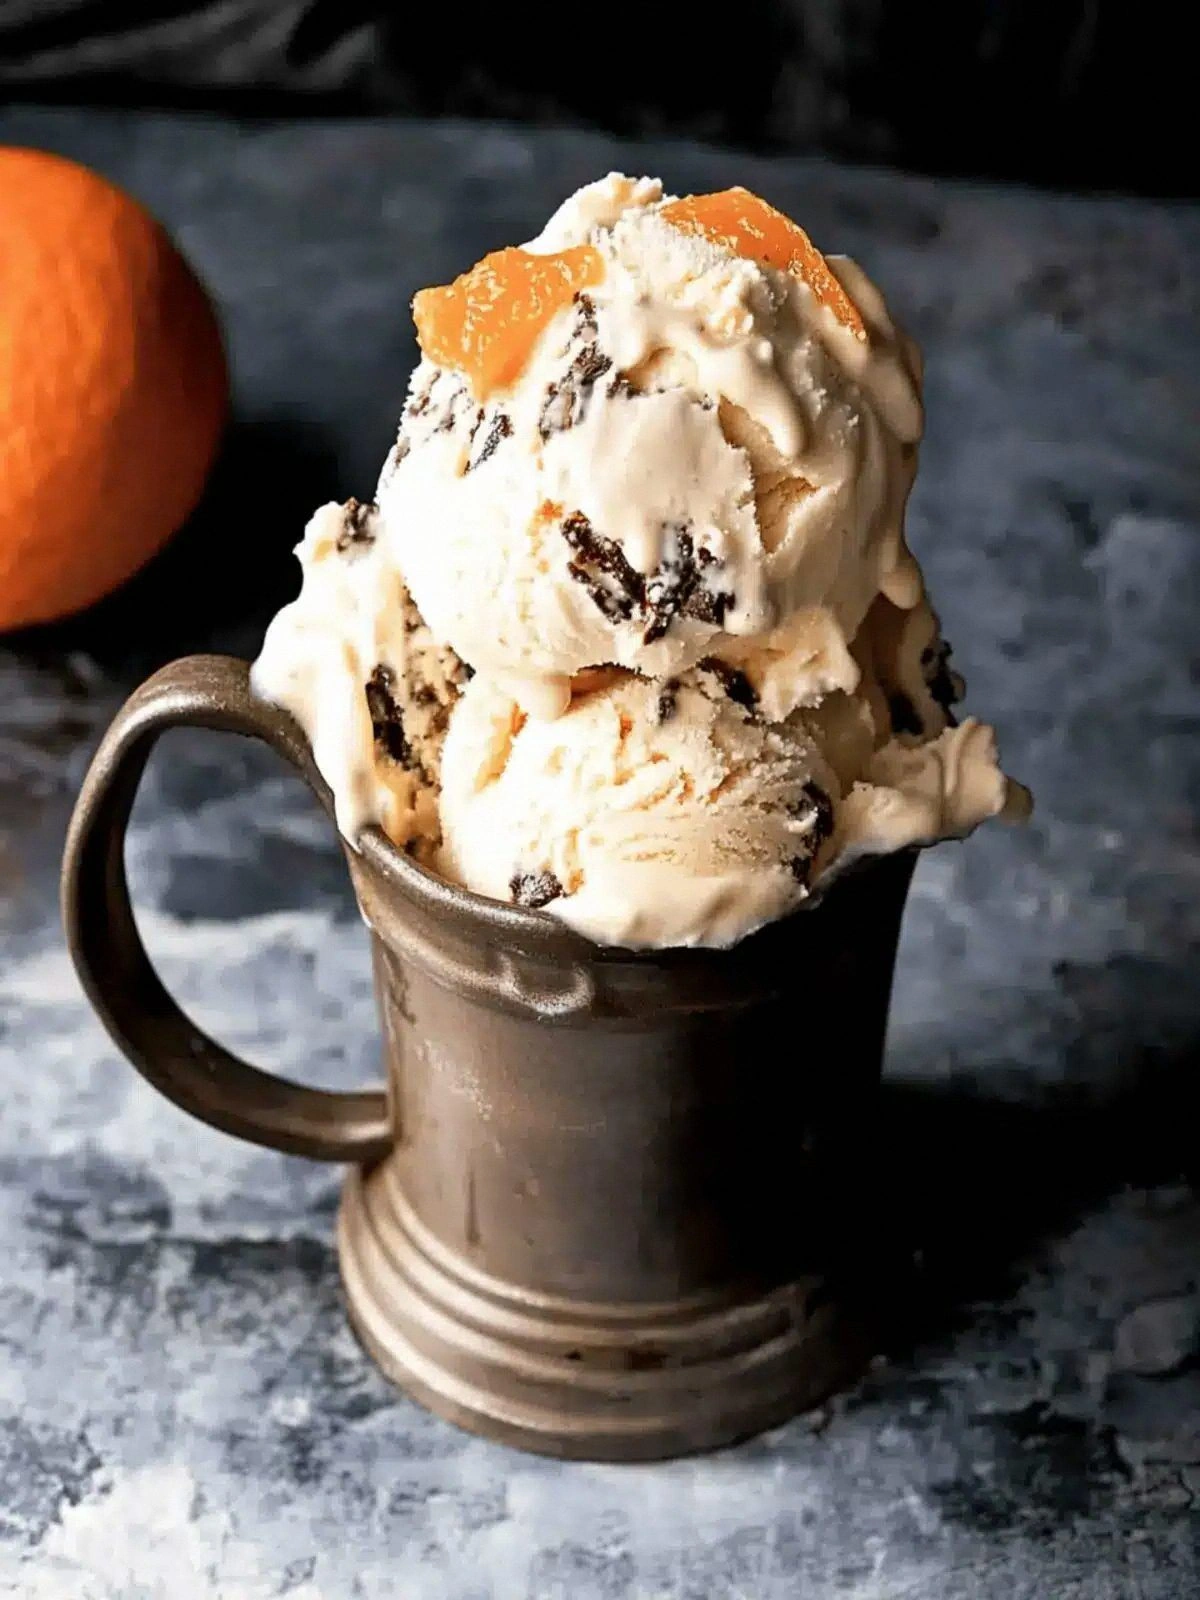
What makes this version of ricotta ice cream stand out is the deliberate balance between indulgence and subtlety. The double cream provides a luxurious mouthfeel, while the whole milk keeps the mixture light enough to freeze without becoming clumpy. Orange zest is not merely a garnish; it infuses the ice cream with a bright, zesty punch that cuts through the richness, creating a flavor profile that feels fresh even in the depths of winter. Dark chocolate is folded in just before the final freeze, ensuring its bittersweet tones are crisp and concentrated, not melted into the cream. The use of egg yolks, often avoided in homemade ice creams, gives the custard a silky, silky-smooth texture that feels like a silky ribbon on the tongue. The result is an ice cream that feels airy yet dense, bright yet indulgent—an experience that feels like a surprise party in every bite.
I dare you to taste this and not go back for seconds. I’m telling you, this is hands down the best version you’ll ever make at home. I’ll be honest—I ate half the batch before anyone else got to try it. Most recipes get this completely wrong, but here’s what actually works: the careful balance of cream, milk, and eggs, the precise timing of the chocolate fold, and the subtle addition of orange zest that turns the whole thing into something unforgettable. Picture yourself pulling this out of the freezer, the whole kitchen smelling incredible, and then taking that first spoonful that melts on your tongue like a warm memory. Okay, ready for the game‑changer? Let me walk you through every single step — by the end, you’ll wonder how you ever made it any other way.
What Makes This Version Stand Out
- Richness: The double cream gives it a lush, velvety body that feels like a luxury dessert, but it’s tempered by the whole milk to keep it from becoming too heavy.
- Bright Contrast: Orange zest injects a sharp, citrusy punch that lifts the chocolate’s bitterness, creating a flavor duet that sings.
- Smooth Texture: Egg yolks act as a natural stabilizer, turning the custard into a silky, melt‑in‑your‑mouth experience rather than a gritty, frozen mess.
- Effortless Elegance: The recipe requires minimal equipment—just a bowl, a whisk, and a freezer—yet it delivers a dessert that feels like a gourmet treat.
- Make‑Ahead Potential: It freezes well for up to a month, so you can prepare it in advance for parties or rainy‑day cravings.
- Ingredient Quality: Using a high‑fat double cream and 70% dark chocolate ensures depth of flavor without the need for artificial additives.
- Unique Twist: Folding in dark chocolate just before the final freeze preserves its texture, giving you a delightful bite of bittersweet shards.
- Universal Appeal: Whether you’re a seasoned chef or a kitchen rookie, the method is straightforward and forgiving.
Inside the Ingredient List
The Flavor Base
Double cream is the backbone of this ice cream, providing the luxurious mouthfeel that makes every bite feel indulgent. Its high fat content ensures the custard stays smooth and doesn’t crystallize during the freezing process. If you skip it, the texture becomes watery and the ice cream loses its silky sheen. For a lighter version, you could substitute half the cream with heavy whipping cream, but the result will be less dense and slightly less rich.
The Texture Crew
Whole milk balances the heaviness of the cream, keeping the mixture from becoming overly dense. It also helps the custard set evenly in the freezer. If you find the mixture too thick, a splash of milk can thin it just enough. The egg yolks are the unsung heroes; they act as a natural stabilizer, preventing ice crystals from forming and giving the ice cream a smooth, custard-like consistency. If you’re allergic to eggs, you can replace them with a tablespoon of cornstarch dissolved in a little water, but the texture will shift slightly.
The Unexpected Star
Orange zest is more than a garnish—it’s the flavor engine of this dessert. It adds bright, citrusy notes that cut through the richness of the cream and chocolate, creating a harmonious balance. The zest’s essential oils release during the cooking process, infusing the entire mixture. Skipping the zest will result in a flat, overly sweet dessert that lacks depth. If you can’t find fresh oranges, a teaspoon of orange zest from a grocery store is a fine substitute, but the flavor will be less vibrant.
The Final Flourish
Dark chocolate is the final touch that elevates this ice cream from ordinary to extraordinary. The 70% cocoa content offers a bittersweet contrast to the sweet cream, adding depth and complexity. When folded in just before the final freeze, the chocolate remains in small, crisp shards that add texture with every bite. If you prefer a milder chocolate flavor, use 50% cocoa, but expect a sweeter, less complex taste. The chocolate also helps stabilize the ice cream, preventing it from melting too quickly when served.
Everything’s prepped? Good. Let’s get into the real action.
The Method — Step by Step
- In a medium saucepan, combine the double cream and whole milk. Heat over medium-low, stirring occasionally, until the mixture just begins to steam—do not let it boil. This gentle warming extracts the best flavor from the cream without scorching it. The aroma that rises should be rich and buttery, signaling that the base is ready for the next step.
- Whisk the egg yolks in a separate bowl until they’re pale and slightly thickened. Slowly pour the hot cream mixture into the yolks, whisking constantly to temper them and prevent scrambling. This step is crucial; a properly tempered custard will be silky and smooth once set. The mixture should feel silky to the touch, like a fine sauce.
- Return the custard to the saucepan and cook over low heat, stirring constantly with a wooden spoon. Keep the heat low to avoid curdling; the custard should thicken enough to coat the back of the spoon. When it reaches a temperature of 80°C (176°F), remove it from the heat. This temperature ensures the custard is thick enough to freeze without forming ice crystals.
- Add the caster sugar, stirring until completely dissolved. The sugar not only sweetens but also lowers the freezing point, giving the ice cream a smoother texture. At this point, fold in the orange zest, distributing it evenly throughout the custard. The citrus aroma should intensify, hinting at the bright flavor to come. This is the moment of truth.
- Let the custard cool to room temperature, then cover and refrigerate for at least 2 hours. The cooling phase is essential; it allows the custard to thicken further and develop deeper flavors. During this time, the mixture should feel firm enough to hold its shape when spooned but still soft enough to stir easily. This step is often overlooked but is the secret to a professional texture.
- While the custard chills, melt the dark chocolate in a heat‑proof bowl set over a pot of simmering water (double boiler). Stir until smooth and glossy, then let it cool slightly. The chocolate should be glossy but not too hot, as that could melt the custard when folded in. This step is trickier than it looks; a slight misstep can ruin the entire batch.
- Fold the melted chocolate into the chilled custard gently, using a spatula to keep the mixture light. The chocolate should be folded in just until it’s evenly distributed, preserving those bite‑size shards. The mixture should feel thick and glossy, a silky custard with hints of chocolate. This step adds a layer of complexity that makes the dessert unforgettable.
- Transfer the mixture into a shallow container and place it in the freezer. After 30 minutes, stir vigorously with a fork to break up ice crystals; repeat this stirring every 30 minutes for the first 2 hours. This process, known as churning, prevents the ice cream from becoming too hard and ensures a creamy texture. Once the mixture is firm yet scoopable, let it rest in the freezer for an additional 2 hours to fully set. The final product should be smooth, dense, and ready to serve.
That’s it — you did it. But hold on, I’ve got a few more tricks that will take this to another level. These insider tips will help you avoid common pitfalls and elevate the flavor profile even further.
Insider Tricks for Flawless Results
The Temperature Rule Nobody Follows
The custard must reach precisely 80°C (176°F) before you remove it from the heat. If it’s too hot, the eggs will scramble; too cool, and the mixture won’t set properly. A simple kitchen thermometer is worth every penny. Once you hit the right temperature, let the custard rest for a minute before whisking in the sugar; this allows the sugars to dissolve fully and prevents a grainy texture. I’ve tried this trick a dozen times, and the difference is crystal clear.
Why Your Nose Knows Best
The aroma of the custard as it cools is a reliable indicator of readiness. A sweet, buttery scent signals that the custard has thickened enough. If you notice a faint, sour smell, it might be starting to curdle, and you should discard it and start over. My first attempt at this recipe involved a burnt sugar aroma, which ruined the entire batch. Trust your nose; it’s a seasoned chef’s best ally.
The 5‑Minute Rest That Changes Everything
After you fold in the chocolate, let the mixture rest for exactly five minutes before placing it in the freezer. This short pause allows the chocolate to set slightly, preventing it from melting back into the custard. The result is a more pronounced chocolate shard in each bite, giving you that delightful crunch. I’ve seen people skip this step and end up with a mushy chocolate swirl; don’t be that person.
Use a Heat‑Proof Bowl for the Double Boiler
A double boiler ensures the chocolate melts evenly without scorching. If you don’t have one, you can use a heat‑proof bowl over a pot of simmering water, but keep the heat low and stir constantly. I once used a glass bowl that cracked when the water boiled, so I switched to a stainless steel one and never looked back. The key is to keep the chocolate at a gentle, steady temperature.
Add a Dash of Vanilla Extract
A teaspoon of pure vanilla extract added after the custard cools deepens the flavor profile, complementing the orange zest and chocolate. Vanilla is a flavor enhancer that brings everything together; it’s a simple addition that makes the ice cream feel more complex. I’ve used this trick in every batch, and the difference is subtle yet unmistakable. If you’re vegan, use a plant‑based vanilla extract; the result is just as delightful.
Creative Twists and Variations
This recipe is a playground. Here are some of my favorite ways to switch things up:
Coconut Cream Swap
Replace the double cream with coconut cream for a tropical twist. The natural sweetness of coconut pairs beautifully with the orange zest, creating a beach‑y vibe. The texture becomes slightly denser but remains creamy. This variation works especially well in summer or when you’re craving a non‑dairy option.
Lemon Zest Variation
Swap orange zest for lemon zest for a sharper, more tart flavor. The citrus notes become more pronounced, cutting through the richness of the chocolate. The result is a bright, refreshing dessert that’s perfect for a light summer treat. Just be careful not to overdo the zest, or the ice cream will taste overly sour.
Hazelnut Praline Swirl
Fold in a handful of chopped hazelnut praline before freezing. The praline adds a crunchy texture and a nutty sweetness that complements the chocolate. It also gives the ice cream a subtle caramel undertone, making each bite a multi‑sensory experience. This variation is a hit at parties and impresses guests with its complexity.
Coffee‑Infused Delight
Add a tablespoon of strong espresso to the custard for a mocha twist. The coffee’s bitterness balances the sweetness and enhances the chocolate flavor. The aroma is intoxicating, and the finish is smooth with a hint of roasted beans. This version is perfect for coffee lovers who want a dessert that satisfies their caffeine cravings.
Berry Compote Layer
Swirl in a homemade berry compote after the custard has frozen partially. The sweet and tart berries add a burst of color and flavor, creating a visually stunning dessert. The berries also add a slight acidity that brightens the overall taste. This variation is ideal for a romantic dinner or a brunch gathering.
Minty Freshness
Incorporate a few fresh mint leaves into the custard before freezing. The mint provides a cooling contrast to the rich ice cream, making it feel lighter. The flavor is subtle yet noticeable, giving the dessert an elegant finish. Mint pairs wonderfully with chocolate and citrus, creating a harmonious balance.
Storing and Bringing It Back to Life
Fridge Storage
Store the ice cream in an airtight container in the refrigerator for up to 3 days. The cold temperature keeps it firm but also allows you to scoop it easily. If you notice any freezer burn, simply cover the surface with a layer of plastic wrap to protect it. This method is perfect for a quick dessert without the need to defrost.
Freezer Friendly
For longer storage, keep the ice cream in the freezer for up to 2 months. Use a freezer‑safe container with a tight seal to avoid ice crystals from forming. Before serving, let it sit at room temperature for 5–10 minutes to soften slightly. This process ensures the texture remains silky and doesn’t become too hard.
Best Reheating Method
If the ice cream has hardened too much, place it in a bowl and microwave on a low setting for 10–15 seconds. Stir well to redistribute the fat and restore a creamy consistency. A tiny splash of water before reheating can help steam the mixture back to perfection, preventing it from drying out. This technique works wonders for leftovers or when you’re in a hurry.