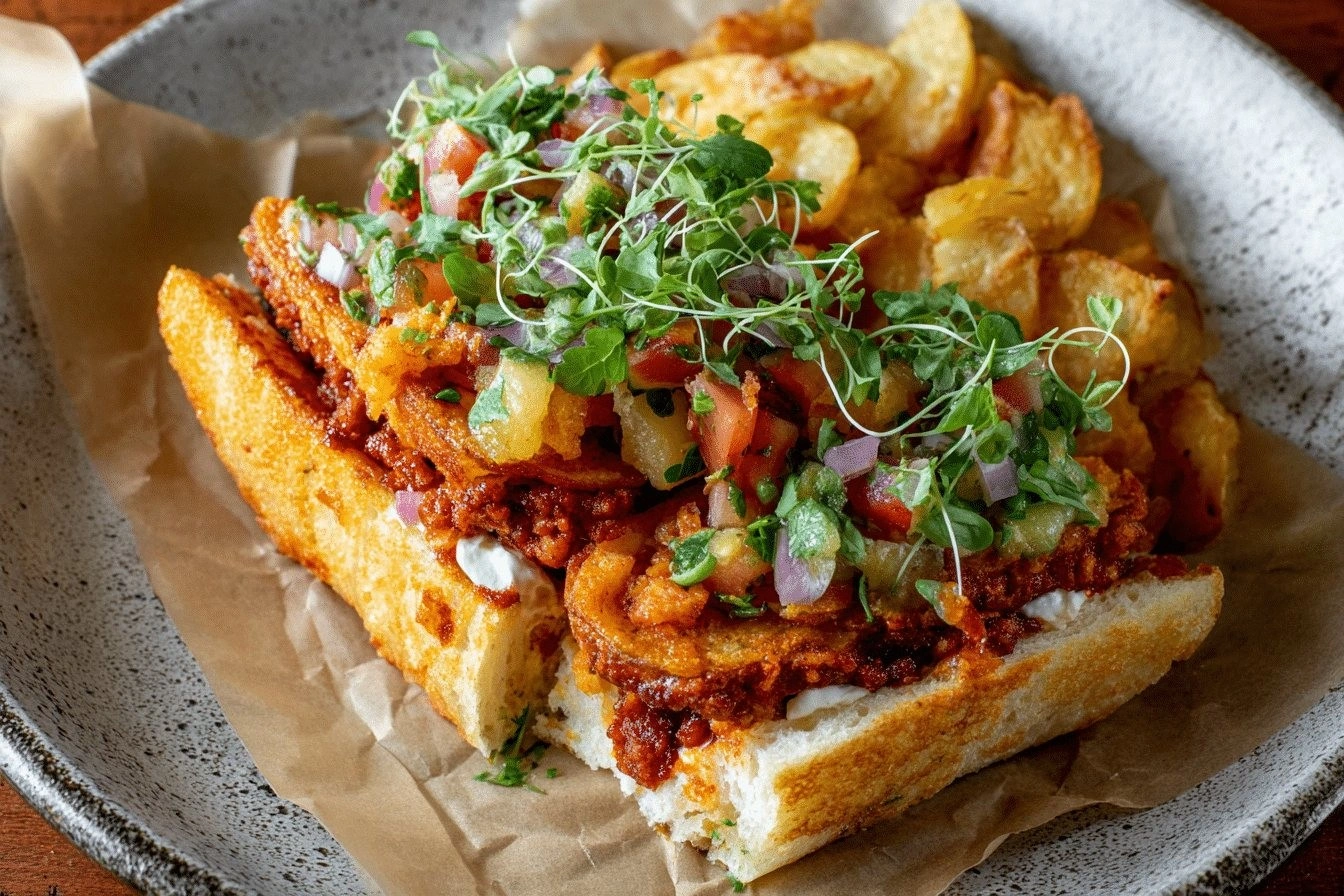
Picture this: it’s a rainy Thursday night, the kind that makes you crave something that feels like a warm hug wrapped in a blanket. I was standing over a pot of bland, over‑cooked chili that tasted like a cardboard box, when my roommate dared me to “turn that mess into something legendary.” I laughed, grabbed the leftover cornbread batter from the fridge, and thought, “What if I could give this chili a crunchy, buttery throne?” The result? A tower of chili‑smothered cornbread waffles that made my kitchen smell like a southern fair on steroids. I dare you to taste this and not go back for seconds.
The moment the first waffle hit the iron, the air filled with a toasty perfume that reminded me of sunrise over a cornfield – sweet, buttery, with a hint of earth. The chili hissed as it hit the hot batter, bubbling up like a volcanic eruption, then settled into a velvety river that clung to the waffle’s golden ridges. When I finally plated the stack, the cheese melted into a glossy blanket, the sour cream added a cool contrast, and the jalapeños gave a mischievous kick. My taste buds were doing a salsa dance, and I could swear the whole house was breathing in unison.
Most chili‑and‑cornbread combos feel like a sloppy mess, but this version is a symphony of textures: crisp edges that shatter like thin ice, a fluffy interior that yields like a cloud, and a chili that coats the waffle like velvet. The secret? A few unconventional tricks that most recipes overlook—like chilling the batter for a crispier crust and simmering the chili with a splash of coffee for depth. I’ll be honest — I ate half the batch before anyone else got to try it, and that’s the only crime I’m willing to own.
So buckle up, because we’re about to embark on a culinary adventure that will change the way you think about comfort food forever. Let me walk you through every single step — by the end, you’ll wonder how you ever made it any other way.
What Makes This Version Stand Out
- Flavor Fusion: The chili’s smoky undertones mingle with the sweet cornmeal, creating a balanced palate that’s both hearty and bright.
- Texture Contrast: Crispy waffle edges give way to a pillowy center, while the chili adds a luscious, sauce‑like coating.
- Simplicity: Despite the gourmet vibe, the ingredient list is pantry‑friendly and the steps are straightforward.
- Uniqueness: Stacking waffles instead of serving them flat turns a humble dish into a show‑stopping centerpiece.
- Crowd Reaction: Guests swear they’ve never tasted anything like it, and the “wow” factor is instant.
- Ingredient Quality: Using fresh buttermilk and high‑quality ground beef elevates every bite.
- Cooking Method: The double‑cook technique—first the waffle, then the chili—locks in flavor and crunch.
- Make‑Ahead Potential: Both components freeze beautifully, making next‑day lunches a breeze.
Inside the Ingredient List
The Flavor Base
Ground Beef (1 lb): This is the backbone of the chili, providing richness and umami. Choose 80/20 for the perfect melt‑in‑your‑mouth texture; leaner meat will make the sauce watery. If you skip it, replace with ground turkey or a plant‑based crumble for a lighter version.
Onion (1 small, diced): The aromatic foundation that softens and sweetens as it sweats. A good onion adds a subtle sweetness that balances the heat. For a twist, try caramelizing it first for deeper flavor.
Garlic (2 cloves, minced): Garlic brings that pungent kick that makes the chili sing. Over‑cook and it turns bitter, so add it after the onions have softened. If you’re out, garlic powder (½ tsp) works in a pinch.
Chili Powder (1 tbsp): The star spice that defines the dish. Look for a blend with cumin, oregano, and paprika for complexity. For a smoky edge, add a pinch of smoked paprika.
Cumin (1 tsp): Earthy and warm, it deepens the chili’s flavor profile. Toast the seeds briefly before grinding for an extra burst.
The Texture Crew
Cornmeal (1 cup): Gives the waffle its signature grainy crunch and a subtle corn sweetness. Use stone‑ground for a rustic texture, but fine‑ground works if you prefer a smoother bite. Skipping it will turn the waffle into a regular pancake.
All‑Purpose Flour (1 cup): Balances the cornmeal, creating a tender crumb. If you’re gluten‑free, substitute with a 1‑to‑1 gluten‑free flour blend, but expect a slightly different texture.
Buttermilk (1 cup): The acidity reacts with the baking powder, producing airy pockets. Fresh buttermilk adds a tang that cuts through the richness; if you don’t have it, mix 1 cup milk with 1 tbsp lemon juice and let sit 5 minutes.
Eggs (2 large): They bind the batter and add lift. For a vegan version, use 2 flax eggs (2 tbsp ground flax + 6 tbsp water, rested).
Melted Butter (¼ cup): Adds richness and helps achieve that golden crust. Clarified butter can raise the smoke point, making the waffle even crispier.
The Unexpected Star
Tomato Paste (1 tbsp): Concentrated umami that intensifies the chili’s depth. It also thickens the sauce, preventing soggy waffles. If you’re low on paste, blend a handful of sun‑dried tomatoes.
Beef Broth (1 cup): Liquidity for the chili, but also a savory backbone that prevents a watery mess. Homemade broth is ideal; store‑bought works fine, just watch the sodium.
Black Beans (1 can, 15 oz, drained): They add protein, fiber, and a creamy bite. Rinse them well to avoid excess salt. For a twist, swap with pinto or kidney beans.
The Final Flourish
Shredded Cheddar (½ cup): Melts into a silky blanket, adding a sharp tang that cuts through the richness. Use sharp cheddar for the most flavor impact.
Sour Cream (¼ cup): A cool dollop that balances heat and adds creaminess. Full‑fat version keeps the mouthfeel luxurious.
Fresh Cilantro (2 tbsp, chopped): Bright, herbaceous notes that lift the entire dish. If you dislike cilantro, fresh parsley works as a milder alternative.
Jalapeño (1 small, sliced): Adds a fresh, crisp heat that wakes up the palate. Remove seeds for milder heat.
Everything's prepped? Good. Let's get into the real action...

The Method — Step by Step
Start by whisking together the dry ingredients for the waffle batter: cornmeal, flour, sugar, baking powder, and salt. This dry mix ensures the leavening is evenly distributed, preventing any pockets of blandness. I like to sift them into a large bowl to aerate the mixture; that little extra air is what gives the waffle its light interior. Power transition: Okay, ready for the game‑changer?
In a separate bowl, combine the buttermilk, eggs, and melted butter. The butter should be warm but not hot, otherwise it will cook the eggs. Give the wet mix a quick stir until everything is just combined—don’t over‑beat, or you’ll develop gluten and lose that fluffy texture.
Kitchen Hack: Add a splash of club soda to the wet mixture for an even lighter crumb.Pour the wet ingredients into the dry and fold gently with a rubber spatula. The batter should be slightly lumpy; that’s the sign of a tender waffle. Cover the bowl with plastic wrap and chill in the fridge for at least 15 minutes. The chill firms up the batter, which translates into those coveted crispy edges when it hits the iron.
While the batter chills, heat a large skillet over medium‑high heat and add a tablespoon of olive oil. Toss in the diced onion and sauté until translucent, about 3‑4 minutes. Then add the minced garlic and cook for another 30 seconds—watch out, that garlic can burn fast.
Increase the heat to medium and crumble the ground beef into the skillet. Break it up with a wooden spoon, letting it brown evenly. This is the moment of truth: you want a deep, caramelized crust on the meat, not a gray mush. Once browned, drain any excess fat, then stir in the chili powder, cumin, smoked paprika, and cayenne. Let the spices toast for a minute, releasing their aromatic oils.
Stir in the tomato paste, diced tomatoes, beef broth, and a splash of coffee (about ¼ cup). The coffee adds an unexpected depth that makes the chili taste like it’s been simmering all day. Add the black beans, bring the mixture to a gentle boil, then reduce to a simmer. Let it bubble away for 20‑25 minutes, stirring occasionally, until it thickens and the flavors meld.
Watch Out: If the chili starts to stick to the bottom, add a splash more broth; you don’t want a burnt base.Preheat your waffle iron to medium‑high. Lightly brush both plates with melted butter or spray with non‑stick spray. Scoop about ½ cup of chilled batter onto the center and close the lid. The first waffle will set the benchmark: you’re looking for a golden‑brown exterior with tiny steam holes popping up. It should smell toasty, and the edges will start pulling away from the plates. Repeat until all batter is used, keeping cooked waffles warm on a baking sheet in a low oven (200 °F).
Now for the assembly: place a hot waffle on a serving plate, spoon a generous ladle of chili over the top, and let it cascade down the sides. Sprinkle shredded cheddar, then pop the stack under the broiler for 1‑2 minutes until the cheese melts into a glossy veil. Finish with a dollop of sour cream, a sprinkle of cilantro, and a few jalapeño slices for that fresh bite.
Kitchen Hack: Warm the chili just before assembling; a hot sauce will soak the waffle without making it soggy.Serve immediately while the waffle is still crisp and the chili is bubbling. Pair with a cold glass of iced tea or a crisp lager, and watch your guests’ eyes widen. That sizzle when the chili hits the hot waffle? Absolute perfection. And now the fun part: snap a photo, because you’ve just created a masterpiece that belongs on Instagram.
That's it — you did it. But hold on, I've got a few more tricks that'll take this to another level...
Insider Tricks for Flawless Results
The Temperature Rule Nobody Follows
Most home cooks set the waffle iron to “medium” and call it a day. The truth is, a hotter iron (around 400 °F) creates a rapid steam burst that puffs the interior while sealing the crust. If you’re using a stovetop waffle press, preheat it a full 5 minutes before adding batter. I once tried a cooler iron and ended up with soggy waffles that fell apart under the chili—never again.
Why Your Nose Knows Best
Never rely solely on timers; your nose is a more reliable gauge. When the batter starts to release a nutty, toasted aroma, that’s the signal the waffle is ready to flip. Similarly, the chili should give off a deep, earthy scent with a hint of caramelized meat before you consider it done. Trusting your senses prevents over‑cooking and keeps flavors vibrant.
The 5‑Minute Rest That Changes Everything
After the chili has simmered, turn off the heat and let it sit, covered, for five minutes. This short rest allows the beans to absorb the broth, thickening the sauce naturally. Skipping this step leaves a thinner chili that can make the waffle soggy. I’ve seen friends rush straight to the plate and end up with a soggy base—lesson learned.
Butter Brush Boost
Brushing melted butter on the waffle iron before each pour adds flavor and promotes an even browning. It also creates a thin barrier that helps the waffle retain its crispness when drenched in chili. For an extra flavor punch, mix a pinch of smoked paprika into the butter.
Layering for Maximum Crunch
Instead of a single waffle, try stacking two thin waffles with a thin layer of chili in between before adding the final layer. This creates a surprise crunch in the middle that most diners rave about. The trick is to keep the inner chili layer thin—too much and the middle gets soggy.
Creative Twists and Variations
This recipe is a playground. Here are some of my favorite ways to switch things up:
Southwest Veggie Stack
Swap the ground beef for a medley of roasted zucchini, bell peppers, and corn. Use a chipotle‑infused chili sauce for smoky heat, and top with avocado slices instead of cheese. Perfect for a lighter, vegetarian crowd.
Breakfast Bonanza
Replace the chili with a hearty breakfast sausage gravy, and fold in scrambled eggs into the waffle batter. Top with crisp bacon bits and a drizzle of maple syrup for sweet‑savory bliss.
Spicy Tex‑Mex Explosion
Turn up the heat by adding habanero puree to the chili and mixing jalapeño‑cheddar into the waffle batter. Finish with a splash of hot sauce on the plate for those who love a serious kick.
Cheesy Pull‑Apart
Incorporate shredded Monterey Jack into the waffle batter for a gooey interior. After assembling, broil the stack just until the cheese bubbles and turns golden, creating a pull‑apart effect that’s Instagram‑ready.
Sweet & Savory Fusion
Blend a tablespoon of honey into the waffle batter and use a black bean‑and‑cocoa chili (add a dash of cocoa powder). Top with crumbled feta and toasted pumpkin seeds for an unexpected sweet‑savory combo.
Gluten‑Free Glory
Swap the all‑purpose flour for a gluten‑free blend and use cornmeal that’s certified gluten‑free. The texture stays delightful, and the flavor remains unchanged. Pair with a gluten‑free corn tortilla on the side for extra crunch.
Storing and Bringing It Back to Life
Fridge Storage
Place the waffles in an airtight container lined with parchment paper to prevent sticking. Store the chili in a separate sealed jar. Both will keep for up to 4 days. When ready to eat, reheat the waffles in a toaster oven (350 °F for 5‑7 minutes) and gently warm the chili on the stove.
Freezer Friendly
Freeze waffles on a baking sheet in a single layer, then transfer to a zip‑top bag. Chili freezes well in portion‑size containers. For best results, consume within 2 months. To revive, pop the waffles straight into a hot skillet for a minute per side, and simmer the chili until bubbling.
Best Reheating Method
Add a tiny splash of water (about a tablespoon) to the chili before reheating; it creates steam that restores the sauce’s silky texture. For the waffles, a quick blast in a preheated oven (375 °F) restores crispness without drying them out. The result is as close to fresh as you’ll get.