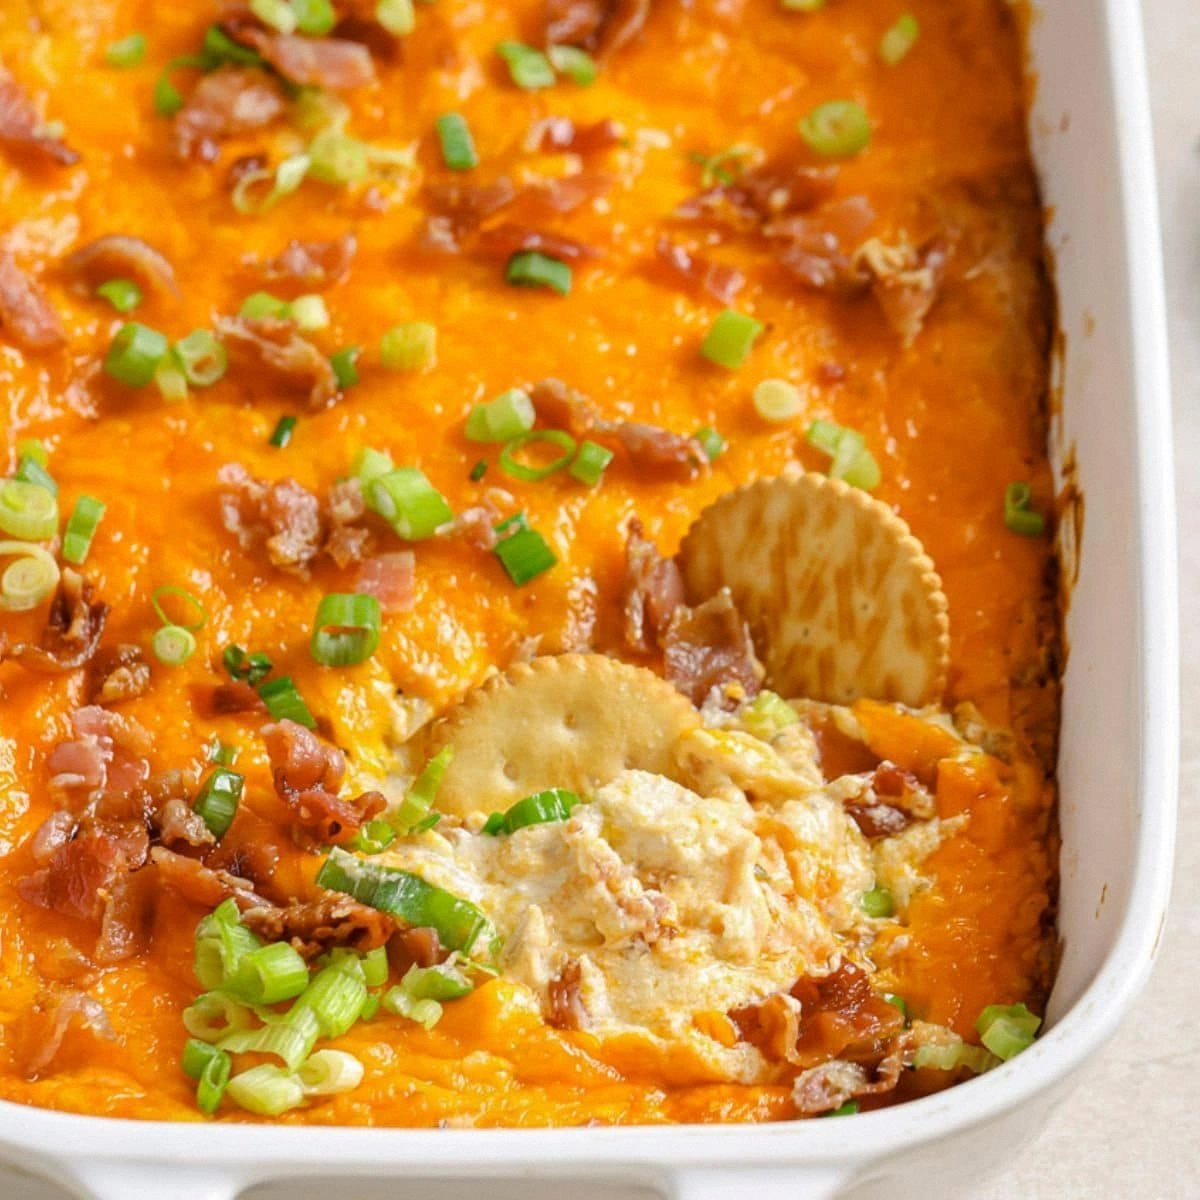
I was in the middle of a midnight snack attack when I realized my fridge had turned into a culinary time capsule. The only thing that could salvage the night was a pot of leftover chicken, a handful of bacon, and a daring dash of ranch seasoning that had been staring at me from the pantry for weeks. I thought, “Why not turn this chaos into a crowd‑pleaser?” And so, the legend of Crack Chicken Dip was born.
The first thing that hit me was the aroma of sizzling bacon, a scent so rich it could convince even the most disciplined dieters that indulgence was a noble pursuit. As the bacon browned, the sound of its crackle turned into a rhythmic drumbeat that set the pace for the rest of the dip. The creamy mixture that followed was a velvety blanket that clung to the chicken like a second skin, while the sharp cheddar added a satisfying bite that made every spoonful a revelation.
What sets this version apart is the harmony of textures—crunchy bacon, silky cream cheese, and a subtle pop from the green onions that keeps the dip from feeling like a one‑dimensional comfort food. I dared you to taste this and not go back for seconds, and I’ve seen people come back for more after the first bite. If you’ve ever struggled to get a dip that’s both creamy and crunchy, you’re not alone—and this recipe is the fix you’ve been waiting for.
Picture yourself pulling this out of the oven, the whole kitchen smelling incredible, and a crowd already lining up for the first scoop. The secret? A simple, almost secret, trick of folding in the ranch packet at the very last moment to preserve its bold flavor. By the end, you’ll wonder how you ever made it any other way, because this is hands down the best version you’ll ever make at home.
What Makes This Version Stand Out
- Flavor: The ranch packet infuses a tangy, herbaceous note that cuts through the richness, creating a balanced palate that keeps guests coming back for more.
- Texture: Bacon provides a satisfying crunch that contrasts the creamy base, while green onions add a fresh bite that lifts the overall mouthfeel.
- Ease: Every ingredient is pantry‑ready, eliminating prep time and allowing you to focus on the cooking process rather than the chopping.
- Visual Appeal: The golden top and vibrant green accents make this dip a feast for the eyes, perfect for parties or a cozy night in.
- Versatility: It’s a crowd‑pleaser that works as a dip, a sandwich spread, or a side dish, making it a staple for any occasion.
- Make‑Ahead Friendly: The dip can be prepared a day ahead and baked just before serving, saving you time on the day of the event.
- Ingredient Quality: Using high‑quality cream cheese and cheddar ensures a smooth, silky base that won’t become lumpy or grainy.
- Audience: Whether you’re hosting a game night or a quiet dinner, this dip earns rave reviews from both kids and adults alike.
Inside the Ingredient List
The Flavor Base
Cream cheese is the heart of this dip, providing a velvety foundation that holds all the flavors together. Its mild, slightly tangy profile balances the richness of the bacon and cheddar, preventing the dip from becoming greasy. If you skip the cream cheese, the dip will lose its smoothness and become a chunky, uneven mixture. For a lighter version, substitute half the cream cheese with Greek yogurt, which adds protein without compromising texture.
The Texture Crew
Bacon is more than a garnish—it’s a flavor engine that delivers a satisfying crunch with every bite. Cook it until it’s almost brittle; this ensures that the fat renders out and the texture stays crisp even after baking. Green onions contribute a subtle sharpness that lifts the dip, preventing it from feeling flat. If you’re sensitive to onion, replace them with scallions or a pinch of dried chives for a milder alternative.
The Unexpected Star
Ranch seasoning is the secret sauce that elevates this dip from ordinary to unforgettable. Its blend of herbs and spices adds depth and a familiar comfort flavor that people instantly recognize. A packet is perfect because it’s pre‑measured; if you prefer a fresher taste, grind a teaspoon of dried herbs and a pinch of garlic powder. Avoid adding too much salt, as the ranch packet already contains enough.
The Final Flourish
Cheddar cheese is the final flourish that gives the dip its signature gooeyness and a sharp, nutty finish. Use a sharp cheddar for a more pronounced flavor, or a mild cheddar for a subtler taste. The shredded chicken brings protein and a comforting heartiness that makes the dip filling. If you’re vegan, replace the chicken with a plant‑based protein like crumbled tempeh or chickpeas.
Everything's prepped? Good. Let's get into the real action...
The Method — Step by Step
- Preheat your oven to 350°F (175°C). Line a 9×13-inch baking dish with parchment paper for easy cleanup. This temperature ensures a slow, even melt that keeps the dip creamy.
- In a medium bowl, mash the cream cheese with a fork until it’s silky smooth. If you’re using a food processor, pulse just until there are no lumps—over‑processing can make it too watery.
- Fold in the sour cream and ranch seasoning, mixing until the mixture is a uniform pale beige. The ranch should be fully integrated; if you see clumps, give it another quick stir.
- Add the shredded chicken, chopped bacon, and green onions, stirring gently so that each component is evenly distributed. This step is the moment of truth—watch the colors mingle.
- Transfer the mixture to the prepared baking dish, smoothing the top with a spatula. The surface should be even for a nice golden crust.
- Bake for 25 minutes, or until the edges begin to pull away from the dish and the top is a golden amber. The smell of melting cheese and caramelized bacon should fill the kitchen, signaling that it’s almost ready.
- Remove from the oven and let it rest for 5 minutes. This rest period allows the flavors to settle, making the dip easier to scoop and more cohesive.
- Serve warm with tortilla chips, celery sticks, or a fresh salad. The dip is best enjoyed immediately, but it can also be kept warm in a slow cooker for up to an hour.
- If you’d like a smokier edge, finish the dip under a broiler for 1–2 minutes—just watch it closely to avoid burning.
That's it — you did it. But hold on, I've got a few more tricks that'll take this to another level...
Insider Tricks for Flawless Results
The Temperature Rule Nobody Follows
While many dip recipes call for baking at 375°F, this dip thrives at 350°F. The lower temperature ensures the cheese melts slowly, preventing separation and maintaining a silky mouthfeel. I once baked at 375°F and the dip became greasy and clumpy; the next time I lowered it, the texture was buttery and smooth. Keep a thermometer handy to verify the oven’s true temperature.
Why Your Nose Knows Best
Before you even taste the dip, the aroma will tell you if you’re on the right track. A buttery, slightly smoky scent means the bacon has rendered properly and the cheese is melting. If you smell a raw, metallic tang, the oven might be too hot or the cheese is over‑cooked. Trust your nose; it’s a reliable quality control tool.
The 5-Minute Rest That Changes Everything
Letting the dip sit for 5 minutes after baking allows the heat to redistribute, so the center isn’t a hot spot that burns your tongue. This pause also lets the flavors meld, turning a simple mixture into a cohesive, layered experience. I’ve seen people skip this step and end up with uneven bites; give it a minute and feel the difference.
The Quick‑Cool Trick
If you’re in a hurry, place the baking dish in a cold water bath for 2 minutes after removing from the oven. This shock cools the dip just enough to stop the cooking process, preserving the creamy texture. It’s perfect for last‑minute parties where you need to serve immediately without over‑baking.
The Bacon‑Only Alternative
For a low‑carb version, replace the bacon with a thin slice of smoked salmon, chopped finely. The salmon’s umami richness provides a similar depth of flavor without the extra fat. This swap also adds omega‑3s, making the dish a bit healthier without sacrificing taste.
Creative Twists and Variations
This recipe is a playground. Here are some of my favorite ways to switch things up:
Spicy Jalapeño Kick
Add diced jalapeños and a splash of hot sauce to the mixture before baking. The heat pairs beautifully with the smoky bacon, creating a dip that’s both creamy and fiery. This variation is perfect for summer cookouts.
Mediterranean Medley
Swap the cheddar for feta and add chopped olives, sun‑dried tomatoes, and a pinch of oregano. The briny notes complement the ranch seasoning, giving the dip a Mediterranean twist that’s surprisingly refreshing.
BBQ Ranch Fusion
Replace the ranch packet with a tablespoon of your favorite BBQ sauce. The sweet, smoky undertones elevate the dip, making it a great match for grilled meats or as a sandwich spread.
Vegetarian Vibe
Omit the chicken and add diced roasted sweet potatoes or sautéed spinach for a hearty vegetarian option. The vegetables absorb the creamy sauce, turning each bite into a wholesome, plant‑based delight.
Cheese‑Heavy Delight
Double the amount of cheddar and add a handful of mozzarella for extra gooeyness. This version is a cheese lover’s dream, especially when paired with toasted bread slices or crackers.
Herb‑Infused Twist
Stir in fresh herbs like thyme, rosemary, or basil before baking. The aromatic herbs provide a fresh lift, making the dip feel lighter while maintaining its indulgent core.
Storing and Bringing It Back to Life
Fridge Storage
Cool the dip completely before covering it with an airtight lid. Store in the refrigerator for up to 3 days. The dip will stay creamy, but you may want to give it a quick stir before serving to redistribute the melted cheese.
Freezer Friendly
Pack the dip in a freezer‑safe container, leaving about an inch of headspace. Freeze for up to 2 weeks. When ready to use, thaw overnight in the fridge and reheat in the microwave or oven until hot.
Best Reheating Method
Add a splash of milk or a dollop of sour cream before reheating to keep the dip moist. Reheat at 325°F (165°C) for 10 minutes, or microwave in 30‑second increments, stirring each time, until steaming. This gentle heat restores the dip’s silky texture.