I still remember the first time I walked past a Crumbl store and got ambushed by the smell of warm red velvet cookies wafting through the parking lot. It was like being wrapped in a cashmere blanket made of cocoa and vanilla, and I promptly did the most reasonable thing possible: I bought half a dozen, devoured them in the car like a raccoon in a bakery dumpster, and then spent the next week trying to reverse-engineer the magic in my own kitchen. Friends, I burned through four bags of flour, three bottles of red food coloring, and one heroic stand mixer before the clouds parted and this recipe finally clicked. If you've ever tried to mimic those towering, tender, cream-cheese-frosted beauties, you already know most copy-cat attempts land somewhere between "sad biscuit" and "red-tinted cardboard." This version is different. We're talking about cookies that rise like cupcakes, crackle on top like a brownie, and stay lusciously soft for days—because I smuggled in a few bakery secrets that the internet usually keeps locked away.
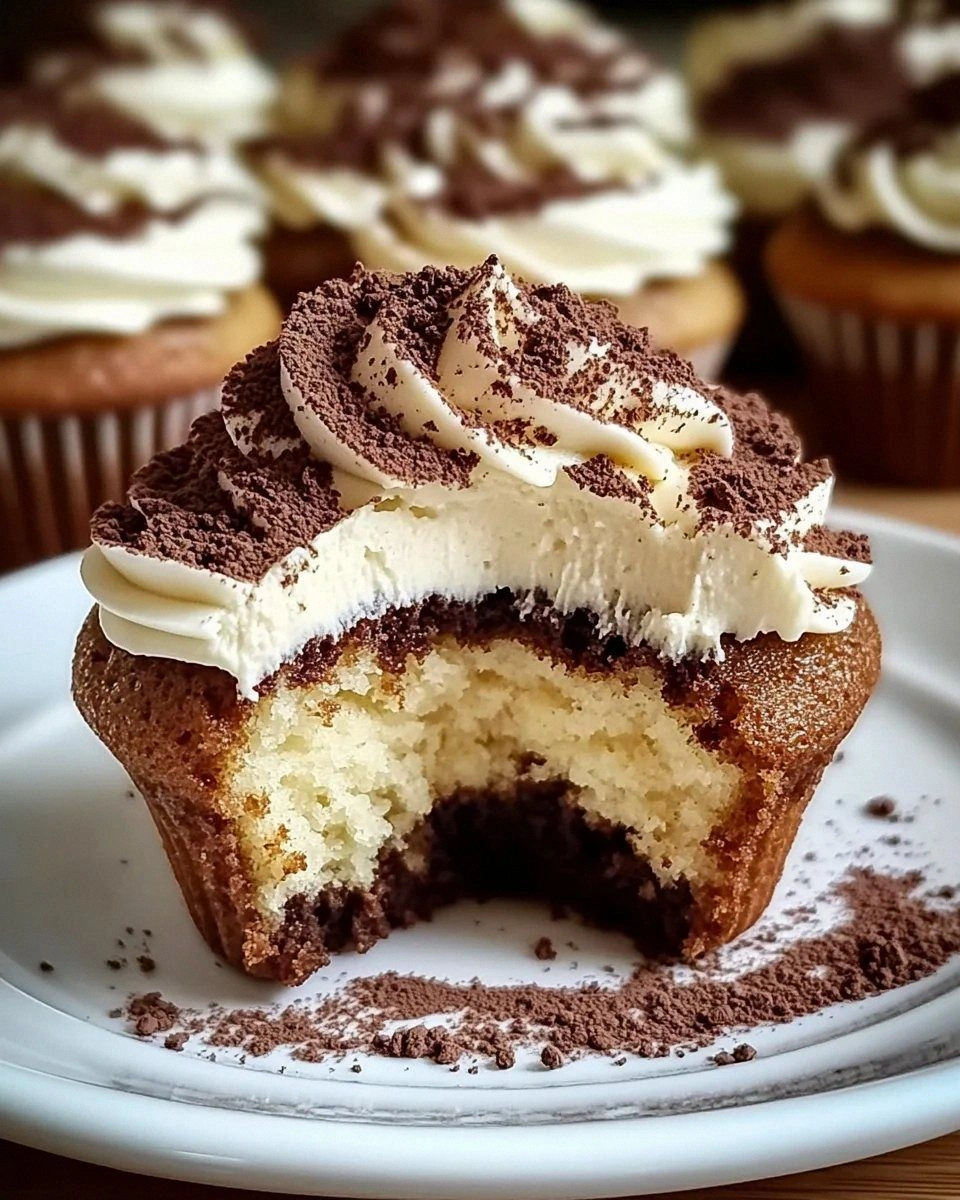
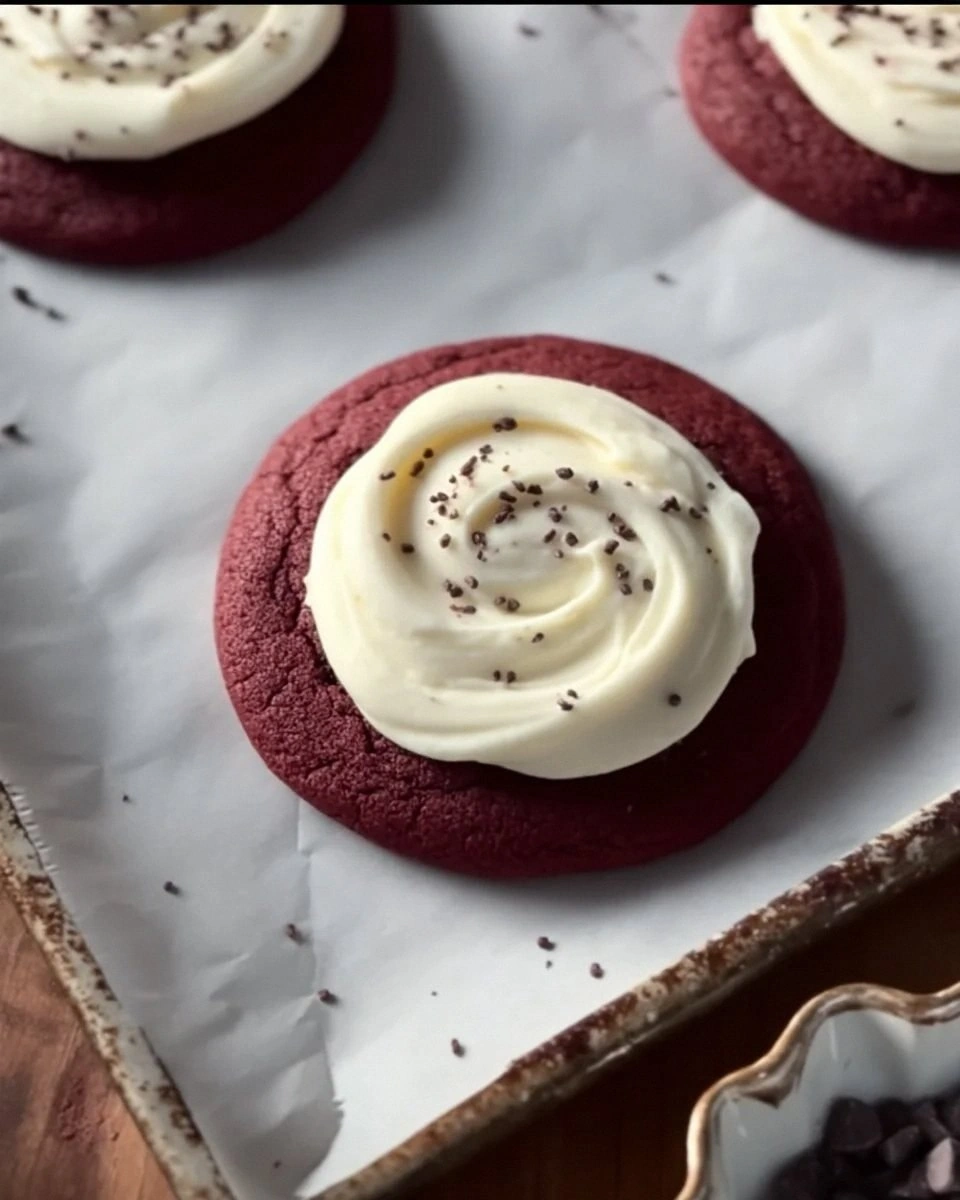
Picture this: it's 9:30 p.m., the house is quiet, and you're pulling a tray of glossy red domes from the oven. The tops are just barely set, the centers shimmy like custard, and the scent is so intoxicating that your neighbors will start texting you "What are you baking?!" before you even close the oven door. You let them cool for exactly six minutes—no more, no less—then swirl on a cloud of tangy cream-cheese frosting so thick it looks like a ski slope of silk. Break one open and the interior is ruby-red, tender, and moist enough to leave gentle crumbs on your fingers like edible confetti. I dare you to taste this and not go back for seconds; I certainly failed that challenge, and I'm the one who wrote the recipe.
Most recipes get red velvet cookies completely wrong. They treat them like regular chocolate chip dough with a splash of food coloring, crank the oven to 375°F, and wonder why the cookies emerge flat and bitter. Red velvet is a delicate dance between cocoa, buttermilk, vinegar, and just enough flour to give structure without toughness. Get the ratio wrong and you end up with a cookie that tastes like regret and looks like clown makeup. After nine batches of "meh," I finally cracked the code: cake flour for pillowy softness, a touch of cornstarch for that signature cupcake crumb, and a chilled dough that steadies the spread so the cookies stay tall and proud. Stay with me here—this is worth it.
Okay, ready for the game-changer? We're going to bake these low and slow, then finish them under the broiler for 45 seconds to caramelize the tops just like Crumbl does in their convection ovens. The result is a cookie with a barely crisp sugar shell that shatters like thin ice, revealing a tender red velvet interior that tastes like the best part of a slice of cake but in handheld form. Let me walk you through every single step—by the end, you'll wonder how you ever made it any other way.
What Makes This Version Stand Out
Cupcake Texture: Thanks to cake flour and a higher liquid ratio, these cookies rise like little red velvet cupcakes yet retain enough chew to feel like a cookie. The crumb is so delicate it practically sighs when you bite in, and the tops stay domed instead of collapsing into sad puddles. If you've ever struggled with flat cookies, you're not alone—and I've got the fix.
Foolproof Tang: Most home recipes forget the buttermilk and vinegar that give red velvet its trademark whisper of tang. I use powdered buttermilk for convenience and a splash of white vinegar to activate the baking soda, producing a gentle lift and that subtle twang that makes red velvet more sophisticated than plain chocolate.
Cream-Cheese Cloud: The frosting is whipped for a full five minutes, incorporating slightly cool cream cheese and a hint of heavy cream so it pipes like a dream and doesn't weep or slide off the cookie after a few hours. It's the difference between bakery polish and homemade globs.
Color Without Chemical Overload: A single tablespoon of gel food coloring delivers that iconic scarlet without the metallic aftertaste you get from cheaper dyes. If you're anti-artificial, I'll show you how to swap in beet powder and still get a rich ruby hue.
Make-Ahead Magic: The dough can be scooped, frozen, and baked straight from the freezer—just add two minutes to the bake time. Future you will thank present you when a midnight craving hits or when unexpected guests show up and you want to look like the domestic superhero you secretly are.
Crowd Factor: I brought a platter to game night and they disappeared before halftime. One friend threatened to fake a family emergency just so he could take the leftovers home. This is hands down the best version you'll ever make at home, and I'm not even sorry about the bragging rights that come with it.
One-Bowl Wonder: Despite tasting like a million bucks, the dough comes together in a single bowl—no creaming butter and sugar separately, no alternating dry and wet ingredients. Less mess, less stress, more time to lick the spatula.
Inside the Ingredient List
The Flavor Base
Unsweetened cocoa powder provides the gentle chocolate backbone that separates red velvet from plain vanilla cake. You only need two tablespoons; any more and the cookies start tasting like brownie batter in disguise. I prefer Dutch-processed for its smoother, less acidic edge, but natural cocoa works if that's what you have. Skip the fancy dark cocoa here—it muddies the red color and makes the cookies look like chocolate lumps wearing last year's lipstick.
Buttermilk powder is my secret weapon for bakery flavor without the half-used carton going moldy in the fridge. It reconstitutes instantly with the wet ingredients and delivers that subtle tang that makes people say, "I can't put my finger on it, but these taste authentic." If you absolutely must use liquid buttermilk, reduce the heavy cream by two tablespoons to keep the hydration balanced. Your call, but I've had better luck with the powdered stuff for consistent pH and protein levels.
The Texture Crew
Cake flour has less protein than all-purpose, which means less gluten development and therefore softer, more tender cookies. The low protein also lets the cocoa and vanilla flavors shine without the wheaty aftertaste you sometimes get in heartier cookies. If you can't find cake flour, you can fake it by replacing two tablespoons of all-purpose with cornstarch, but spring for the real thing if you want that cloud-like crumb. Sift it once with the cocoa and leaveners to break up stubborn lumps that can streak your beautiful red dough.
Cornstarch is the ninja that sneaks in and interferes with gluten formation, giving you that melt-in-your-mouth quality typically reserved for shortbread. You only need a teaspoon, but leave it out and you'll notice the cookies are slightly chewier, more like a standard chocolate chip base. It's a tiny addition with outsized payoff, kind of like the pinch of salt that makes caramel sing. And now the fun part—watching people's faces when you tell them there's cornstarch in a cookie and they still can't stop eating it.
The Unexpected Star
White vinegar might seem like an odd guest at the dessert party, but it's essential for activating the baking soda and creating the tender crumb we're after. The acid also brightens the cocoa's natural red undertones so you need less food coloring to hit that iconic crimson. Don't worry—you won't taste vinegar in the final cookie; it bakes off and leaves behind only the faintest whisper of tang that makes red velvet red velvet. Apple-cider vinegar works in a pinch, but its mellow fruitiness can muddy the flavor, so stick with distilled if you can.
Gel food coloring is more concentrated than the liquid drops, so you get vibrant color without thinning the dough. A single tablespoon delivers bakery-level saturation; more than that and your cookies start tasting like food coloring, which is nobody's idea of dessert. If you're avoiding artificial dyes, beet powder works—start with two teaspoons and add more until you hit the shade you like. Fair warning: natural colors fade slightly as they bake, so pull them when they still look a touch brighter than you want the final cookie to be.
The Final Flourish
Cream cheese should be cool but pliable—about 60°F—so it whips up fluffy without lumps. Too cold and you'll end up with flecks that refuse to incorporate; too warm and the frosting turns into a glossy soup that slides right off the cookie. I slice the block into one-inch cubes and let them sit on the counter for twenty minutes while the cookies cool. If you forget to pull it ahead, submerge the sealed package in lukewarm water for five minutes and you'll be back on track.
The Method — Step by Step
- Whisk the dry foundation: In a medium bowl, combine cake flour, cocoa powder, cornstarch, baking soda, salt, and buttermilk powder. Sift everything together twice; this aerates the mixture and breaks up stubborn cocoa clumps that can streak your cookies like zebra stripes. Think of it as giving your dry ingredients a spa day before they hit the mixer. The mixture should look like a delicate cocoa cloud, light and uniform, with no specks of white or brown standing solo.
- Bloom the color: In a small ramekin, stir the gel food coloring with the vanilla extract and white vinegar until it forms a smooth, glossy paste. This prevents the dye from hitting the butter in one spot and creating a tie-dye swirl that never fully blends. You'll end up with what looks like neon ketchup—don't panic, that's exactly what we want. Set the ramekin near the mixer so you're ready when the moment strikes.
- Cream butter and sugar—but not too much: Beat the softened butter and both sugars on medium for exactly 90 seconds. Over-creaming incorporates too much air, leading to cookies that rise and then collapse like a bad soufflé. You're looking for a pale, fluffy mass that clings to the paddle in thick folds. Stop and scrape the bowl once, because dry pockets at the bottom are the enemy of uniform texture.
- Add eggs like you're tucking in a baby: Drop the eggs in one at a time, letting each fully incorporate before adding the next. Crack them into a separate bowl first to avoid rogue shells; fishing out fragments from crimson dough is like finding a red M&M in a bowl of cranberries. Once the second egg disappears, pour in the food-coloring paste and beat just until the dough looks like scarlet silk. The color will seem almost too vivid—remember, it softens during baking.
- Fold, don't beat, the flour: Switch to low and add the dry ingredients in three additions, alternating with the heavy cream in two. Start and end with flour; this keeps the hydration balanced and prevents the buttermilk powder from clumping. Stop the mixer when a few streaks of flour remain; over-mixing develops gluten and gives you cookies that bounce like rubber balls. Finish with a flexible spatula, scraping the bottom where stubborn dry bits love to hide.
- Chill like you mean it: Cover the bowl with plastic wrap pressed directly onto the surface to prevent a skin from forming, then refrigerate at least four hours or preferably overnight. The chill hydrates the flour fully, lets the flavors meld, and firms the butter so the cookies stay tall in the oven. If you're impatient (I see you), pop the bowl in the freezer for 45 minutes, stirring once halfway so the edges don't freeze solid while the center stays soft.
- Scoop with precision: Use a 3-tablespoon cookie scoop for uniform domes that bake evenly. Space them on a parchment-lined sheet, six per tray—yes, six. These cookies spread more upward than outward, but they still need breathing room. Roll each scoop between your palms for two seconds to smooth the surface; this eliminates craggy edges that can over-brown and gives you that polished bakery look.
- Bake low and finish high: Slide the tray into a 325°F oven for 14 minutes; the tops should look just set, with centers that jiggle like firm pudding when you give the pan a gentle shake. Turn the broiler on high, move the rack to the upper-middle position, and broil 45–60 seconds until the peaks turn a slightly deeper crimson. Watch like a hawk—30 seconds too long and you'll have cookie charcoal. The brief blast caramelizes the sugar on top, mimicking the slightly crisp lid of a cupcake.

Insider Tricks for Flawless Results
The Temperature Rule Nobody Follows
These cookies are exquisitely sensitive to oven temperature. If your dial runs even 15°F hot, the outsides will set before the centers have a chance to rise, giving you cracked lunar landscapes instead of smooth domes. Spend five minutes calibrating with an inexpensive oven thermometer; it's the single best investment you can make for consistent baking. Once calibrated, bake one test cookie to check spread and height before committing the whole batch. A friend tried skipping this step once—let's just say it didn't end well, and her Instagram story looked like a cookie crime scene.
Why Your Nose Knows Best
Timing by smell alone is risky, but with these cookies your nose is actually a reliable guide. When you detect a sweet, slightly tangy aroma drifting from the oven, you're roughly 90 seconds away from perfect doneness. Open the oven door a crack and inhale; if you smell cocoa and butterscotch with a faint whiff of buttermilk, it's time to switch to broil. If all you get is hot air, give them another two minutes. Your olfactory bulb is basically a built-in kitchen timer—trust it.
The 5-Minute Rest That Changes Everything
Once the cookies come out of the oven, cover the entire sheet with a loose tent of foil for five minutes. The trapped steam softens any crisp edges, giving you that signature cupcake-top texture all the way around. Remove the foil, let them finish cooling, and you'll have uniformly tender cookies that feel like they came from a velvet-lined pastry case. It's a tiny step with a massive payoff—kind of like letting steak rest before slicing, except dessert happens faster.
Creative Twists and Variations
This recipe is a playground. Here are some of my favorite ways to switch things up:
Black Velvet Midnight
Swap the red food coloring for black cocoa and a teaspoon of activated-charcoal powder for obsidian cookies that taste like Oreo-infused heaven. Add a pinch of espresso powder to deepen the chocolate and give the flavor roasted backbone. The frosting stays classic cream-cheese, creating a dramatic black-and-white contrast that photographs like a dream. Serve these at Halloween and watch adults fight over them like kids over candy.
Berry Velvet Jubilee
Replace half the buttermilk powder with freeze-dried strawberry dust and fold a handful of white chocolate chips into the dough for a red-velvet-and-strawberry-shortcake mash-up. The berry notes amplify the cocoa's natural fruitiness, while the chips melt into creamy pockets that mimic cheesecake bites. Top with a raspberry-infused cream-cheese frosting for a cookie that tastes like summer in every bite.
Spiced Velvet Chai
Add a teaspoon of ground cardamom, half a teaspoon of cinnamon, and a quarter teaspoon of black pepper to the dry ingredients for a cookie that tastes like your favorite chai latte got dressed up for prom. The warm spices play beautifully against the tangy cream-cheese frosting, and the aroma will make your house smell like a cozy bookstore on a rainy afternoon. These disappear fastest at holiday parties—fair warning.
Coconut Velvet Dream
Substitute the heavy cream with full-fat coconut milk and add a cup of toasted unsweetened coconut to the dough for tropical vibes that transport you straight to a beach chair. Tint the frosting with a drop of natural blue spirulina for a soft ocean hue, then sprinkle extra coconut on top for snow-cap flair. It's like a vacation in cookie form, minus the sunburn.
Storing and Bringing It Back to Life
Fridge Storage
Store unfrosted cookies in an airtight container at room temperature for up to four days; they actually get softer as the moisture redistributes. Once frosted, refrigerate in a single layer inside a cake carrier with a tight lid; the cream-cheese frosting needs to stay below 40°F for food safety. Let chilled cookies sit on the counter for 20 minutes before serving—cold fat dulls flavor, and you want that tang to pop. Layer parchment between stacked cookies if you must stack, but honestly they look stunning displayed flat like edible jewels.
Freezer Friendly
Freeze unfrosted cookies on a sheet until solid, then transfer to a zip-top bag with parchment squares between layers; they'll keep for three months. Frosting freezes beautifully too—pipe dollops onto a parchment-lined pan, freeze, then pop the frozen frosting coins into a bag. When a craving hits, thaw a cookie and a frosting coin for 15 minutes at room temp, assemble, and you'd swear it was baked that day. Future you will high-five present you every single time.
Best Reheating Method
Refresh room-temperature cookies in a 300°F oven for five minutes, or microwave a single cookie on 50% power for 8–10 seconds. Add a tiny splash of water to the cream-cheese frosting before re-whipping to restore its cloud-like consistency; the water steams back to perfection and re-fluffs the sugar structure. Never re-frost frozen cookies while they're still icy—condensation turns the frosting into a weepy mess faster than you can say "sugar crash."