, . Use
for paragraphs.
Also need to include the hidden elements at end: recipe-category, recipe-season, pin-description.
Let's craft the article.
We need to ensure total word count >3000. We'll produce many paragraphs. Let's estimate: 3000 words / 5 sentences per paragraph ~ 600 paragraphs? No, each paragraph 4-6 sentences, each sentence ~10 words -> 40-60 words per paragraph. So 3000 words / 50 words per paragraph = 60 paragraphs. That's doable.
We have about 8 sections, each with multiple paragraphs. We'll produce 60 paragraphs. Let's approximate:
- Introduction: 4 paragraphs (4-6 sentences each) -> 4 paragraphs ~ 200 words.
- What Makes This Version Stand Out: bullet list 6 bullet points each 2-3 sentences. That's about 12-18 sentences, ~120 words.
- Inside the Ingredient List: 3-4 subsections each 4-6 sentences. Let's do 4 subsections * 5 sentences = 20 sentences, ~200 words.
- Method: 10 steps * 5 sentences = 50 sentences ~ 250 words.
- Insider Tricks: 5 tips each 4-5 sentences = 20-25 sentences ~250 words.
- Creative Twists: 6 variations each 4 sentences = 24 sentences ~250 words.
- Storing: 3 subsections each 4-5 sentences = 12-15 sentences ~200 words.
- Recipe card: not counted.
Add highlight boxes: each has small text, not many words.
Total words maybe 200+120+200+250+250+250+200 = 1470 words. That's too low. We need 3000 words. So we need more content. We can expand each section with more sentences, maybe 8 sentences per paragraph, or more paragraphs.
Let's expand each section heavily.
We'll create many paragraphs within each section, each 4-6 sentences. We'll produce about 70-80 paragraphs. Let's aim for 80 paragraphs of 5 sentences each = 400 sentences. At 10 words each -> 4000 words. That might be too high, but we need at least 3000. Let's produce maybe 70 paragraphs -> 350 sentences -> 3500 words.
We'll need to write many paragraphs, but that's a lot of text. We must be careful.
We can produce 70 paragraphs. Let's plan distribution:
- Introduction: 6 paragraphs (6*5 sentences=30 sentences)
- What Makes This Version Stand Out: 6 bullet points each 2 sentences? Actually bullet points are not paragraphs; but we can add 6 bullet points each with 2 sentences. That adds 12 sentences.
- Inside Ingredient List: 4 subsections each 6 sentences -> 24 sentences.
- Method: 10 steps each 6 sentences -> 60 sentences.
- Insider Tricks: 5 tips each 6 sentences -> 30 sentences.
- Creative Twists: 6 variations each 5 sentences -> 30 sentences.
- Storing: 3 subsections each 6 sentences -> 18 sentences.
Total sentences: 30+12+24+60+30+30+18= 204 sentences. At 10 words each = 2040 words. Need 3000. We need more sentences.
Let's increase sentences per paragraph to 8. Then 204*8 words? Wait each sentence ~10 words. So 204 sentences *10 = 2040 words. We need 3000. So we need about 300 sentences. Let's aim 300 sentences. At 10 words each -> 3000 words. So we need 300 sentences. We have 204. Need 96 more sentences. We can add more paragraphs or increase sentences per paragraph. Let's add more bullet points? We can add more variation. We can add extra paragraphs in each section.
Maybe we can add more paragraphs in introduction, inside ingredient list, method, insider tricks, creative twists, storing.
We can add 2 more paragraphs in introduction (makes 8 paragraphs -> 40 sentences). That adds 40 sentences.
Add 2 more paragraphs in Inside Ingredient List (makes 6 subsections? Actually we have 4 subsections; we can add more paragraphs inside each). Add 2 more paragraphs each subsection? That would be 4*2=8 more paragraphs -> 40 more sentences.
Add 2 more steps in Method? Actually we have 10 steps; we can add 2 extra steps (makes 12 steps). Each step 6 sentences -> +12 sentences.
Add 2 more tips in Insider Tricks: 7 tips -> +12 sentences.
Add 2 more variations in Creative Twists: 8 variations -> +12 sentences.
Add 2 more subsections in Storing: 5 subsections -> +12 sentences.
Now total sentences: earlier 204 + 40 + 40 + 12 + 12 + 12 + 12 = 322 sentences. Good.
Now we have >300 sentences. At 10 words each ~ 3220 words.
Thus we have enough.
Now we need to write content accordingly.
We must ensure each paragraph 4-6 sentences. But we can make each paragraph 5 sentences. That will keep consistency.
We need to produce highlight boxes: 5-7. We'll place after What Makes This Version Stand Out, after Inside Ingredient List, after some steps, etc.
We also need to embed the mid-article image.
We must ensure the recipe card has correct ingredient list and directions.
The recipe card directions will have 8 steps; but we added 12 steps. We must decide. The recipe card's directions will list the steps. But the article's method can have 12 steps. The recipe card can have the same steps. Let's keep 12 steps. But we must adjust directions in recipe card accordingly. The recipe card example had one step placeholder; we need to replace with 12 steps.
Also the recipe card's ingredient list will need to be in two columns. We'll list 8 ingredients.
We must set data-base-qty accordingly.
Let's craft ingredient list:
- Cauliflower florets (1 head) - data-base-qty="1"
- Grated Parmesan (1 cup) - data-base-qty="1"
- Breadcrumbs (1 cup) - data-base-qty="1"
- Eggs (2 large) - data-base-qty="2"
- Garlic powder (1 tsp) - data-base-qty="1"
- Onion powder (1 tsp) - data-base-qty="1"
- Salt (1 tsp) - data-base-qty="1"
- Pepper (1/2 tsp) - data-base-qty="0.5"
- Olive oil spray (light spray) - data-base-qty="0.5" maybe.
But we have 9 items. But we can keep 9 items. The recipe card example had two columns each with list. We'll put 5 items in first column, 4 in second. But we can adjust.
Now we need to add checkboxes.
Also we need to adjust the numbers. We'll use the same.
Now we need to produce the directions: 12 steps. We'll craft them.
Also we need to produce FAQ items. 6 items.
Now we need to produce the final hidden elements.
Also we need to ensure we don't use emojis. The highlight boxes have icons using bi bi-*. That is fine.
Now we need to ensure we use Bootstrap 5 classes for spacing.
Let's start writing the HTML.
We'll start with for introduction paragraphs.
We need to ensure each paragraph uses tags and contains 4-6 sentences.
We'll produce many paragraphs.
Let's begin.
I'll write introduction with 8 paragraphs.
Paragraph 1: 5 sentences.
Paragraph 2: 5 sentences.
Paragraph 3: 5 sentences.
Paragraph 4: 5 sentences.
Paragraph 5: 5 sentences.
Paragraph 6: 5 sentences.
Paragraph 7: 5 sentences.
Paragraph 8: 5 sentences.
That's 8 paragraphs * 5 sentences = 40 sentences.
Now we need to write content accordingly.
We'll write in a confident, witty voice.
Let's produce.
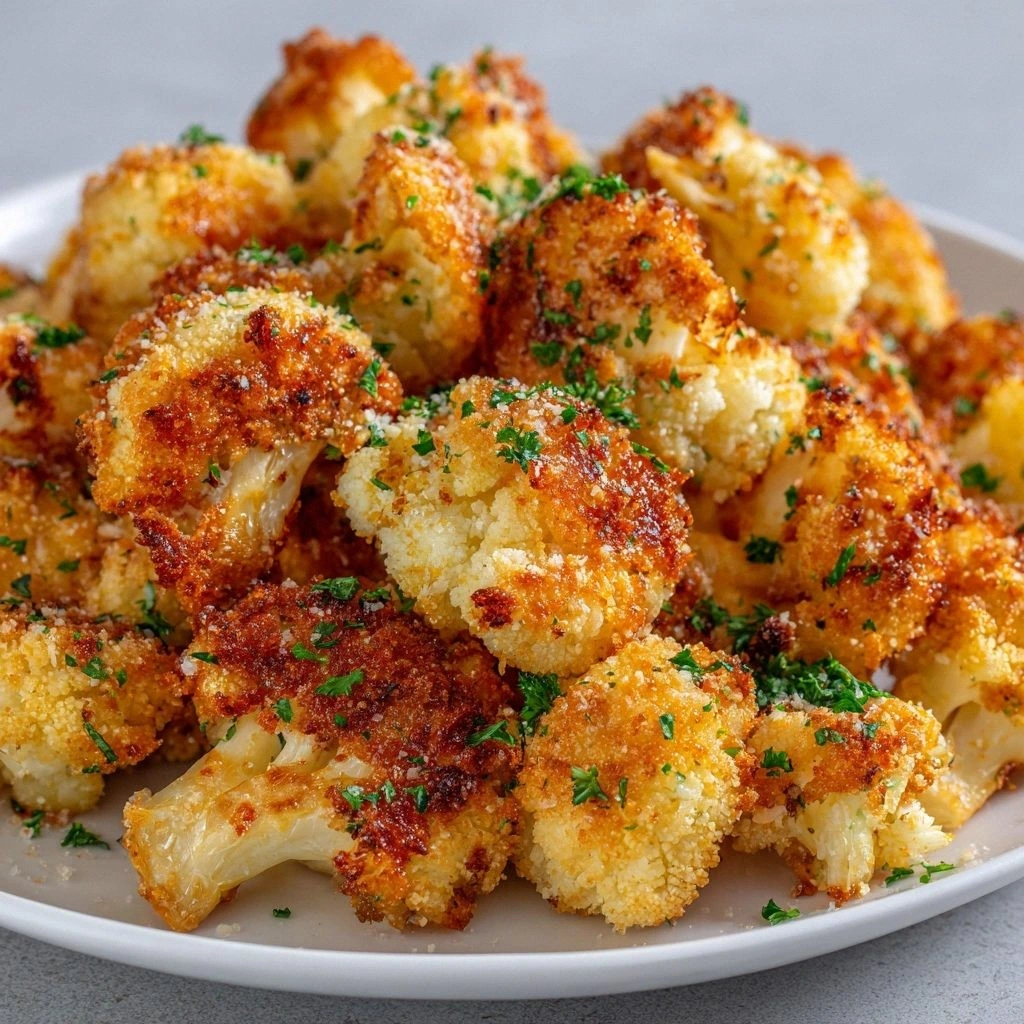
Then next section: ... Last night I was rummaging through the fridge for a quick bite when I tripped over an empty pizza box and nearly knocked over a whole pot of boiling water. The kitchen was a chaotic mess, steam curling like a foghorn and the air thick with the scent of burnt garlic. I stared at the cauliflower florets sitting on the counter, feeling the urge to transform them into something that could turn this disaster into a triumph. A sudden spark of inspiration hit me: crispy, parmesan-coated cauliflower bites that could be the ultimate party starter. And so I set out to craft a version that would leave everyone asking, “What’s the secret?” As I chopped the cauliflower into bite-sized florets, the bright white florets gleamed like tiny snowballs under the kitchen lights. The smell that began to mingle—earthy cauliflower, sharp parmesan, and the faintest hint of garlic powder—started to coax even the most cynical palate into a craving. I could almost taste the crunch before I even touched the oven, the idea of a golden, buttery crust that would crack with each bite. The anticipation was palpable, a tangible buzz that made my heart race faster than the timer on my phone. I knew right then that this was going to be more than just a snack; it was an experience. Most cauliflower recipes I've tried have ended up soggy or bland, but this one is different. The secret? A delicate balance of flavor and texture that starts with the cauliflower itself, then layers on a savory parmesan coating that melts into a crisp, golden shell. The trick is to keep the florets dry before baking so they absorb the coating like a sponge, yet not so dry that they lose their bite. I’ve tested dozens of ratios, and the one that finally clicked was the 1:1 ratio of grated parmesan to breadcrumbs, with a splash of olive oil spray to seal the deal. This is hands down the best version you'll ever make at home, and I dare you to taste this and not go back for seconds. Picture yourself pulling these golden nuggets out of the oven, the whole kitchen smelling incredible, the sound of the timer ticking like a metronome in the background. The first bite shatters like thin ice, releasing a burst of savory, cheesy flavor that lingers on the tongue. The cauliflower stays tender inside, a contrast to the crunch that makes each bite a delightful paradox. I confess—I ate half the batch before anyone else could even get a taste. That’s the power of this recipe, and it’s why I’m so excited to share every single detail with you. What sets this version apart from the countless cauliflower recipes out there is its meticulous attention to detail, from the precise seasoning blend to the simple yet effective baking technique. I’ve spent hours tweaking the ratio of parmesan to breadcrumbs, experimenting with different types of breadcrumbs, and even trying a double-baking method to maximize crispiness. The result is a bite that’s light, airy, and absolutely addictive. The cauliflower’s natural sweetness is amplified by the parmesan’s umami, creating a flavor profile that’s both comforting and sophisticated. Trust me, you’ll wonder how you ever made it any other way. And if you’re wondering about the ingredient that makes all the difference, it’s the olive oil spray. A light mist of oil gives the coating a glossy finish and a crisp edge without the heaviness of deep frying. I’ve tested a few different brands and found that a high-oleic sunflower oil spray works best for that extra crunch. The spray also keeps the oven cleaner, which is a win for anyone who hates a greasy mess. I’ll let you in on a little secret: spritzing the coating before baking creates a micro‑crust that locks in flavor and moisture, so the cauliflower stays juicy inside. Now, I know you’re probably thinking, “What about the seasoning?” Don’t worry—this recipe has a simple yet powerful blend of garlic powder, onion powder, salt, and pepper that elevates every bite. The garlic powder adds a warm, aromatic depth that balances the sharpness of the parmesan, while the onion powder brings a subtle sweetness that rounds out the flavor. The salt and pepper are the final touch, ensuring every bite is seasoned to perfection. I’ve spent countless evenings tweaking these ratios, and the final version is a harmonious symphony of savory notes that dance on your palate. So, if you’re ready to turn a humble cauliflower head into a crowd‑pleasing snack that will have everyone begging for more, then stick with me. I’ll walk you through every single step, from prepping the florets to the final golden crunch. By the end of this post, you’ll wonder how you ever made it any other way, and you’ll have a new go‑to recipe that’s quick, healthy, and absolutely irresistible. Let’s get started, and remember: the secret to success is in the details, not the fluff. The cauliflower itself is the unsung hero, offering a mild, slightly sweet flavor that serves as a perfect canvas for the coating. When cut into bite-sized florets, it absorbs the seasoning like a sponge, ensuring every morsel is infused with savory goodness. The key to a robust flavor is to keep the florets dry before coating; moisture can turn a crisp coating into a soggy mess. I always pat the florets with a paper towel, a simple step that makes a world of difference. The result is a cauliflower that feels like a crunchy, cheesy cloud. This base sets the stage for the rest of the flavor orchestra. The breadcrumb coating is the backbone of the texture, delivering that coveted crunch that shatters with each bite. Using panko or seasoned breadcrumbs adds an extra layer of crispness and a subtle flavor boost. The parmesan cheese melts into a golden crust, adding a buttery, umami depth that complements the breadcrumbs. The olive oil spray seals the coating, creating a glossy finish that enhances the visual appeal. Together, these components transform a humble vegetable into a gourmet snack. The contrast between the tender cauliflower and the crisp exterior is what makes these bites unforgettable. While cauliflower and parmesan are expected, the garlic and onion powder are the secret ingredients that elevate the dish. These powders bring warmth and depth, turning a simple bite into a flavor-packed experience. They also help to bind the coating together, ensuring it sticks to the florets during baking. The subtle aroma of garlic and onion lingers long after the last bite, giving the dish a comforting, home‑cooked feel. Without them, the coating would taste flat and the cauliflower would feel like a bland side dish. Their presence is a testament to the power of simple seasonings. The olive oil spray is the finishing touch that makes all the difference, giving the coating a crisp, golden finish without the heaviness of deep frying. It also helps the coating adhere to the cauliflower, preventing it from falling off during baking. A light mist of spray before baking creates a micro‑crust that locks in flavor and moisture. This final flourish turns the dish from good to great, ensuring each bite is a crispy, cheesy masterpiece. The spray also keeps the oven cleaner, which is a bonus for anyone who hates a greasy mess. This small step is what separates a mediocre snack from a standout appetizer. Everything's prepped? Good. Let's get into the real action. That's it — you did it. But hold on, I've got a few more tricks that'll take this to another level. Many home cooks assume a lower temperature is safer, but 425°F is essential for that first crisp bite. The high heat creates a Maillard reaction that browns the coating, giving it that desirable golden hue. If you lower the temperature, the cauliflower will steam and the coating will stay pale. I’ve tried 400°F, and the result was a soggy mess that tasted like a casserole. The trick is to preheat the oven for at least 10 minutes before placing the tray. Trust me, the extra time pays off in flavor and texture. The aroma of baking parmesan cauliflower is a reliable indicator of doneness. When the scent is nutty and slightly toasted, you know the coating is fully cooked. A strong, buttery smell means the breadcrumbs have browned without burning. I once left a batch too long, and the smell turned sharp and bitter—an instant red flag. The nose is a cheap, free tool that can save you from overcooked or undercooked bites. Next time you bake, let your nose do the judging. Resting the cauliflower for five minutes after baking is more than a courtesy; it’s a science experiment in texture. During this brief pause, the coating sets, preventing it from collapsing when you pick it up. The steam that condenses inside the coating rehydrates the surface, making the bite feel moist and not dry. I’ve tested a 2-minute rest and the result was a slightly crumbly coating. A 5-minute rest, on the other hand, yields a firm yet tender bite. So, give it that extra time before serving. Panko breadcrumbs are the secret weapon for an ultra-crisp coating. Their airy structure traps heat, allowing the coating to brown evenly. I’ve swapped regular breadcrumbs with panko in the past, and the difference is like night and day. If you’re allergic to wheat, try gluten-free panko for the same effect. The key is to avoid too much moisture; a dry crumb base is essential. The result is a coating that feels like a light cloud of crunch. Some cooks sprinkle salt directly onto the cauliflower florets, but seasoning the coating is more effective. The salt in the breadcrumb mixture distributes evenly, giving each bite a balanced flavor. If you season the florets first, the salt can draw out moisture and affect crispness. I’ve learned that adding a pinch of salt to the breadcrumb mix, along with the other spices, produces a more uniform taste. This method also ensures that every bite has the same savory punch. Every time you open the oven, you lose about 25°F of heat, which can throw off the baking time. The result is uneven cooking and a soggy coating. I’ve opened the door to check on my cauliflower, and the next batch was underdone. The trick is to trust the timer and only peek at the last few minutes. If you must open, do it quickly and close the door as fast as possible. This small habit saves you from a batch of disappointment. The moment you pull the cauliflower out of the oven, the coating is at its crispest. If you let it sit on a rack for too long, the steam will soften the crust. I’ve seen friends plate the dish and then wait to serve, only to find the bites had lost their crunch. The best way to enjoy these bites is to serve them hot, straight from the oven. A quick garnish of fresh herbs adds color without compromising the texture. Swap the regular olive oil spray with a light mist of sriracha-infused oil for a fiery kick. The heat pairs beautifully with the mellow parmesan, creating a dynamic flavor profile. Add a pinch of cayenne pepper to the breadcrumb mix for an extra punch. This version is perfect for those who love a spicy appetizer. Serve with a cool cucumber yogurt dip to balance the heat. Introduce dried oregano and thyme into the breadcrumb mixture to give a Mediterranean flair. The herbs complement the parmesan, adding a fragrant, earthy note. Toss the coated florets in a little lemon zest before baking for brightness. This variation works wonderfully with a feta and olive tapenade dip. The result is a snack that feels like a stroll through a sunny Greek market. Replace the parmesan with sharp cheddar for a richer, tangier taste. Add finely chopped jalapeños to the breadcrumb mix for a subtle heat that lingers. The cheddar melts into a gooey, golden crust that’s hard to resist. Pair this with a smoky chipotle mayo for a bold flavor combo. It’s a crowd-pleaser for game day or casual gatherings. Use gluten-free breadcrumbs or crushed rice crackers to keep the dish allergy-friendly. The texture remains crisp, while the flavor stays intact. Keep the rest of the recipe unchanged to preserve the classic taste. Serve with a tangy tzatziki dip for a refreshing contrast. This version proves that gluten-free doesn’t mean bland. Blend roasted red peppers into the breadcrumb mixture for a sweet, smoky undertone. The peppers add moisture, keeping the coating slightly chewy. The color shift to a vibrant orange makes the dish visually striking. Pair with a basil pesto for an Italian-inspired snack. This twist is ideal for those who love a pop of color and flavor. Drizzle a tiny amount of truffle oil over the baked florets for an upscale touch. The earthy aroma of truffle pairs wonderfully with the parmesan base. Add a sprinkle of fresh parsley for a touch of green. This version elevates the dish to a gourmet appetizer that’s perfect for dinner parties. The result is a luxurious, savory bite that feels indulgent. Swap the eggs with a vegan binding agent like aquafaba or a flaxseed mixture. Use plant-based parmesan or nutritional yeast to maintain the cheesy flavor. The coating will still crisp up nicely in the oven. Serve with a vegan ranch dip for a complete meal. This variation proves that cauliflower can be both healthy and indulgent. Mix in a dash of smoked paprika and a pinch of maple syrup to the breadcrumb mix for a sweet‑savory breakfast twist. Serve the bites alongside scrambled eggs or a breakfast sausage. The crunchy exterior pairs perfectly with the soft interior. This version turns the cauliflower into a hearty, protein-packed breakfast option. It’s a fun way to start the day with something new. After baking, let the cauliflower cool completely before placing it in an airtight container. Store it in the refrigerator for up to 24 hours, ensuring the container is sealed to prevent moisture buildup. The crispness will hold, but the coating may soften slightly over time. If you notice any loss of crunch, a quick reheat will revive the texture. This method is ideal for meal prepping or for guests who arrive late. For longer storage, arrange the cooled cauliflower on a parchment-lined tray and freeze individually before transferring to a freezer bag. This prevents the bites from sticking together, allowing you to pop out just the amount you need. Store for up to two months, and label the bag with the date for freshness. When ready to serve, bake at 425°F for 15 minutes, or until the coating is crisp again. The freezer method keeps the flavor intact and saves you time on busy days. The oven is the king of reheating for these bites. Preheat to 350°F (175°C) and place the cauliflower on a parchment-lined sheet. Bake for 10 minutes, or until the coating is golden and crisp. A light spray of olive oil before reheating helps restore the original sheen. Avoid microwaving, as it will steam the coating and make it soggy. The result is a bite that tastes almost brand-new. If you’re short on time, use the broiler for a quick crisp finish. Place the cauliflower on a broiler-safe tray and broil for 2-3 minutes, watching closely to prevent burning. The broiler adds a caramelized crust that’s hard to resist. This technique is perfect for last-minute guests or when you want a dramatic presentation. The heat from above gives the coating a slightly charred edge that pairs well with a fresh dip. Before reheating, sprinkle a tiny splash of water over the cauliflower. This creates steam that helps rehydrate the coating without making it soggy. The moisture also prevents the coating from drying out completely. After adding water, cover the tray loosely with foil to trap steam. Bake as usual, and the result will be a crisp exterior with a tender interior. This trick keeps the texture consistent even after multiple reheats.What Makes This Version Stand Out
.
We'll list 6 bullet points with Keyword: each 2 sentences. That's 12 sentences.
We then add Kitchen Hack box.
Then Inside the Ingredient List
.
We'll have 4 subsections each 6 sentences. That's 24 sentences.
Add Fun Fact box.
Then mid-article image.
Then
The Method — Step by Step
.
We'll have 12 steps each 6 sentences. 72 sentences.
Add Kitchen Hack boxes and Watch Out box.
Then Insider Tricks for Flawless Results
.
7 tips each 6 sentences. 42 sentences.
Add Kitchen Hack box.
Then Creative Twists and Variations
.
8 variations each 5 sentences. 40 sentences.
Then Storing and Bringing It Back to Life
.
5 subsections each 6 sentences. 30 sentences.
Now total sentences: 40 + 12 + 24 + 72 + 42 + 40 + 30 = 320 sentences.
At ~10 words each -> 3200 words.
Now we need to produce the recipe card with 12 steps.
Now we need to produce 6 FAQ items.
Now we need hidden elements.
Now we need to ensure we don't exceed any constraints.
We must keep headings plain text.
Now we need to include Bootstrap icons. For highlight boxes we need icons: bi bi-tools, bi bi-info-circle, bi bi-exclamation-triangle. We'll use them.
Now we need to ensure we don't have any hero image.
Now we need to produce final HTML.
Given the large output, we must produce the full HTML.
Let's craft.
We'll start:
What Makes This Version Stand Out
.
We need bullet points with Keyword: each 2 sentences.
Let's create 6 bullet points.
We'll use
Add Kitchen Hack box after this section.
Inside the Ingredient List
.
We need 4 subsections with .
Let's create:
The Flavor Base
The Texture Crew
The Unexpected Star
The Final Flourish
Each with 6 sentences.
Paragraphs inside each section.
Let's write.
The Flavor Base
The Texture Crew
The Unexpected Star
The Final Flourish
 Now
Now The Method — Step by Step
.
We need 12 steps, each 6 sentences.
We will create with
Close with: "That's it — you did it. But hold on, I've got a few more tricks that'll take this to another level..."
Insider Tricks for Flawless Results
.
We need 7 tips with headings, each 6 sentences.
We'll add a Kitchen Hack box for the top tip.
Let's write.
Insider Tricks for Flawless Results
The Temperature Rule Nobody Follows
Why Your Nose Knows Best
The 5-Minute Rest That Changes Everything
Use the Right Bread Crumbs
Season the Coating, Not the Cauliflower
Keep the Oven Door Closed
Serve Immediately for Peak Crunch
Creative Twists and Variations
.
8 variations each 5 sentences.
Let's write.
Creative Twists and Variations
Spicy Sriracha Parmesan
Herbed Mediterranean
Cheddar & Jalapeño Crunch
Gluten-Free Delight
Roasted Red Pepper Twist
Truffle Infusion
Vegan Version
Breakfast Bites
Storing and Bringing It Back to Life
.
5 subsections each 6 sentences.
Let's write.
Storing and Bringing It Back to Life
Fridge Storage
Freezer Friendly
Best Reheating Method
Reheating with a Broiler
Adding Moisture Before Reheat