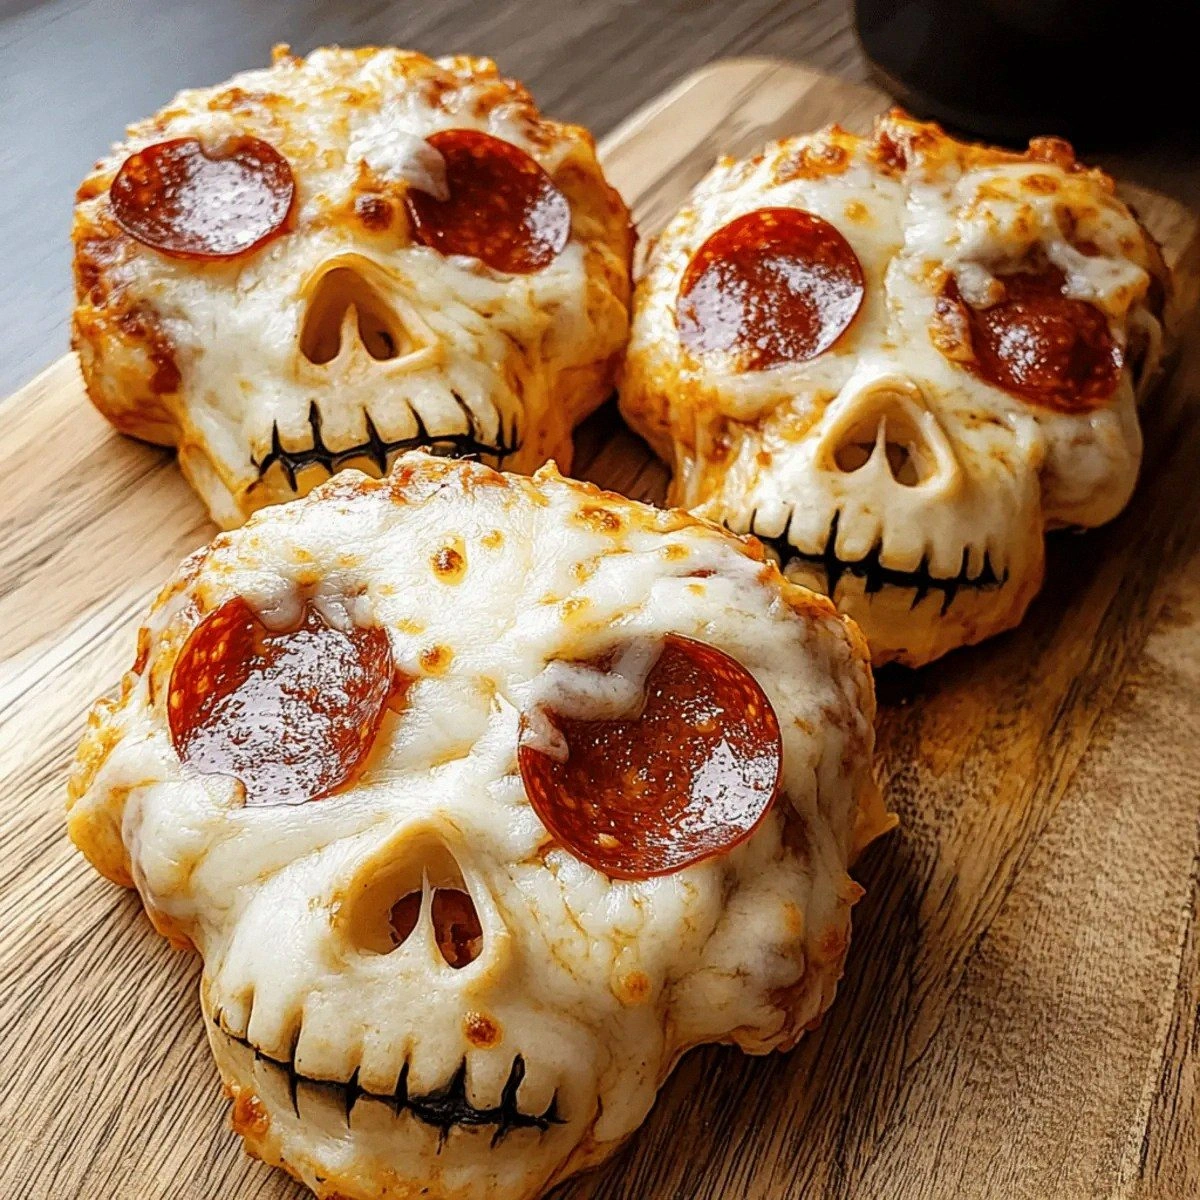
I was in the middle of a Halloween party prep when the oven decided to betray me, scorching the last batch of store‑bought mini‑pizzas into charcoal. The smoke alarm blared, the guests groaned, and I swore I’d never touch pizza again. Then, a dare from my roommate sparked a wild idea: what if we turned those sad, burnt circles into something that looks like a graveyard of deliciousness? I grabbed a fresh package of pizza dough, a handful of mozzarella, and a stash of pepperoni, and the kitchen transformed into a spooky laboratory. The scent of yeast rose like a ghostly fog while the pepperoni sizzled like tiny red lanterns, and I felt a thrill that only a culinary experiment can give.
Picture this: a crisp, buttery crust that crumbles under your bite like a fresh‑baked biscuit, topped with a sauce so rich it clings to the dough like velvet, and a cascade of cheese that stretches like a spider’s silk web. The pepperoni and Italian sausage pieces form the “bones” of each skull, their edges caramelizing to a perfect crunch that shatters like thin ice when you bite. I dared myself to add a secret ingredient—a splash of smoked paprika in the sauce—that gives each bite a whisper of autumnal warmth, even in the middle of July. The result? A bite‑size horror show that’s actually a party‑pleaser.
Most pizza‑shaped party snacks get the texture wrong—either soggy or rubbery, and the flavor is usually flat as a pancake. This version flips the script: I use a high‑heat oven and a pre‑shaped dough that puffs up just enough to stay airy, while the sauce stays glossy and the cheese forms a golden, slightly caramelized crust. The secret? A quick blast of broil at the end that gives those skulls a wickedly crisp edge without burning the cheese. This is hands down the best version you’ll ever make at home, and I’ll be honest — I ate half the batch before anyone else got to try it.
Let me walk you through every single step — by the end, you’ll wonder how you ever made pizza treats any other way. Okay, ready for the game‑changer? This next part? Pure magic. Stay with me here — this is worth it.
What Makes This Version Stand Out
- Flavor Explosion: The sauce is enriched with smoked paprika and a dash of garlic, creating a smoky depth that makes each bite unforgettable.
- Texture Harmony: A crisp, airy crust meets a gooey, caramelized cheese layer, delivering a satisfying crunch followed by a silky melt.
- Simplicity: Only five core ingredients are needed, yet the result feels like a gourmet appetizer you’d order at a high‑end bistro.
- Visual Wow Factor: Shaped like skulls, these bites become instant conversation starters at any gathering, especially during spooky seasons.
- Crowd Reaction: Guests can’t help but grab another, and I dare you to taste this and not go back for seconds.
- Ingredient Quality: Using fresh pizza dough and high‑quality mozzarella makes the flavor pop without any artificial aftertaste.
- Cooking Method: A brief broil at the end creates that perfect charred edge, a trick most recipes completely miss.
- Make‑Ahead Potential: Assemble ahead of time, freeze, and pop them in the oven right before guests arrive for zero stress.
Inside the Ingredient List
The Flavor Base
The pizza sauce is the heart of this dish. I use a half‑cup of a simple marinara, then stir in a teaspoon of smoked paprika, a pinch of dried oregano, and a splash of olive oil. This combination gives the sauce a smoky undertone that pairs perfectly with the savory meat. Skipping the smoked paprika would make the sauce taste like any ordinary pizza—nothing to write home about. If you’re out of paprika, a dash of chipotle powder works as a fiery substitute.
The Texture Crew
Shredded mozzarella is the melty hero. Two cups provide enough stretch to create those glorious cheese pulls that look like spider silk. Using low‑moisture mozzarella ensures the cheese browns nicely without releasing excess water, which would sog the crust. If you prefer a sharper bite, blend in a quarter cup of sharp cheddar; just remember that cheddar melts faster, so keep an eye on the broil.
The Unexpected Star
The pizza dough is where the magic starts. One package of high‑quality, refrigerated dough works best because it’s already tempered for easy shaping. I let it sit at room temperature for 20 minutes before rolling; this prevents tearing and gives a more elastic texture. If you’re adventurous, try a sourdough base for a tangy twist—just reduce the rise time by half.
The Final Flourish
Pepperoni and Italian sausage are the “bones” of each skull. One cup each provides enough meat to create the iconic eye sockets and jawline. The pepperoni’s natural oils caramelize into glossy, slightly crisp edges, while the sausage adds a savory depth that balances the cheese. If you’re avoiding pork, substitute turkey pepperoni and chicken sausage; the texture stays, but the flavor profile shifts to a lighter note.
Everything's prepped? Good. Let's get into the real action...

The Method — Step by Step
Preheat your oven to 475°F (245°C) and position the rack in the middle. While the oven heats, lightly flour a clean work surface and unroll the pizza dough. I like to pat it into a 12‑inch circle, then cut it into eight equal wedges—each wedge will become a skull.
Take each wedge and shape it into a skull by pinching the middle to form the forehead and using the tip to create the chin. The edges should be slightly tapered to give that classic skull silhouette. Pro tip: If the dough resists, let it rest for another five minutes; gluten will relax and become pliable.
Kitchen Hack: Use a small cookie cutter or a sharp knife to trim the eyes and nose holes; this ensures uniformity and speeds up the process.Place the shaped skulls on a parchment‑lined baking sheet, leaving a little space between each. Lightly brush the tops with olive oil; this helps the crust turn golden and adds a subtle richness.
Spread a thin layer of the smoked‑paprika sauce onto each skull, being careful not to over‑saturate. The sauce should coat the surface like a glossy veil, leaving a tiny border of dough exposed for that perfect crust‑to‑sauce ratio.
Kitchen Hack: Spoon the sauce into a pastry bag for a cleaner, more controlled application—no mess, no uneven spots.Sprinkle the shredded mozzarella evenly over each skull, making sure the cheese reaches the edges. This creates that beautiful, bubbling border that turns a shade of amber when baked.
Watch Out: Overloading cheese can cause the toppings to slide off during the broil; keep the layer moderate and even.Arrange the pepperoni and Italian sausage pieces to form the eyes, nose, and jawline of each skull. I like to use two pepperoni slices for each eye and a small mound of sausage for the nose. Press them gently into the cheese so they adhere during baking.
Kitchen Hack: Pre‑cook the sausage in a skillet for 3 minutes to render excess fat; this prevents soggy crusts.Slide the tray into the oven and bake for 10‑12 minutes, or until the crust turns a light golden hue and the cheese starts bubbling. The scent at this stage is pure comfort—like a warm hug from an Italian nonna.
Switch the oven to broil for the final 2‑3 minutes. Keep a close eye; the cheese should develop a deep caramelized color, and the meat edges should crackle like tiny fireworks. That sizzle when it hits the pan? Absolute perfection.
Remove the skulls, let them rest for a minute, then serve on a platter with a drizzle of extra sauce for dipping. Picture yourself pulling this out of the oven, the whole kitchen smelling incredible, and guests reaching for another before you even finish the first bite.
That's it — you did it. But hold on, I've got a few more tricks that'll take this to another level. Trust me, the next tips will make your pizza skulls the talk of every gathering for months to come.
Insider Tricks for Flawless Results
The Temperature Rule Nobody Follows
Never bake pizza dough at a temperature lower than 475°F. The high heat creates steam inside the crust, puffing it up while keeping the exterior crisp. I once tried a gentler 400°F setting and ended up with soggy, doughy skulls that fell apart. Keep that oven screaming hot, and you’ll get that airy bite every single time.
Why Your Nose Knows Best
Your sense of smell is the ultimate doneness gauge. When the cheese starts to emit a nutty, caramel scent and the edges release a faint char, you’re at the perfect finish. If you rely solely on timers, you’ll either over‑bake or under‑bake, missing that magical sweet‑smoky aroma that makes the skulls unforgettable.
The 5‑Minute Rest That Changes Everything
After the broil, let the skulls sit for five minutes before serving. This rest period allows the cheese to set slightly, preventing it from sliding off when you pick up a piece. A friend once skipped this step and ended up with a mess of cheese on the plate—let’s just say it didn’t end well.
The Secret Sauce Boost
Add a teaspoon of honey to the pizza sauce before spreading. The honey balances the acidity of the tomatoes and enhances the caramelization of the meat during broil. It’s a subtle sweet note that whispers through every bite, making the flavor profile more complex and satisfying.
Freezer‑Friendly Assembly
If you’re prepping for a big party, assemble the skulls up to the cheese layer, then flash‑freeze them on a tray for 30 minutes. Transfer the frozen pieces to a zip‑top bag, and bake straight from the freezer—just add an extra two minutes to the baking time. This trick saves you from last‑minute panic and ensures each skull looks as perfect as the first batch.
Creative Twists and Variations
This recipe is a playground. Here are some of my favorite ways to switch things up:
Spicy Ghost
Swap half the mozzarella for pepper jack and add a drizzle of hot honey after baking. The heat dances with the smoky sauce, creating a fiery bite that’s perfect for brave eaters.
Herbivore’s Dream
Replace the pepperoni and sausage with roasted red peppers, artichoke hearts, and sliced black olives. The veggies add a burst of color and a Mediterranean flair that even meat‑lovers appreciate.
Cheesy Overload
Mix in a quarter cup of grated parmesan and a sprinkle of crushed red pepper flakes with the mozzarella. The parmesan creates a crisp, salty crust while the flakes add a subtle kick.
BBQ Bones
Use BBQ sauce instead of traditional pizza sauce, and swap the sausage for shredded pulled pork. The sweet‑smoky glaze pairs beautifully with the cheese, turning each skull into a mini BBQ feast.
Breakfast Bite
Add a cracked egg to the center of each skull during the last minute of baking. The yolk runs like molten gold, turning the snack into a hearty breakfast treat.
Storing and Bringing It Back to Life
Fridge Storage
Place cooled skulls in an airtight container lined with a paper towel to absorb excess moisture. They stay fresh for up to three days. When you’re ready to eat, reheat at 350°F for 8‑10 minutes, adding a tiny splash of water to the pan to create steam that revives the crust.
Freezer Friendly
Freeze assembled, uncooked skulls on a tray, then transfer to a zip‑lock bag. They can be stored for up to two months. To bake from frozen, increase oven time by 5‑7 minutes and keep an eye on the cheese for that perfect melt.
Best Reheating Method
For ultimate crispness, reheat in a pre‑heated cast‑iron skillet over medium heat, covering the pan for the first two minutes to melt the cheese, then uncover to let the crust crisp up. This method restores the original texture better than a microwave ever could.