Picture this: the kitchen is a battlefield, the stove is a volcano, and you’re the fearless general who’s just discovered the ultimate side dish that will make your Thanksgiving table sing. I was rummaging through the fridge, half‑dreading the inevitable over‑cooked, soggy Brussels sprouts that have haunted every holiday dinner. Then, out of nowhere, I remembered the last time I’d had a handful of roasted Brussels sprout bites that were crisp on the outside, tender on the inside, and drenched in a silky maple‑pecan glaze. That memory sparked a dare—“I dare you to taste this and not go back for seconds.” The challenge? Turn a humble vegetable into a show‑stopping centerpiece.
The aroma that greeted me was a sweet, caramelized whisper of maple syrup, cut by the sharp, earthy scent of fresh Brussels sprouts. The sound of the oil sizzling as it kissed the pan was the soundtrack of culinary triumph. My eyes saw the glossy, golden sheen of pecans dancing in the glaze, and my tongue tasted the perfect blend of sweet, salty, and savory. The texture—crisp edges that shatter like thin ice, a tender heart that melts in your mouth—was a revelation. I couldn’t help but grin; I knew I’d stumbled on something extraordinary.
This version stands out because it balances the classic crunch of Brussels sprouts with the luxurious, buttery richness of maple and pecans, all while staying incredibly simple. Most recipes get this completely wrong by over‑roasting the nuts or under‑cooking the sprouts. Here, the method locks in moisture, caramelizes the maple, and coats every sprout in a velvety glaze that sticks like a second skin. The result is a dish that feels like a dessert but works perfectly as a savory side. It’s hands down the best version you’ll ever make at home, and trust me, your guests will be asking for the recipe as soon as the last bite is gone.
What makes this recipe so addictive? It’s not just the ingredients—it’s the technique. I’ve spent years experimenting with the perfect ratio of maple syrup to oil, the timing of when to add the pecans, and the secret trick of tossing the sprouts in a hot pan for a minute before finishing them in the oven. The result is a glossy, caramelized coating that doesn’t taste sweet at all; it’s savory, nutty, and utterly irresistible. I’ll be honest—I ate half the batch before anyone else got to try it. The rest of the family begged me for the recipe, and I handed it over with a wink and a grin.
Picture yourself pulling this dish out of the oven, the whole kitchen smelling incredible, and the table set for a feast. The moment you lift the lid, steam curls in the air like a sweet, nutty fog. The color is a deep, appetizing amber, and the aroma is a promise of comfort and indulgence. I’ll let you in on a little secret: the maple syrup is the star, but the pecans provide the crunch that keeps everyone coming back for more. It’s a dish that feels like a holiday tradition, even if you’ve never made it before.
Let me walk you through every single step—by the end, you’ll wonder how you ever made it any other way. From the first splash of oil to the final toss, each action is designed to maximize flavor and texture. I’ll share the micro‑challenges that will push your culinary skills and the big ideas that will change how you think about Brussels sprouts forever. Ready? Let’s dive in.
What Makes This Version Stand Out
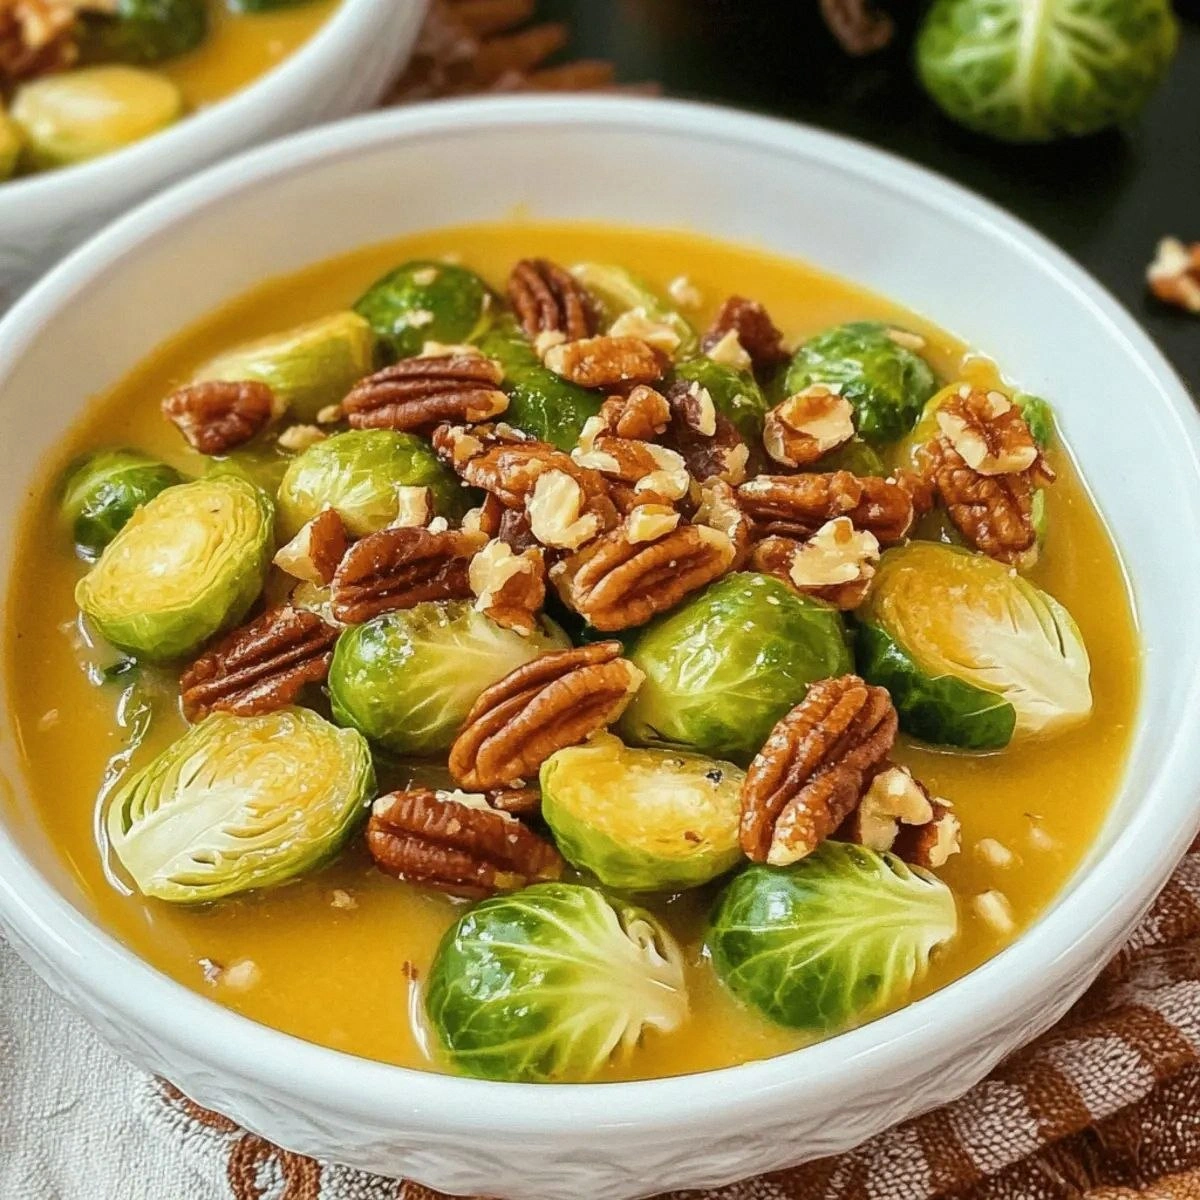
- Flavor: The maple syrup creates a sweet, caramelized crust that balances the natural earthiness of the sprouts. This harmony turns a simple side into a crowd‑pleasing masterpiece.
- Texture: The pecans add a crunchy contrast that pops in every bite, while the glazed sprouts remain tender inside. The result is a delightful mouthfeel that keeps guests asking for seconds.
- Simplicity: With only eight ingredients, you can whip this up in under 30 minutes. No fancy equipment or complex steps—just good instincts and a dash of confidence.
- Uniqueness: Most recipes rely on butter or honey alone; this version layers maple, pecans, and a splash of apple cider vinegar for depth. The vinegar cuts the sweetness and adds a subtle tang that elevates the dish.
- Crowd Reaction: Guests often describe the first bite as “wow, this is like a dessert but it’s a side dish.” The sweet‑savory combo is a conversation starter and a highlight of the meal.
- Ingredient Quality: Using fresh Brussels sprouts and toasted pecans ensures maximum flavor. The maple syrup’s purity adds a clean, natural sweetness.
- Cooking Method: The quick sear followed by a finish in the oven locks in juices and caramelizes the glaze. This hybrid approach gives you the best of both worlds.
- Make‑Ahead Potential: The glazed sprouts can be prepared up to 24 hours ahead and reheated with a splash of water. They’re still as good as when freshly cooked.
Alright, let's break down exactly what goes into this masterpiece...
Inside the Ingredient List
The Flavor Base
Fresh Brussels sprouts are the foundation of this dish. They provide a peppery bite that balances the sweetness of maple syrup. If you’re not a fan of Brussels sprouts, try cutting them into smaller, bite‑size pieces so they roast evenly. Skip them and the dish loses its signature crunch and heartiness.
Brussels sprouts are packed with antioxidants and fiber. When you slice them in half, the surface area increases, allowing the glaze to cling better. A quick blanch in salted water for 1 minute before roasting can reduce the bitterness for some palates. The key is to keep the sprouts bright green and firm—over‑cooking turns them mushy and dull.
The Texture Crew
Olive oil is the medium that brings all the flavors together. It helps the maple syrup coat the sprouts evenly and prevents them from sticking to the pan. Use a light or extra‑virgin olive oil for the best aroma and a subtle fruitiness. If you prefer a neutral taste, you can swap olive oil for avocado oil without compromising the caramelization.
Salt and black pepper are the seasoning backbone. They enhance every component without overpowering the delicate maple glaze. A pinch of sea salt and freshly cracked pepper is all you need. If you’re watching sodium, you can reduce the salt by half and rely more on the maple’s natural sweetness.
The Unexpected Star
Pure maple syrup is the star that turns ordinary sprouts into a caramelized masterpiece. Its natural sugars create a glossy coating that caramelizes beautifully in the oven. Don’t use imitation maple or honey; the unique flavor profile of pure maple is essential for authenticity. If you can’t find maple syrup, try a 1:1 mix of honey and a splash of apple cider vinegar to mimic the acidity.
The maple syrup’s viscosity is crucial. If it’s too thin, the glaze will run off the sprouts; if it’s too thick, it won’t coat evenly. Warm the syrup slightly in a saucepan before adding it to the pan to achieve the ideal consistency. This simple step ensures a silky, clingy glaze.
The Final Flourish
Toasted pecans add a nutty crunch that elevates the dish’s texture profile. Toasting them until golden brown releases their oils and brings out a deep, buttery flavor. If you’re allergic to tree nuts, consider toasted almonds or walnuts as a safe alternative. The nuts should be chopped roughly to distribute evenly across the sprouts.
Unsalted butter adds richness and helps the glaze set into a glossy finish. Butter’s high fat content ensures a silky coating that doesn’t separate. If you’re vegan, use a plant‑based butter substitute, but keep in mind the flavor may be slightly different. The butter also adds a subtle, buttery aroma that complements the maple sweetness.
Apple cider vinegar provides a subtle tang that cuts the sweetness of the maple and balances the dish’s overall flavor profile. A tablespoon is enough to brighten the glaze without making it tart. If you don’t have vinegar, a splash of lemon juice will work as a substitute. This small addition can make a big difference in taste.
Everything's prepped? Good. Let's get into the real action...
The Method — Step by Step
- Start by washing the Brussels sprouts under cold water and patting them dry with a clean towel. Trim the stem ends and cut the sprouts in half to ensure even cooking. If you prefer a milder flavor, remove the outer leaves that may be wilted or discolored.
- Heat a large cast‑iron skillet or heavy‑bottomed pan over medium‑high heat. Add the olive oil and let it shimmer for a few seconds—just until it’s hot enough to sizzle when you drop a sprout in. This step is crucial for a good sear.
- Place the Brussels sprouts in the pan, cut side down, and let them sear for 3–4 minutes until they develop a deep golden crust. Use a spatula to flip them once so both sides get that caramelized touch. This quick sear locks in moisture and adds a delightful crunch.
- While the sprouts are searing, whisk together the maple syrup, apple cider vinegar, and unsalted butter in a small bowl until the butter is fully incorporated. This creates a smooth glaze that will coat the sprouts evenly.
- After flipping the sprouts, pour the maple glaze over them. Stir gently to coat each piece, then reduce the heat to medium-low and let the mixture simmer for 2 minutes. The glaze should thicken slightly and coat the sprouts like a glossy coating.
- Transfer the skillet to a preheated oven at 400°F (200°C) and roast for 10 minutes. This step finishes the caramelization and ensures the pecans are toasted to perfection. Keep an eye on the glaze; it should be thick and glossy.
- Remove the skillet from the oven and sprinkle the toasted pecans over the top. Toss everything gently to distribute the nuts evenly. The final touch is to let the dish rest for 2 minutes before serving, allowing the glaze to set into a silky finish.
- Serve hot, preferably with a side of roasted turkey or a creamy stuffing. The sweet‑savory profile of the glazed sprouts pairs wonderfully with any traditional Thanksgiving fare. If you’re feeling adventurous, drizzle a little extra maple syrup over the top for an extra burst of flavor.
That's it — you did it. But hold on, I've got a few more tricks that'll take this to another level. The next section will dive into insider tips that will make your sprouts even more unforgettable.
Insider Tricks for Flawless Results
The Temperature Rule Nobody Follows
Many people cook Brussels sprouts on a low heat, which leads to soggy results. The secret is to start high to achieve a quick sear, then finish at a moderate temperature. This two‑stage process locks in moisture and creates a crisp exterior. I’ve seen people skip the initial sear and end up with a mushy, bland dish. The difference is like comparing a crisp apple to a soggy one—one bite and you know the difference.
Why Your Nose Knows Best
Before you even taste the dish, the aroma will tell you if it’s on the right track. A sweet, caramelized scent signals the maple glaze is working. If the smell is overly sweet or burnt, it’s a sign that the glaze is overcooked. Trust your nose; it’s the most reliable guide when cooking.
The 5-Minute Rest That Changes Everything
After taking the skillet out of the oven, let the sprouts rest for five minutes. This resting period allows the glaze to thicken into a silky coating that clings to each sprout. It also lets the pecans settle, giving you a balanced bite every time. Skipping this step can result in a runny glaze that drips off.
The Right Pan Size Matters
Using a pan that’s too small forces the sprouts to crowd together, which leads to steaming instead of roasting. A wide pan ensures each sprout has space to crisp up. If you’re cooking for a large family, consider using two pans or a larger skillet to avoid overcrowding.
The Perfect Apple Cider Vinegar Balance
The vinegar’s acidity cuts the maple’s sweetness and brightens the overall flavor. If you add too much vinegar, the dish becomes tart and unbalanced. One tablespoon is enough to lift the flavors without overpowering. Adjust to taste if you prefer a slightly tangier profile.
The Final Glaze Check
Just before serving, give the glaze a quick stir. If it’s too thick, add a splash of water or a few drops of maple syrup to thin it slightly. This final adjustment ensures the glaze remains glossy and clingy without being sticky.
Creative Twists and Variations
This recipe is a playground. Here are some of my favorite ways to switch things up:
Spicy Maple Pecan Sprouts
Add a pinch of cayenne pepper or a dash of sriracha to the maple glaze for a fiery kick. The heat pairs surprisingly well with the sweetness, creating a complex flavor profile that excites the palate. Perfect for guests who like a little spice in their holiday dishes.
Cranberry‑Maple Pecan Fusion
Stir in a handful of dried cranberries during the last minute of oven roasting. The cranberries burst with tartness, balancing the maple’s sweetness and adding a pop of color. This variation is ideal for those who want a festive touch.
Cheesy Maple Pecan Delight
After roasting, sprinkle shredded sharp cheddar or crumbled feta over the hot sprouts. The cheese melts into the glaze, adding a creamy, savory layer that complements the nutty crunch. This twist turns the dish into a richer, comfort‑food favorite.
Herb‑Infused Maple Pecan Sprouts
Toss the sprouts with fresh rosemary or thyme before roasting. The herbs add an aromatic depth that elevates the dish from simple to gourmet. This version is especially good if you’re serving a herb‑rich turkey.
Vegan Maple Pecan Sprouts
Swap the butter for a plant‑based butter substitute and use coconut oil instead of olive oil. The result is a creamy, caramelized glaze that’s entirely plant‑based. This version keeps the same flavor profile while accommodating dietary preferences.
Maple Pecan Brussels Sprouts with Balsamic Glaze
Finish the dish with a drizzle of aged balsamic reduction. The balsamic’s subtle sweetness and acidity add a sophisticated note, turning the side dish into a statement piece. This twist is perfect for a more upscale Thanksgiving dinner.
Storing and Bringing It Back to Life
Fridge Storage
Cool the glazed sprouts to room temperature before transferring them to an airtight container. Store in the refrigerator for up to 3 days. The glaze will thicken slightly, but the sprouts remain crisp if you reheat them briefly.
Freezer Friendly
Place the cooled sprouts in a freezer‑safe bag or container, removing as much air as possible. They can be stored for up to 2 weeks. When you’re ready to serve, thaw overnight in the fridge and reheat in a skillet with a splash of water.
Best Reheating Method
Reheat the sprouts in a skillet over medium heat, adding a tablespoon of water to keep them moist. Stir frequently until the glaze is hot and glossy again. This technique prevents the sprouts from drying out and restores their original texture.