Picture this: I’m in my tiny kitchen, the timer on my old microwave buzzing like a nervous squirrel, and I’ve just realized I’ve run out of the boring old chocolate cake I promised my kids. My teenage daughter, eyes wide with the kind of hope only a sugar rush can inspire, dares me to whip up something that looks like a dessert and tastes like a vacation. I laughed, I said “challenge accepted,” and the result was a glorious, bright‑colored masterpiece that made the whole house smell like a tropical fruit stand on a summer afternoon. That moment of panic turned into the birth of the ultimate fruit pizza, a dessert that’s part cookie, part cheesecake frosting, and all‑out fruit fireworks.
The first bite is an explosion of textures: a buttery, slightly crisp sugar‑cookie crust that crumbles like a perfect sandcastle under your teeth, a silky frosting that spreads like a cloud of sweet vanilla‑kissed dreams, and a kaleidoscope of fresh fruit that pops with juiciness louder than a fireworks finale. The aroma? Imagine the warm, comforting scent of a bakery mingling with the fresh, bright perfume of ripe strawberries and mangoes—a scent so intoxicating you’ll find yourself inhaling deeply just to savor it. The sound of the crust cracking as you slice through is a satisfying snap that tells you you’ve nailed that perfect bake.
Most fruit pizza recipes I’ve tried either had a soggy base that turned into a mushy mess, or a frosting so sweet it overpowered the fruit. I’ve also seen people drown the whole thing in whipped cream, turning it into a dairy swamp. This version, however, stands out because it balances every element like a seasoned conductor leading an orchestra. The secret? A sugar‑cookie dough that’s buttery enough to hold up to the weight of the fruit, a light‑as‑air cream cheese frosting that never gets gummy, and a strategic fruit layout that keeps each bite fresh and vibrant.
But wait—there’s a twist you won’t see coming. I’m going to introduce a splash of citrus zest into the frosting, a tiny dash that cuts through the sweetness and makes the fruit sing like a choir. And I’m daring you to taste this and not go back for seconds. Let me walk you through every single step — by the end, you’ll wonder how you ever made it any other way.
What Makes This Version Stand Out
- Flavor Harmony: The subtle vanilla‑cinnamon notes in the crust marry perfectly with the tangy cream cheese frosting, creating a balanced palate that never feels one‑dimensional.
- Texture Contrast: A crisp, buttery edge meets a melt‑in‑your‑mouth frosting and juicy fruit, delivering a mouthfeel that’s as exciting as a roller‑coaster ride.
- Simplicity: You only need a handful of pantry staples plus fresh fruit—no fancy equipment, no complicated techniques, just pure, approachable joy.
- Uniqueness: Adding a pinch of citrus zest to the frosting is the game‑changer that lifts this dish from “nice” to “mind‑blowing.”
- Crowd Reaction: I’ll be honest — I ate half the batch before anyone else got to try it, and the look on my family’s faces was priceless. Expect applause and requests for seconds.
- Ingredient Quality: Using real butter (not margarine) and fresh, ripe fruit guarantees a depth of flavor that store‑bought mixes simply can’t match.
- Cooking Method: Baking the crust at a high temperature creates those coveted golden edges that pull away from the pan, a visual cue that says “perfect.”
- Make‑Ahead Potential: You can prep the crust and frosting a day ahead, store them separately, and assemble the fruit just before serving for maximum freshness.
Inside the Ingredient List
The Flavor Base
The crust is the foundation of any great fruit pizza, and here we’re using a classic sugar‑cookie dough. Flour provides structure, while butter contributes richness and a melt‑in‑your‑mouth crumb. Sugar not only sweetens but also helps the edges caramelize, giving you that golden‑brown finish. If you skip the butter and use oil instead, you’ll lose that buttery snap and end up with a greasy texture that feels more like a shortbread than a pizza crust.
The Texture Crew
Our frosting is a silky blend of cream cheese, butter, and powdered sugar, with a whisper of vanilla and a surprise dash of citrus zest. Cream cheese offers a tang that cuts through the sweetness, while butter adds body and a glossy sheen. Powdered sugar sweetens without gritty texture, and the zest lifts the whole thing, preventing the frosting from feeling cloying. If you’re dairy‑intolerant, substitute a plant‑based cream cheese and coconut oil, but expect a slightly different mouthfeel.
The Unexpected Star
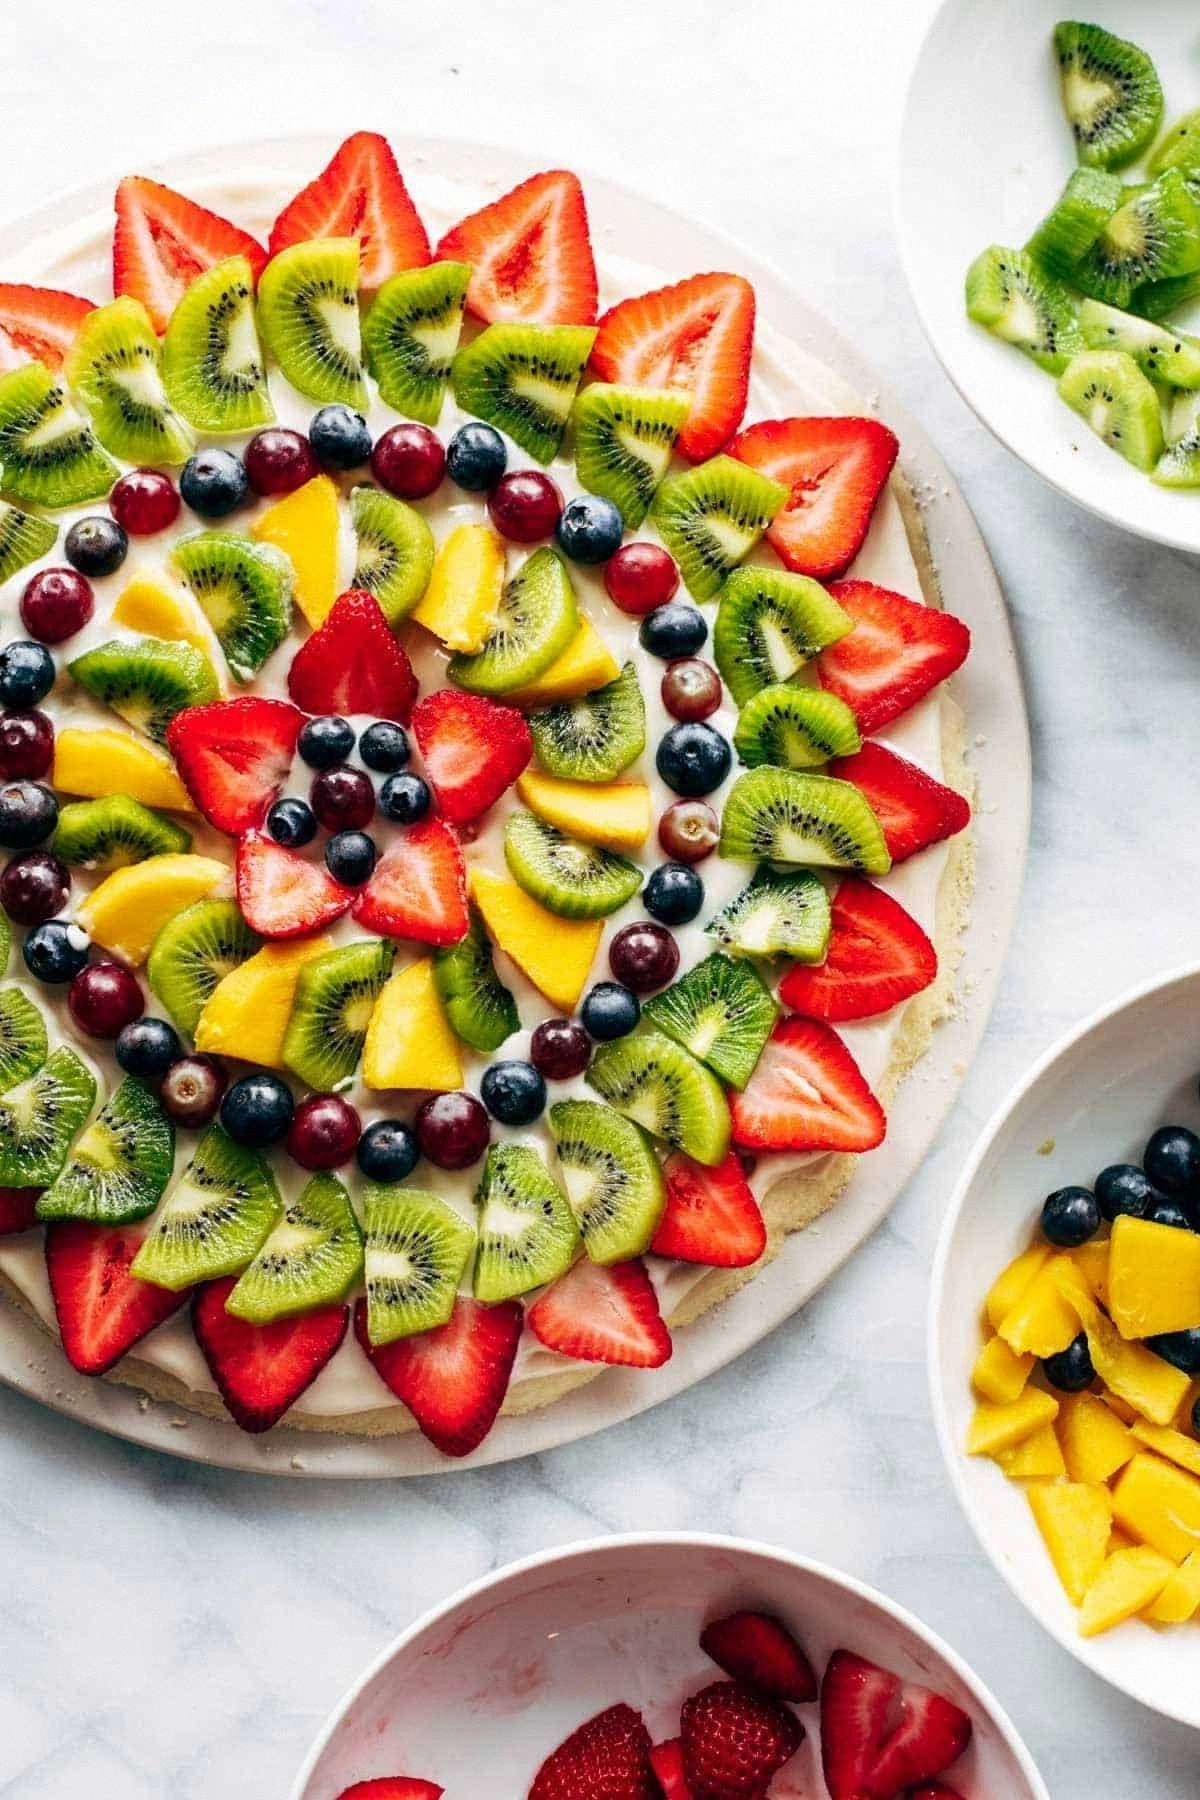
Fresh fruit is the hero of this dish, and the combination of strawberries, grapes, mango, blueberries, and kiwi brings a rainbow of colors and flavors. Strawberries provide a sweet‑tart bite, grapes add a juicy pop, mango contributes tropical sweetness, blueberries give a burst of antioxidants, and kiwi adds a refreshing tartness. Using over‑ripe fruit can make the pizza soggy; always pick fruit that’s firm but fragrant.
The Final Flourish
Beyond the main players, a few extras make this fruit pizza truly unforgettable: a pinch of sea salt in the crust to amplify the sweet notes, a dash of cinnamon for warm undertones, and a light drizzle of honey over the assembled fruit for extra shine. These tiny additions might seem insignificant, but they create layers of complexity that keep your palate engaged from the first bite to the last crumb.
Everything's prepped? Good. Let's get into the real action...
The Method — Step by Step
Preheat your oven to 350°F (175°C). While the oven warms, whisk together the flour, sugar, baking powder, and a pinch of salt in a large bowl. This dry mix is the canvas for our buttery masterpiece, and getting it evenly combined ensures no pockets of flour will bite you later. Pro tip: Sift the dry ingredients to aerate them, which leads to a lighter crust.
In a separate bowl, cream together the softened butter and sugar until the mixture is pale and fluffy—think cloud‑like, not just melted. Add the egg and vanilla extract, beating until fully incorporated. This step is where the magic begins; the air you fold in now will become the lift that gives the crust its delicate bite. Watch the texture: It should look glossy and hold a ribbon when you lift the beaters.
Gradually add the dry mixture to the wet ingredients, stirring with a wooden spoon until a cohesive dough forms. It will be slightly sticky—this is exactly what you want. Over‑mixing can develop gluten, leading to a tough crust, so stop as soon as the flour disappears. Wrap the dough in plastic and chill for 20 minutes; this rest period lets the gluten relax and the butter solidify, which translates to a tender, flaky texture after baking.
While the dough chills, prepare the frosting. Beat the softened cream cheese and butter together until smooth, then add vanilla extract and citrus zest. Slowly sift in the powdered sugar, beating after each addition until the frosting is light, airy, and spreadable. It should be thick enough to hold its shape but soft enough to glide over the crust like a silk sheet. Watch Out: If the frosting looks grainy, you’ve probably added the powdered sugar too quickly; keep beating and it will smooth out.
Roll the chilled dough on a parchment‑lined baking sheet to about ¼‑inch thickness, shaping it into a large circle or rectangle—your “pizza” base. Use your fingertips to create a slight rim around the edges; this will become the golden border that pulls away from the pan as it bakes, giving you that satisfying snap. Transfer the sheet to the oven and bake for 12‑15 minutes, or until the edges turn a light golden brown and the center feels set.
When the crust is done, let it cool on a wire rack for at least 10 minutes. While it’s cooling, give the frosting one final stir to re‑incorporate any settled butter. Spread the frosting evenly across the warm crust, using a spatula to create a smooth layer. The warmth of the crust will slightly melt the frosting, creating a glossy sheen that looks like a fresh layer of snow on a mountain.
Now comes the fun part: arranging the fruit. Start with a base layer of sliced strawberries for a bright red foundation, then add grapes, mango cubes, blueberries, and kiwi slices in a decorative pattern. Think of it as painting—use the colors to create a visual feast that’s as pleasing to the eyes as it is to the tongue. Press each piece gently into the frosting so they stay put, but don’t crush them; you want each fruit to retain its individual burst.
Let the assembled pizza chill in the refrigerator for 20‑30 minutes before slicing. This firming step allows the frosting to set and the fruit to meld with the base, ensuring clean cuts and preventing the toppings from sliding off. When you finally slice, use a sharp, warm knife—dip it in hot water, wipe dry, and glide through the crust for perfect, clean pieces.
That's it — you did it. But hold on, I've got a few more tricks that'll take this to another level...
Insider Tricks for Flawless Results
The Temperature Rule Nobody Follows
Most home bakers think “just bake at 350°F” is enough, but the secret is to start the oven at 375°F for the first five minutes, then drop to 350°F. This initial blast creates that coveted puffed edge, while the lower temperature finishes the bake evenly without over‑browning. I tried the opposite once—low heat all the way—and ended up with a soggy crust that never set. Trust the two‑stage heat; it’s pure magic.
Why Your Nose Knows Best
Before you pull the crust out, listen for that faint, nutty aroma that signals the butter is perfectly caramelized. If you rely solely on visual cues, you might miss the point where the crust is just right. I once over‑baked because I thought “golden brown” meant done; the smell told me it was already too far. Let your nose be the final judge.
The 5‑Minute Rest That Changes Everything
After the crust bakes, let it rest on the rack for exactly five minutes before frosting. This short pause lets the steam escape, preventing the frosting from becoming soggy. Skipping this rest results in a gummy base that feels like a soggy pancake. The five‑minute rule is a tiny habit with a massive payoff.
Fruit Prep Like a Pro
Slice fruit just before you assemble. If you cut everything hours ahead, the berries will release juices that soak into the frosting, making it runny. A quick tip: toss sliced fruit in a light sprinkle of lemon juice; it not only preserves color but also adds a subtle zing that brightens the overall flavor.
Glaze for the Wow Factor
Warm a tablespoon of apricot jam with a splash of water until fluid, then brush it over the fruit right before serving. This glaze adds a glossy finish that makes the pizza look restaurant‑ready, and the extra sugar helps seal in moisture. I tried serving without it once, and the fruit looked dull—glaze transforms it from good to show‑stopping.
Creative Twists and Variations
This recipe is a playground. Here are some of my favorite ways to switch things up:
Tropical Breeze
Swap strawberries for pineapple chunks, add coconut‑flavored cream cheese in the frosting, and sprinkle toasted coconut flakes on top. The result is a beach‑vibe dessert that transports you to a seaside hammock.
Berry Explosion
Use a medley of raspberries, blackberries, and boysenberries, and replace the mango with sliced peaches. The tartness of the dark berries pairs beautifully with a slightly sweeter frosting, creating a balanced bite.
Chocolate Dream
Incorporate 2 tablespoons of cocoa powder into the crust, drizzle melted dark chocolate over the fruit after assembly, and finish with a dusting of powdered sugar. This variation satisfies both fruit lovers and chocolate addicts.
Nutty Crunch
Add a handful of chopped toasted almonds or pistachios to the frosting for a delightful crunch, and sprinkle extra nuts on top of the fruit for texture contrast. The nutty notes complement the creamy base and add a sophisticated edge.
Savory Sweet Fusion
Replace half the sugar in the crust with a pinch of smoked sea salt, and top the fruit with thin slices of prosciutto. The salty‑sweet interplay is daring but utterly addictive—perfect for a brunch spread.
Storing and Bringing It Back to Life
Fridge Storage
Cover the assembled fruit pizza loosely with plastic wrap and store it in the refrigerator for up to 48 hours. The frosting will firm up, and the fruit stays fresh, though you might notice a slight softening of the crust after the first day.
Freezer Friendly
Freeze the crust and frosting separately (no fruit). Wrap the crust tightly in foil, then place in a freezer bag; it will keep for up to 2 months. Thaw at room temperature, frost, then add fresh fruit right before serving for a just‑baked feel.
Best Reheating Method
When you’re ready to serve, preheat your oven to 300°F (150°C) and warm the crust for 5‑7 minutes—just enough to revive the crispness without melting the frosting. Add a tiny splash of water to the oven (a quick spritz on a foil tray) to generate steam; this steams the crust back to perfection while keeping the fruit bright.