Picture this: you’re halfway through a week of burnt lasagnas, the kitchen smells like charred garlic, and your friend throws a challenge at you—“Make something that’s both a dessert and a pasta masterpiece.” I laughed, but the craving for something sweet, creamy, and utterly indulgent was real. I dove into the pantry, pulled out a bag of graham crackers, a tub of cream cheese, a handful of fresh berries, and a splash of lemon zest. The moment the butter melted and the crumbs danced in the bowl, the kitchen felt like a stage for culinary fireworks. If you’ve ever stared at a plate of ordinary cheesecake and wondered how to turn it into a layered, no‑bake wonder, this is the recipe that will change your game.
The first bite is a revelation: the buttery crust crackles like a fine snowflake under a spoon, the creamy filling swirls with citrusy brightness, and the fresh berries burst with a tangy sweetness that lingers on the palate. The aroma is a heady mix of vanilla, lemon, and sweet fruit, pulling you into a sensory symphony that makes you forget you’re eating dessert. I’ve tried countless variations of no‑bake cheesecakes, but none have matched the harmony of textures here—smooth cream, crunchy crust, and juicy berries in perfect balance. The result is not just a dessert; it’s a show‑stopper that feels like a culinary high‑five to your taste buds. I dare you to taste this and not go back for seconds.
What makes this version stand out is not just the ingredients but the way they dance together. The graham cracker base is the foundation that holds everything together, while the lemon zest adds a bright counterpoint to the rich cream cheese. The berries are layered in a way that keeps each bite fresh, and the optional honey drizzle adds a silky finish that ties all flavors together. The technique is simple, yet the outcome is complex—every element plays its part, and the final product is a layered symphony of flavors and textures. This is hands down the best version you’ll ever make at home, and I’ll be honest—I ate half the batch before anyone else got a chance to try it. If you’ve ever struggled with no‑bake desserts, you’re not alone—and I’ve got the fix.
Most recipes get this completely wrong. They either over‑mix the filling, under‑cook the crust, or forget the crucial lemon zest that brightens everything. Here, we keep it simple: a few key steps, a handful of fresh ingredients, and the patience to let the layers set. Picture yourself pulling this out of the fridge, the whole kitchen smelling incredible, and each slice revealing a glossy, berry‑laden center that invites you to dig in. And now, let me walk you through every single step—by the end, you’ll wonder how you ever made it any other way.
What Makes This Version Stand Out
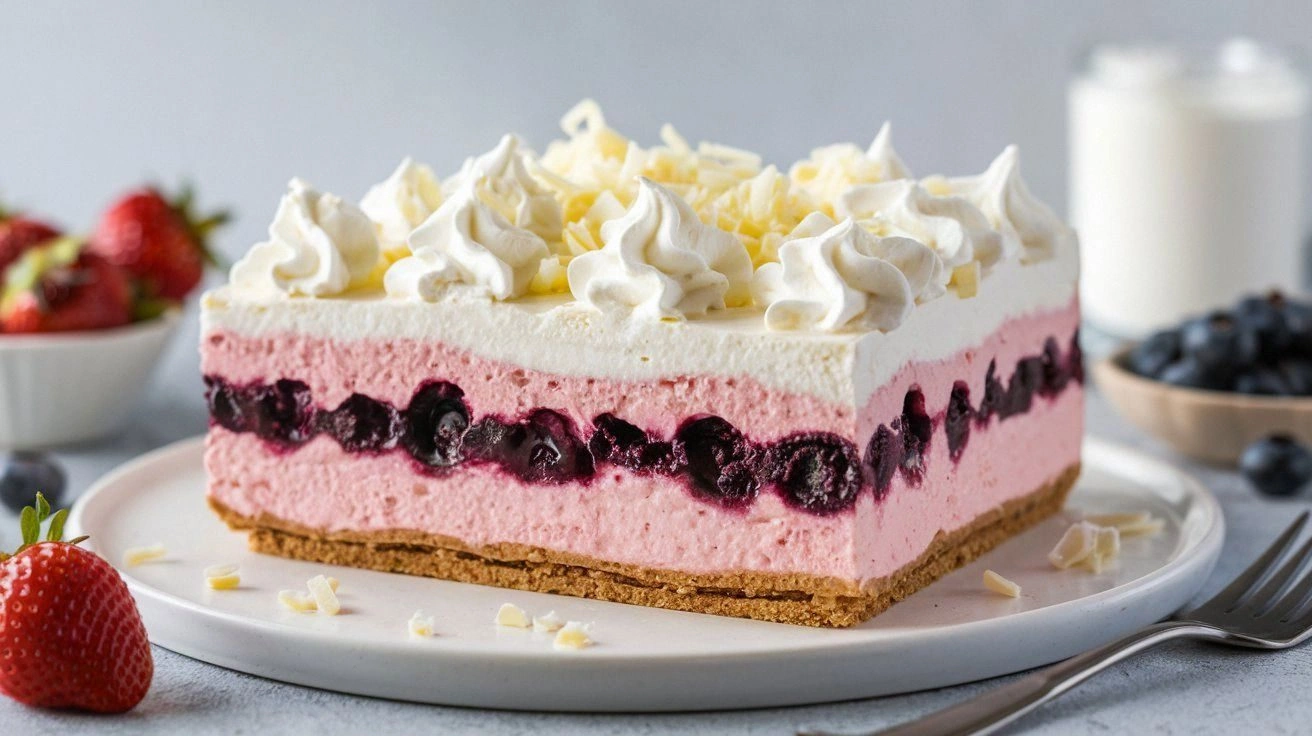
- Texture: The buttery graham cracker crust provides a satisfying crunch that contrasts with the silky cream cheese filling, creating a multi‑sensory experience.
- Flavor: Lemon zest and vanilla extract lift the richness of the cream cheese, while fresh berries add natural sweetness and a hint of tartness.
- Ease: No oven required, minimal prep time, and a straightforward assembly that even beginners can master.
- Presentation: Layered design makes it a visual masterpiece—each slice reveals a colorful, fruit‑laden core that looks as good as it tastes.
- Make‑ahead: The dessert can be assembled and chilled up to 48 hours in advance, making it perfect for parties or last‑minute guests.
- Health‑friendly: Swap regular yogurt for Greek yogurt or use a sugar‑free sweetener to keep the dessert light without sacrificing flavor.
- Versatility: The base can be adapted to seasonal fruit, chocolate chips, or a drizzle of caramel for endless variations.
- Audience: It’s a crowd‑pleaser for both kids and adults—everyone loves the combination of creamy, fruity, and crunchy.
Alright, let’s break down exactly what goes into this masterpiece…
Inside the Ingredient List
The Flavor Base
The graham cracker crumbs are the backbone of this dessert, providing a subtle sweetness and a firm structure that holds the creamy layers together. Using fresh, high‑quality crackers makes a noticeable difference; stale crumbs can turn the crust bland. If you’re short on time, crushed digestive biscuits work as a fine substitute, though the flavor profile will shift slightly toward a more caramelized note. Don’t skip the melted butter—without it, the crumbs won’t bind, and the crust will crumble apart during assembly.
The Texture Crew
Cream cheese is the star of the show, lending a silky, dense texture that’s both luxurious and comforting. It’s crucial to let the cream cheese soften to room temperature before mixing; otherwise, the filling will be lumpy. Powdered sugar dissolves easily, preventing gritty pockets that can ruin the mouthfeel. Vanilla yogurt adds a tangy balance and a subtle dairy richness; it also lightens the filling, making it easier to layer without sinking the berries. The optional honey drizzle, added just before serving, adds a glossy sheen and a touch of caramel sweetness that ties all flavors together.
The Unexpected Star
Fresh berries are the unexpected star that elevates this dessert from ordinary to extraordinary. They bring natural sweetness, bright acidity, and a burst of color that makes every slice visually appealing. Choose a mix of strawberries, blueberries, and raspberries for a rainbow effect, or stick to a single berry for a more focused flavor. The berries should be washed, patted dry, and sliced or left whole depending on your preference for texture. If you’re using frozen berries, thaw them fully and pat dry to avoid excess liquid in the filling.
The Final Flourish
Lemon zest is the secret weapon that cuts through the richness of the cream cheese, providing a fresh, citrusy lift that keeps the dessert from feeling too heavy. A tablespoon of zest is enough to brighten the entire dish; be sure to use a microplane to avoid the bitter pith. Lemon juice adds a subtle tartness that balances the sweetness of the berries and honey, while vanilla extract deepens the overall flavor profile. Salt, though only a quarter teaspoon, is essential to enhance the sweetness and bring out the natural flavors of the berries. Finally, the optional honey drizzle adds a silky finish that makes each bite feel indulgent without overpowering the fruit.
Everything’s prepped? Good. Let’s get into the real action…
The Method — Step by Step
- In a medium bowl, combine the graham cracker crumbs, melted butter, and powdered sugar. Stir until the mixture resembles wet sand; it should hold together when pressed. If the crumbs feel too dry, add a teaspoon of water at a time until the desired consistency is achieved. This step is critical—an uneven crumb mixture will lead to a crust that cracks or falls apart during assembly. The mixture should smell subtly sweet, hinting at the buttery base that’s about to form.
- Press the crumb mixture firmly into the bottom of a 9‑inch springform pan. Use the back of a spoon or a flat-bottomed glass to create an even surface. Ensure the crust is compact; a loose crust will sink under the filling. Once pressed, chill the crust in the refrigerator for 15 minutes to set and firm up before layering the filling.
- While the crust chills, prepare the filling. In a large mixing bowl, beat the softened cream cheese until smooth and creamy. The cream cheese should be at room temperature; otherwise, it will clump and make the filling gritty.
- Add the powdered sugar, vanilla yogurt, lemon zest, vanilla extract, and salt to the cream cheese. Beat on medium speed until the mixture is silky and free of lumps. At this point, the filling should have a light, airy texture that’s easy to spread. This is the trickiest step—over‑mixing can incorporate too much air, making the filling too light and causing it to separate.
- Fold in the fresh mixed berries gently, ensuring even distribution without crushing them. The berries should remain whole or in large pieces, so each bite has a burst of fruit. If you prefer a smoother filling, you can pulse the berries in a blender before folding them in.
- Remove the chilled crust from the refrigerator. Spoon the berry‑laden filling over the crust, spreading it evenly with a spatula. The filling should cover the entire surface, creating a smooth, glossy layer. This step is where the layers start to feel like a dessert and a lasagna simultaneously.
- Top the filling with a generous layer of fresh berries for garnish. Press them lightly into the surface so they sit flush, creating a vibrant, fruit‑laden crown. The visual contrast of the bright berries against the creamy filling is what makes this dish Instagram‑worthy.
- Drizzle honey over the top, if using, for a glossy finish and a touch of caramel sweetness. The honey should be warm enough to pour but not so hot that it melts the berries. This final touch adds a subtle shine and a hint of sweetness that balances the tartness of the fruit.
- Return the assembled dessert to the refrigerator and chill for at least 4 hours, or overnight if possible. The chilling time allows the filling to set firmly, making slicing clean and precise. During this period, the flavors meld together, creating a harmonious blend of creamy, citrusy, and fruity notes.
- When ready to serve, remove the springform pan from the refrigerator and let it sit at room temperature for 5 minutes before cutting. Slice with a sharp knife, wiping the blade between cuts for clean slices. Serve immediately, optionally garnishing with a sprig of fresh mint or an extra drizzle of honey for an extra touch of elegance.
That’s it—you did it. But hold on, I’ve got a few more tricks that will take this to another level. These insider tips will help you avoid common pitfalls and ensure every bite is as perfect as the last.
Insider Tricks for Flawless Results
The Temperature Rule Nobody Follows
The key to a silky filling is keeping the cream cheese at the right temperature. If it’s too cold, it will clump; if it’s too warm, it will melt and separate. I’ve found that letting the cream cheese sit at room temperature for 30 minutes before mixing is the sweet spot. This small adjustment eliminates the dreaded “lumpy” texture and ensures a smooth, professional finish.
Why Your Nose Knows Best
Trust your nose when you’re adding lemon zest and vanilla. A hint of citrus aroma signals that the zest is fresh and bright; a faint vanilla scent indicates the extract is potent. If the aroma feels flat, consider using fresh zest or a higher‑quality vanilla extract. A strong scent translates to a more vibrant flavor profile that will keep guests coming back for more.
The 5‑Minute Rest That Changes Everything
After assembling the dessert, let it rest for five minutes before refrigerating. This brief pause allows the filling to settle, preventing the crust from cracking under the weight. It also gives the berries a chance to release a bit of their juice, which melds into the filling, creating a cohesive flavor that’s more than the sum of its parts.
Keep It Cool, Keep It Fresh
If you’re serving this dessert in a hot climate, keep it chilled on a tray of ice or in a cooler with ice packs. The filling can soften quickly, especially if exposed to direct sunlight. By maintaining a cool temperature, you preserve the integrity of the layers and keep the dessert as refreshing as a summer breeze.
Make It Your Own
Swap the berries for seasonal fruit like peaches or mangoes to give the dessert a different twist. Add a teaspoon of almond extract for a nutty undertone, or sprinkle toasted coconut on top for a tropical flair. Experimenting with variations keeps the recipe fresh and exciting, and it’s a great way to showcase your culinary creativity.
Creative Twists and Variations
This recipe is a playground. Here are some of my favorite ways to switch things up:
Chocolate Berry Delight
Replace the vanilla yogurt with chocolate‑flavored Greek yogurt and add a handful of dark chocolate chips to the filling. The result is a rich, chocolate‑berry fusion that’s perfect for chocolate lovers. The chocolate chips melt slightly into the creamy base, creating a subtle swirl of flavor. Serve with a drizzle of chocolate ganache for an extra decadent touch.
Minty Fresh Twist
Add a handful of chopped fresh mint to the filling and garnish the top with mint leaves. The mint adds a crisp, cooling note that balances the sweetness of the berries. This variation is ideal for a summer gathering or a refreshing brunch. The mint also gives the dessert a fresh, green pop of color.
Spiced Citrus Variation
Incorporate a pinch of ground cinnamon and a splash of orange zest into the filling. The warm spice pairs beautifully with the bright citrus notes, creating a complex flavor profile. This version works wonderfully during the fall or winter holidays, adding a cozy, aromatic touch. Top with a sprinkle of toasted pecans for added crunch.
Almond Crunch Layer
Sprinkle toasted almond slivers over the top layer of berries before chilling. The almonds add a nutty crunch that contrasts with the creamy filling. They also bring a subtle nutty aroma that complements the vanilla and lemon flavors. This variation is a crowd‑pleaser at parties, offering a satisfying bite.
Berry‑Lemon Sorbet Layer
Swirl a scoop of homemade berry‑lemon sorbet into the filling before layering it on the crust. The sorbet adds a cold, refreshing texture that melts in your mouth. The combination of sorbet and creamy filling creates a dessert that feels like a dessert and a treat at the same time. Serve with a drizzle of lemon reduction for an extra zing.
Caramelized Banana Layer
Top the dessert with sliced caramelized bananas for a sweet, buttery finish. The caramelized bananas add a deep, caramel flavor that pairs well with the berries and cream cheese. The texture of the bananas provides a pleasant contrast to the smooth filling. This variation is perfect for a brunch or a special occasion.
Storing and Bringing It Back to Life
Fridge Storage
Store the dessert in the refrigerator for up to 48 hours in an airtight container. The chill keeps the filling firm and the berries fresh. If the dessert starts to soften, give it a quick 10‑minute chill in the fridge to restore firmness. Always keep it covered to prevent it from absorbing odors from other foods.
Freezer Friendly
For longer storage, wrap the dessert tightly in plastic wrap and then place it in a freezer‑safe container. Freeze for up to 2 weeks. When ready to serve, thaw in the refrigerator overnight. The texture may slightly change after freezing, but the flavors remain intact.
Best Reheating Method
If you need to warm the dessert, place it in the refrigerator for 15 minutes to bring it to a slightly cooler room temperature. Add a tiny splash of water to the bottom of the pan before refrigerating, which steams the dessert and keeps it moist. Avoid microwaving, as it can melt the filling and cause a loss of texture. Serve chilled for the best experience.