I still remember the Great Chicken Tender Catastrophe of 2019 like it happened yesterday. There I was, standing in my tiny apartment kitchen, flour in my hair, oil splattering across the stove like a Jackson Pollock painting, and a pile of sad, soggy chicken strips mocking me from the plate. My friends were due to arrive for game night in twenty minutes, and I had promised them the crispiest, most addictive chicken tenders they'd ever taste. Instead, I had created what could only be described as breaded rubber bands floating in a grease swamp. The smell lingered for days, and my ego took an even bigger hit than my security deposit when I had to repaint the oil-splattered wall behind the stove.
Fast forward through three months of obsessive testing, seventeen different breadcrumb varieties, and one minor oven fire (don't ask), and I finally cracked the code to what I honestly believe are the most ridiculously crispy, flavor-bomb chicken tenders to ever come out of a home oven. These beauties are coated in a magical mixture of Parmesan cheese and lemon zest that creates these insane little lacy edges that shatter like caramelized sugar when you bite into them. The secret isn't just in the coating though — it's in a technique I discovered by complete accident when I forgot about a batch I'd left drying on a rack, and ended up creating the most ridiculously crunchy exterior I've ever achieved without a deep fryer.
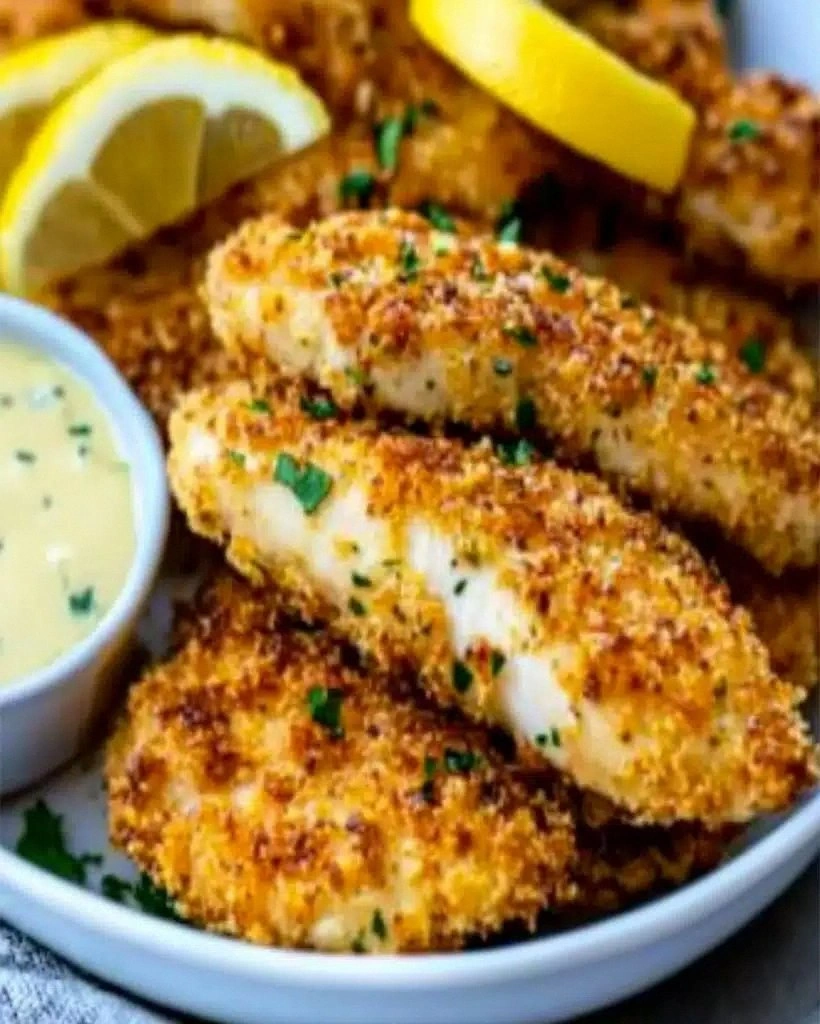
Picture this: it's a random Tuesday night, you're in your pajamas, and you pull a sheet pan of these golden sticks of joy from your oven. The kitchen fills with this intoxicating aroma of butter, cheese, and citrus that makes your neighbors wonder if Ina Garten moved in next door. You bite through that first tender and experience what can only be described as a textural symphony — the crunch echoes through your skull like stepping on fresh snow, giving way to impossibly juicy chicken that practically sighs when you cut into it. That bright pop of lemon cuts through the richness of the Parmesan, creating this perfect balance that keeps you reaching for "just one more" until suddenly you're staring at an empty pan wondering where the last hour went.
What makes this version different from the thousands of other chicken tender recipes floating around the internet? I'm glad you asked. Most recipes get the coating completely wrong — they either go too heavy on the breadcrumbs (resulting in that dreaded cardboard texture) or they skip the crucial drying step that makes the difference between sad and soggy versus shatteringly crisp. Plus, I've added a few unconventional ingredients that might make Italian grandmothers clutch their pearls, but will make your taste buds throw a party. Trust me on this one — the combination of Parmesan, lemon, and a secret ingredient I'll reveal soon creates something magical that has converted even the pickiest eaters in my life. Let me walk you through every single step — by the end, you'll wonder how you ever made it any other way.
What Makes This Version Stand Out
Before we dive into the nitty-gritty details, let me hit you with the highlights that make these tenders absolutely legendary in my circle of friends and family. These aren't just empty boasts — each of these points comes from months of side-by-side testing against other popular recipes, and the results weren't even close.
- Shatter-Crisp Coating: Thanks to a double-dredge technique and a crucial air-drying step, these tenders develop a crust so crispy it actually makes audible crunching sounds when you bite into it. I'm not exaggerating — I've had dinner guests pause mid-conversation just to comment on the crunch factor.
- Flavor Explosion: The combination of fresh lemon zest, aged Parmesan, and a hint of garlic creates this addictive flavor profile that hits all the right notes — bright, savory, and just a little bit funky from the cheese. It's like your favorite Italian restaurant and your childhood comfort food had a beautiful baby.
- Oven Magic: No deep frying required! These get just as crispy in the oven thanks to a high-heat method and a clever use of butter that basically creates mini convection currents around each tender. Your house won't smell like a fast food joint for days, and you can actually feel good about eating these regularly.
- Foolproof Method: I've tested this recipe on my most cooking-challenged friends (love you, Sarah), and even they produced restaurant-quality results. The steps are designed to be forgiving — there's a built-in safety net at every stage that prevents the common disasters that plague most chicken tender attempts.
- Meal Prep Champion: These tenders reheat like a dream, staying crispy even after a night in the fridge. I make double batches on Sunday and use them throughout the week in salads, wraps, and just for straight-up snacking. They're the gift that keeps on giving.
- Kid-Approved, Adult-Adored: I've served these to everyone from picky toddlers to food snobs, and the response is universally enthusiastic. One friend confessed she hid the leftovers from her husband so she could have them for lunch the next day. I don't condone marital deception, but I understand the impulse.
- Ingredient Flexibility: While I give you the optimal ingredients, this recipe is surprisingly forgiving. No Parmesan? Use Romano. Out of lemons? Lime works great. Gluten-free? I've got you covered with a simple swap that actually improves the texture.
- One-Pan Wonder: Everything happens on a single sheet pan, making cleanup a breeze. The butter and cheese create these incredible crispy bits on the pan that you'll be fighting over — they're like chicken tender cracklings, and they're absolutely addictive.
Alright, let's break down exactly what goes into this masterpiece...
Inside the Ingredient List
Great cooking starts with understanding your ingredients — not just what they are, but why they matter and how they work together to create something greater than the sum of their parts. I've broken this down into four key groups because once you understand the role each player has in this delicious drama, you'll be able to improvise like a jazz musician and still hit all the right notes.
The Flavor Foundation
The chicken itself is obviously the star here, but not all chicken is created equal. I've tested this with everything from fancy organic free-range breasts to whatever was on sale at the discount grocery store, and while the expensive stuff does taste slightly better, the real game-changer is how you prep it. Cutting your own tenders from whole chicken breasts gives you control over the thickness, which is crucial for even cooking. Those pre-cut "tenderloins" from the store are often irregularly shaped and cook unevenly, leaving you with dry edges and undercooked centers. Plus, cutting your own saves you about 40% on cost, which means more money for quality Parmesan.
The Parmesan cheese isn't just there for flavor — it acts like tiny little flavor bombs that melt and create these lacy, crispy edges that will make you weak in the knees. Please, I'm begging you, buy a wedge and grate it yourself. The pre-grated stuff in the green can has cellulose added to prevent clumping, which also prevents it from melting properly. Freshly grated Parmesan melts into the coating, creating these incredible pockets of umami-rich crispiness that will have you picking at the pan long after you're full.
Lemon zest might seem like a background player, but it's the secret weapon that makes these tenders so addictive. The oils in the zest contain all these bright, floral compounds that wake up your palate and make the chicken taste more... chicken-y. It's like turning up the contrast on a photo — everything becomes more vivid and defined. I use a Microplane to get the finest zest possible, which distributes more evenly and prevents any bitter pith from sneaking in.
The Texture Crew
Panko breadcrumbs are non-negotiable here — their jagged, irregular shape creates more surface area for crisping, and they don't absorb as much oil as regular breadcrumbs. I've tried every brand under the sun, and the Japanese imports really are worth the extra dollar. They stay crisper longer and have this delightful lightness that doesn't sit like a brick in your stomach. If you can only find regular breadcrumbs, pulse them briefly in a food processor to break them down into smaller, more irregular pieces.
The flour mixture is where most recipes go wrong — they use too much and create a gummy layer between the chicken and the crispy coating. I've found that a light dusting is all you need, and adding a bit of cornstarch to the mix creates an extra-crispy barrier that stays crunchy even after cooling. The cornstarch molecules are shaped differently than flour molecules, and when they hit hot fat, they create this incredible shatter that's unlike anything else.
Butter might seem like an odd choice for oven-baked tenders, but hear me out. When you dot the pan with butter, it melts and creates these little pockets of fat that essentially shallow-fry the bottom of each tender. The milk solids in the butter also contribute to browning through the Maillard reaction, giving you that deep golden color and nutty flavor that makes these look and taste like they came from a professional kitchen.
The Unexpected Star
Here's where things get weird — mayonnaise. I know, I know, it sounds gross, but stay with me here. Brushing the tenders with a thin layer of mayo before coating creates an emulsion that helps the breadcrumbs adhere better than eggs or buttermilk. Plus, the oil and egg in the mayo contribute to browning and create this incredibly juicy interior that will make you question everything you thought you knew about chicken tenders. I've served these to mayo-haters who had no idea they were eating it, then converted them to the church of mayo once they found out.
Garlic powder might seem basic, but it's the backbone that ties all the other flavors together. Fresh garlic would burn and turn bitter, but garlic powder disperses evenly and creates this savory base note that makes everything else taste more intense. I use a specific brand that I discovered by accident when my usual was out of stock — it has a more complex flavor that includes some toasted notes. Is this level of garlic powder obsession normal? Probably not, but the results speak for themselves.
The Final Flourish
Fresh herbs are your friend here, but timing is everything. I add dried oregano to the coating mixture because it can stand up to the high heat, but save fresh parsley for garnish. The contrast between the cooked and fresh herbs creates this layered flavor experience that keeps each bite interesting. Plus, the green specks make it look like you really know what you're doing, even if you're just following a recipe from the internet.
Sea salt isn't just for finishing — I use it at three different stages to build flavor throughout. Salting the chicken directly draws out moisture and seasons it from the inside out. Then a light sprinkle on top right before serving awakens all the other flavors and gives you these delightful little salty bursts that make you reach for another tender before you've even finished chewing the first one.
Everything's prepped? Good. Let's get into the real action...
The Method — Step by Step
Here's where the magic happens, and I'm going to walk you through every single detail because I've learned that what seems obvious to me after making these hundreds of times can be the difference between success and another kitchen disaster for someone else. Don't just skim this part — every step has been tested and refined to solve a specific problem that plagues home cooks.
- Start by preheating your oven to 425°F (220°C), and don't you dare skip the preheating step. I know you're hungry and impatient, but putting food into a cold oven is like trying to start a race with your shoes untied — everything falls apart before you even get started. While the oven heats, place your rack in the upper-middle position. This ensures the tenders get that intense heat from above that creates the blistered, crispy tops while the butter on the pan does its magic underneath. The oven needs a good 20-30 minutes to come to temperature and stabilize, so use this time to prep everything else.
- Cut your chicken breasts into tender-sized strips, about 3/4-inch thick and 4-5 inches long. Here's the key — they should all be roughly the same size so they cook evenly. I like to cut on the bias, which gives you more surface area for crispy coating and makes them look professionally done. Don't stress about perfection here; rustic is fine, but try to keep them consistent. If you end up with some weird little pieces, save them for chicken salad or stir-fry. And please, for the love of all that is crispy, pat them completely dry with paper towels. Any moisture on the surface will create steam, and steam is the enemy of crispiness.
- Set up your breading station like you're preparing for surgery — everything in its place, within easy reach. You'll need three shallow dishes: one with flour mixed with cornstarch, salt, pepper, and garlic powder; one with mayonnaise thinned with a splash of water; and one with panko mixed with Parmesan, lemon zest, and dried oregano. The order matters here — flour first, then mayo, then breadcrumbs. Think of it as chicken kindergarten: you line up, you get your coat, you get your sticky stuff, you get your crunchy stuff. I learned this organization the hard way after making a breadcrumb trail across my kitchen that my cat still hasn't forgiven me for.
- Now comes the fun part — breading the tenders. Take each piece of chicken and dredge it lightly in the flour mixture, tapping off the excess. You want a thin, even coating, not a thick pasty layer. Then brush it with a thin layer of the mayo mixture. I use a pastry brush and try to get just enough to make it sticky — too much and your breadcrumbs will slide off like a bad toupee. Finally, press it into the breadcrumb mixture, making sure every nook and cranny gets coated. Really press it in there; you want those breadcrumbs to adhere like they're holding on for dear life. Place each finished tender on a wire rack set over a baking sheet. This air circulation is crucial for getting crispy all around.
- Here's where most recipes rush and ruin everything — you need to let the breaded tenders rest for at least 15 minutes, preferably 30 if you can stand the wait. This is when the coating sets up and adheres properly to the chicken. Skip this step and your coating will slide off in sheets like sunburned skin. I've started using this time to clean up the kitchen and prep any dipping sauces, which makes me feel like a real adult who has their life together. The coating will actually look slightly darker and drier when it's ready — that's the flour and mayo doing their bonding thing.
- While the tenders are resting, prepare your pan. I use a rimmed baking sheet lined with parchment for easy cleanup, but the real secret is those little dots of butter I mentioned earlier. Space them evenly across the pan — about one small pat for every two tenders. When the pan goes in the oven, the butter melts and essentially creates these little shallow-fry zones that crisp up the bottom of each tender while the top gets golden from the direct heat. It's like having two cooking methods working simultaneously, which is why these get so ridiculously crispy without any actual frying.
- Place the tenders on the pan, making sure they don't touch — overcrowding leads to steaming, and steaming leads to sadness. You want space between each one so the hot air can circulate freely. If you've done the math and realize all your tenders won't fit without touching, use two pans rather than cramming them together. Trust me on this one — I once tried to fit everything on one pan because I didn't want to wash two, and I ended up with a pan of chicken that tasted like disappointment and broken dreams.
- Slide the pan into your preheated oven and set a timer for exactly 12 minutes. No peeking! Every time you open that door, you're letting out heat and disrupting the carefully balanced environment that makes these so crispy. After 12 minutes, flip each tender carefully with tongs. The bottoms should be golden brown and crispy, and you should see little butter bubbles around the edges. If any are sticking, let them cook another minute — they'll release when they're ready. Flip them all and return to the oven for another 8-10 minutes, depending on their thickness.
- The moment of truth comes when you pull them out and see that deep golden color, hear that satisfying crunch when you tap them with tongs, and smell that incredible aroma of butter, cheese, and chicken that makes your stomach growl like an angry bear. Let them rest for exactly 5 minutes — this allows the juices to redistribute and prevents you from burning your mouth in a fit of impatience. I've watched too many people (okay, me) burn their tongues because they couldn't wait five lousy minutes for perfection.
That's it — you did it. But hold on, I've got a few more tricks that'll take this to another level...
Insider Tricks for Flawless Results
After making these tenders literally hundreds of times, I've discovered some nuances that separate the good from the absolutely transcendent. These aren't just nice-to-know tips — they're the difference between chicken tenders that impress and ones that make people stop mid-chew to ask what your secret is.
The Temperature Rule Nobody Follows
Here's something that will change your cooking life: use a meat thermometer, and not just for the final temperature check. I check the internal temperature of my chicken at the 15-minute mark, even though I know it's nowhere near done. Why? Because it trains me to understand how quickly chicken cooks and prevents the panic that leads to overcooking. The sweet spot is 165°F, but I pull mine at 160°F because they continue cooking from residual heat. This tiny difference keeps them from drying out, and once you nail this timing, you'll never have dry chicken again. I actually have a little chart taped inside my spice cabinet with times for different thicknesses — it's dorky, but it works.
Why Your Nose Knows Best
Your sense of smell is actually a more reliable indicator than most timing guidelines. When the tenders are about 3 minutes from done, you'll start to smell this incredible aroma that's equal parts roasted chicken, toasted cheese, and something almost nutty. That's your cue to start checking them. This smell happens right before they hit peak crispiness, and it's saved me from overcooking more times than I can count. My neighbor once knocked on my door asking what smelled so good — that's how powerful this aroma is. Learn to trust your nose, and you'll become a more intuitive cook overnight.
The 5-Minute Rest That Changes Everything
I cannot stress this enough — those 5 minutes of resting time aren't optional. During this rest, the juices redistribute throughout the meat, the coating sets up and becomes even crispier, and the temperature equalizes so you don't burn your mouth. But here's the pro tip: place them on a fresh wire rack for resting, not the one from the baking sheet. The hot rack from the oven will continue cooking the bottoms, potentially making them overcooked on the bottom. This tiny detail is what separates restaurant-quality results from "pretty good for homemade."
The Mayo Modification Method
If you're still grossed out by the mayo brush, try this: mix the mayo with different flavorings to create custom variations. A teaspoon of sriracha gives you a subtle heat that builds as you eat. A squeeze of lemon juice thins it out and adds brightness. My favorite is mixing in some Everything Bagel seasoning — it creates these incredible flavor pockets in the coating that will make you famous at potlucks. Just remember to keep the mayo layer thin — you're using it as glue and flavor enhancer, not as a sauce.
The Double-Batch Strategy
Always, always make a double batch. Not only do these reheat beautifully, but the cooked tenders freeze exceptionally well. I lay them in a single layer on a baking sheet, freeze until solid, then transfer to a freezer bag. When you want to reheat them, don't microwave — that's how you get soggy sadness. Instead, pop them in a 400°F oven for 8-10 minutes straight from frozen. They come out almost as crispy as fresh, making them perfect for emergency dinner situations or when you need to bribe your kids to clean their rooms.
Creative Twists and Variations
This recipe is a playground. Here are some of my favorite ways to switch things up:
Buffalo Ranch Explosion
Replace half the mayo with buffalo sauce and add ranch seasoning to the breadcrumb mixture. The result is these incredible tenders that taste like your favorite sports bar appetizer but way better. Serve with celery sticks and blue cheese dressing for the full experience. I brought these to a Super Bowl party once and accidentally started a minor riot when they ran out.
Mediterranean Magic
Swap the Parmesan for feta, add oregano and lemon zest to the breadcrumb mixture, and brush the tenders with olive oil instead of butter. The feta doesn't melt the same way, but it creates these incredible crispy cheese bits that taste like you're eating chicken in a Greek taverna. Serve with tzatziki and a Greek salad for a complete meal that transports you straight to the islands.
Everything Bagel Bonanza
Add Everything Bagel seasoning to both the flour mixture and the breadcrumb coating. The sesame seeds toast up and add incredible nuttiness, while the garlic and onion bits create these little flavor explosions. These are absolutely incredible for breakfast — serve them with cream cheese for dipping and you'll understand why weekend brunch was invented.
Korean-Inspired Kick
Mix gochujang into the mayo for a Korean twist that brings heat, sweetness, and incredible umami depth. Add some sesame seeds to the breadcrumb mixture and serve with a soy-ginger dipping sauce. These have this incredible crimson color that makes them look as dramatic as they taste. My Korean neighbor tried these and declared them "not authentic but absolutely delicious," which is high praise indeed.
Herb Garden Fresh
Add whatever fresh herbs you have growing to the breadcrumb mixture — parsley, thyme, rosemary, oregano all work beautifully. The fresh herbs create these green flecks that make the tenders look garden-fresh and taste incredibly vibrant. These are perfect for summer when your herb garden is going crazy and you need new ways to use up all that parsley.
Cajun Carnival
Add Cajun seasoning to every layer — the flour, the mayo, and the breadcrumbs. The key is using a good quality blend that has a balance of heat and herbs. Serve with remoulade sauce and you'll swear you're in New Orleans. Just be careful with the salt — Cajun seasoning often contains salt, so adjust accordingly to avoid over-seasoning.
Storing and Bringing It Back to Life
Fridge Storage
Let the tenders cool completely before storing — hot chicken in a container creates condensation, which is the enemy of crispiness. Store them in an airtight container with a paper towel on the bottom to absorb any excess moisture. They'll keep for up to 4 days in the fridge, though they're best within the first 48 hours. I like to separate layers with parchment paper to prevent them from sticking together and getting soggy spots.
Freezer Friendly
These freeze beautifully if you do it right. Let them cool completely, then arrange in a single layer on a baking sheet lined with parchment paper. Freeze until solid (about 2 hours), then transfer to a freezer bag with as much air removed as possible. They'll keep for up to 3 months, though honestly, they've never lasted more than 2 weeks in my house. The key is freezing them individually first so they don't stick together in one big chicken ice block.
Best Reheating Method
The oven is your friend here — 400°F for 8-10 minutes if thawed, 10-12 minutes if frozen. Add a tiny splash of water to the pan before reheating — it creates steam that rehydrates the chicken without making the coating soggy. The steam dissipates quickly in the hot oven, leaving you with crispy outsides and juicy insides. Avoid the microwave at all costs unless you enjoy eating chicken-flavored rubber. If you're in a hurry, an air fryer works great too — 3-4 minutes at 375°F does the trick perfectly.