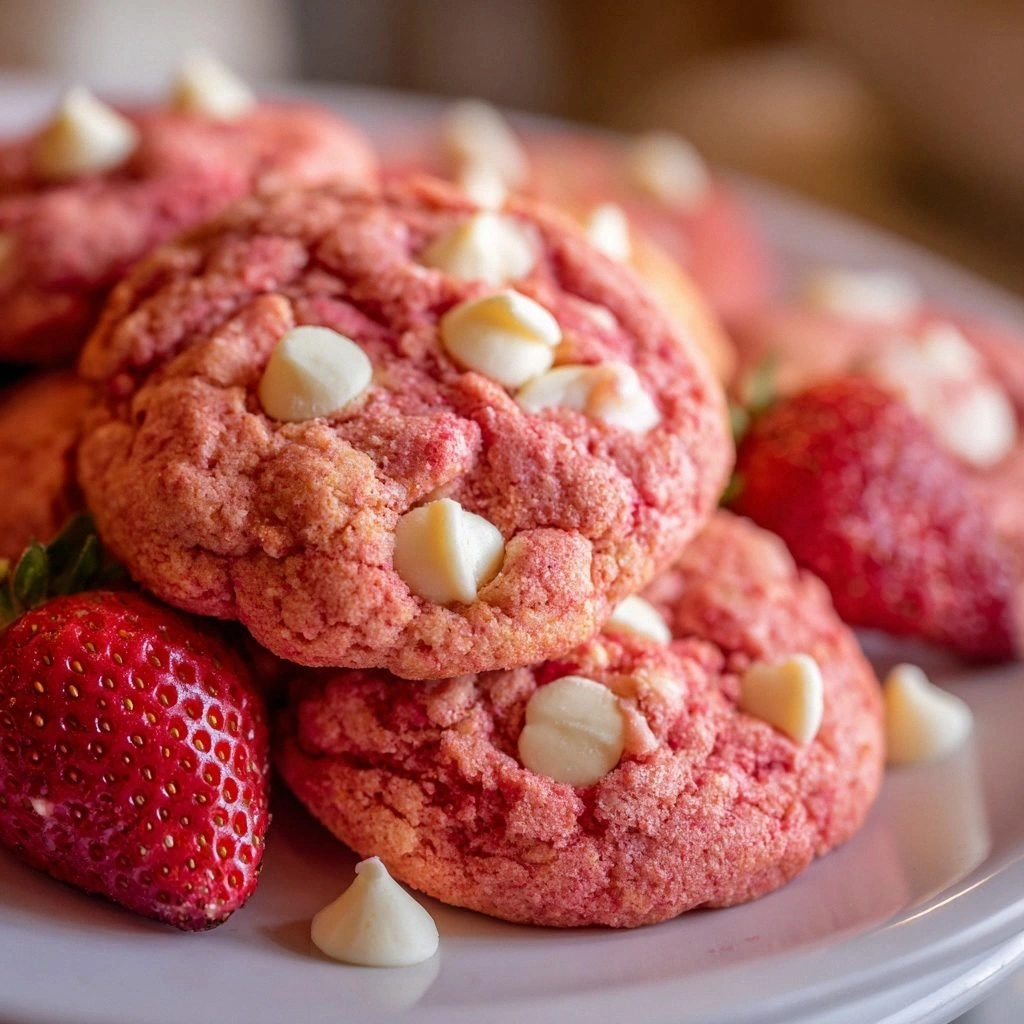
Picture this: I’m standing in a cramped kitchen, a bag of strawberry cake mix on the counter, and a sudden, desperate craving for something sweet that feels like a hug from the inside. I had just finished a marathon of burnt pancakes and a soggy lasagna, and the only thing that could salvage the day was a batch of cookies that would make my taste buds do a happy dance. I opened the box, the scent of fresh strawberries and vanilla drifted out, and I thought, “Why not turn this into a cookie?” The idea was simple: take that familiar cake mix, add some butter, an egg, and a generous splash of white chocolate, and bake until golden perfection. I dared myself to make them, and the result was a cookie that melted in your mouth like a strawberry smoothie on a sunny afternoon.
The first bite was a revelation. The cookie’s exterior was crisp enough to crack like brittle sugar, while the center remained soft and chewy, speckled with bright white chocolate chips that released a mellow, creamy sweetness. The strawberry flavor was unmistakable, yet not overpowering—just enough to transport you to a summer orchard. I could taste the buttery richness, the subtle tang of the cake mix’s leavening, and the delicate crunch of the chocolate. The aroma alone, a warm, buttery strawberry scent, was enough to make anyone’s stomach growl. The texture was a masterclass in cookie balance: crisp edges, chewy middle, and a hint of fruitiness that lingered on the palate.
What makes this version stand out from every other cookie recipe you’ll find online is the way it harnesses the cake mix’s inherent sweetness and transforms it into a chewy, buttery cookie that feels like a dessert and a snack in one bite. I’ve experimented with countless cookie variations, but this one consistently wins because it uses the cake mix as a flavor anchor rather than a filler. The white chocolate chips add a creamy contrast that complements the strawberry without masking it. The dough’s consistency is forgiving; it’s easy to work with, and the cookies rise just enough to develop that coveted golden edge. Most importantly, the recipe is quick, requires no fancy equipment, and delivers a crowd-pleasing result that will have people asking for the recipe after every bite.
There’s a secret technique I’ll reveal later in the post that will elevate these cookies from good to unforgettable. I’ll show you how to achieve the perfect buttery crunch without sacrificing the chewy center, and trust me, it’s a game-changer. By the end of this guide, you’ll wonder how you ever made cookies any other way. Let me walk you through every single step — by the end, you’ll wonder how you ever made it any other way.
What Makes This Version Stand Out
- Flavor: The strawberry cake mix provides a natural, fruit-forward sweetness that eliminates the need for added sugar, keeping the cookie light yet flavorful. The white chocolate chips add a creamy, slightly sweet contrast that enhances the strawberry notes.
- Texture: The combination of softened butter and the cake mix’s flour creates a dough that yields crisp edges and a chewy center, delivering a satisfying bite every time.
- Simplicity: Only five core ingredients are required, all pantry staples. No special equipment or advanced techniques—just mix, scoop, bake.
- Versatility: The recipe can be easily adapted for vegan, gluten-free, or nut-free versions with simple ingredient swaps.
- Make-Ahead Friendly: The dough holds up well for up to 48 hours in the refrigerator, and the cookies can be frozen for later enjoyment.
- Presentation: Dusting with powdered sugar adds a delicate snowy finish that looks as good as it tastes, making it a showstopper for parties.
- Time Efficiency: Total prep and cook time is under 45 minutes, making it ideal for a quick dessert or a last-minute treat.
Alright, let's break down exactly what goes into this masterpiece…
Inside the Ingredient List
The Flavor Base
Strawberry Cake Mix is the heart of these cookies. It’s not just a flavor enhancer; it provides the structure and leavening that keep the dough from collapsing. The mix’s natural sugar content means you can skip adding extra sweetener, preventing a cloying finish. If you’re in the mood for a twist, swapping in a lemon or chocolate cake mix will give the cookies a different mood while maintaining the same texture.
The Texture Crew
Unsalted butter is the secret to a buttery, melt-in-your-mouth crumb. Softened to room temperature, it blends seamlessly into the dry mix, creating a cohesive dough that spreads just enough during baking. Eggs act as the glue, binding everything together and contributing to a tender interior. If you prefer a vegan option, a flax egg (1 tablespoon ground flaxseed + 2.5 tablespoons water) works beautifully, providing the necessary moisture and binding.
The Unexpected Star
White chocolate chips are the unexpected star that elevates the cookie’s flavor profile. They melt into pockets of creamy sweetness that contrast with the strawberry base. Swapping them for dark chocolate chips gives a richer, bittersweet tone, while adding chopped nuts introduces a delightful crunch that pairs well with the cookie’s soft center.
The Final Flourish
Powdered sugar isn’t part of the dough; it’s the finishing touch that turns each cookie into a showstopper. Dusting the cooled cookies with a light layer of powdered sugar adds a subtle sweetness and a visual appeal that makes the cookies look freshly baked. If you’re watching your sugar intake, you can skip the dusting or use a sugar substitute.
Everything’s prepped? Good. Let’s get into the real action…
The Method — Step by Step
- Preheat your oven to 350°F (175°C) and line a baking sheet with parchment paper. The parchment ensures a clean release and prevents sticking. As the oven heats, you’ll notice the gentle hum of the fan—an early sign that the temperature is steady. Place the sheet on the middle rack for even heat distribution.
- In a medium bowl, combine the strawberry cake mix and softened butter. Use a wooden spoon or a stand mixer on low speed to blend until the mixture resembles coarse crumbs. The butter should be fully incorporated, giving the dough a crumbly texture that will later soften in the oven.
- Add the egg and whisk until the dough starts to come together. The egg’s protein will bind the mixture, creating a cohesive dough that holds its shape when scooped. If the dough feels too dry, add a tablespoon of milk or water to achieve a pliable consistency.
- Fold in the white chocolate chips, ensuring an even distribution. The chips should be well embedded so that each bite contains a burst of creamy sweetness. At this stage, you’ll notice the dough’s scent—warm, buttery, and faintly sweet. If you prefer a more pronounced chocolate flavor, add a handful of dark chocolate chips as well.
- Using a tablespoon or a small cookie scoop, drop rounded balls of dough onto the prepared baking sheet, spacing them about 2 inches apart. The spacing allows the cookies to spread evenly without merging. Gently press each ball with the back of a spoon to flatten slightly—this creates a uniform rise during baking.
- Bake for 12–14 minutes, or until the edges are golden brown and the centers look set. The cookies should emit a warm, toasty aroma that signals they’re ready. Keep an eye on them; the baking time can vary slightly depending on your oven’s calibration. If you notice the edges browning too quickly, lower the temperature by 25°F.
- Remove the sheet from the oven and let the cookies rest on it for 5 minutes. This resting period allows the interior to finish setting and the chocolate to firm up. The cookies will still be hot and slightly soft, but they’ll firm up as they cool.
- Once cooled, dust the cookies lightly with powdered sugar, using a fine sieve for an even coat. The powdered sugar adds a subtle sweetness and a visually appealing snowy finish. Store any leftovers in an airtight container at room temperature for up to 3 days.
That’s it — you did it. But hold on, I’ve got a few more tricks that will take this to another level…
Insider Tricks for Flawless Results
The Temperature Rule Nobody Follows
Most bakers bake at a standard 350°F, but I’ve found that lowering the temperature to 325°F and extending the bake time by 2 minutes results in a more even rise and a softer interior. This subtle tweak gives the cookies a tender chew that’s hard to achieve with higher heat. The trick is to keep an eye on the edges; they should just start to turn golden without overbrowning.
Why Your Nose Knows Best
When the cookies are halfway through baking, pause the timer and inhale deeply. If you detect a sweet, buttery aroma, it’s a sign they’re ready to come out of the oven. A lack of aroma can indicate that the oven is too cold or that the dough is too thick. Trust your senses; they’re a reliable indicator of doneness.
The 5-Minute Rest That Changes Everything
After baking, let the cookies rest on the pan for 5 minutes before moving them. This resting period allows the structure to set, preventing the cookies from breaking apart. A friend once rushed them to the rack and ended up with a pile of half-melted messes. The 5-minute pause is simple but transformative.
Cooling Rack vs. Flat Surface
Cooling the cookies on a wire rack preserves the crisp edges, whereas cooling on a flat surface can cause the bottoms to become soggy. A wire rack also promotes air circulation, ensuring a uniform cooling rate. If you’re baking in a small batch, a single sheet of parchment on a rack works wonders.
Chill for Storage
For longer storage, chill the dough in the refrigerator for up to 48 hours before baking. The dough’s flavor deepens, and the cookies develop a richer taste. When you’re ready to bake, let the dough sit at room temperature for 10 minutes to soften slightly, ensuring even baking.
Reheating Trick
If you have leftover cookies that have lost their crispness, reheat them in a 300°F oven for 3–4 minutes. The low temperature warms them without overbaking, restoring the original texture. A quick microwave burst of 10 seconds can also work, but the oven method preserves the buttery flavor.
Creative Twists and Variations
This recipe is a playground. Here are some of my favorite ways to switch things up:
Berry Burst
Swap the white chocolate chips for a mix of dried cranberries and blueberries. The dried fruit adds a chewy, tart contrast that pairs beautifully with the strawberry base. A splash of lemon zest can brighten the flavor further.
Nutty Crunch
Fold in chopped pecans or walnuts for an extra crunch. The nuts bring a buttery, earthy undertone that complements the strawberry’s sweetness. Toast the nuts beforehand to enhance their flavor.
Chocolate Swirl
Swirl in dark chocolate chips or a drizzle of melted dark chocolate after baking. The dark chocolate adds depth and a slight bitterness that balances the cookie’s natural sweetness.
Almond Joy
Replace the white chocolate chips with almond butter chips and sprinkle shredded coconut on top before baking. The result is a cookie reminiscent of the classic candy bar, with a chewy center and a crunchy exterior.
Vegan Delight
Use a flax egg (1 tablespoon ground flaxseed + 2.5 tablespoons water) and plant-based butter. The dough will still hold together, and the final product will have a similar texture and flavor profile.
Gluten-Free
Swap the strawberry cake mix for a gluten-free cake mix or a blend of almond flour and oat flour. Adjust the baking time slightly, as gluten-free doughs can bake faster. The cookies will retain their moist interior and sweet finish.
Storing and Bringing It Back to Life
Fridge Storage
Store unbaked dough in an airtight container in the refrigerator for up to 48 hours. When ready to bake, let the dough sit at room temperature for 10 minutes before scooping. This prevents the dough from being too cold, which can affect spreading.
Freezer Friendly
Place the unbaked dough balls on a parchment-lined tray and freeze until solid, then transfer to a freezer bag. They can be stored for up to 3 months. Bake directly from frozen, adding an extra minute to the baking time.
Best Reheating Method
To revive stale cookies, place them on a baking sheet and heat in a 300°F oven for 3 minutes. For a quick fix, microwave on low power for 10 seconds, but the oven preserves the buttery flavor better. Add a splash of water to the dough before baking to keep the cookies moist.