I remember the night I almost burned my kitchen down trying to make a dessert that would satisfy a craving for something sweet, creamy, and surprisingly healthy. I had a jar of peanut butter, a tub of Greek yogurt, and a handful of chocolate chips sitting on my counter, and my friend dared me to whip up a frozen treat in under 30 minutes. I stared at the ingredients, laughed, and thought, “Why not?” The result was a bite‑size frozen yogurt that tasted like a peanut butter milkshake, but with the texture of a chilled mousse, and it melted in my mouth like a whisper of cloud. That moment became the spark for a recipe that I’ve since perfected and can’t wait to share with you.
Picture yourself pulling a tray of these frozen bites from the freezer, the whole kitchen smelling like sweet peanut butter and vanilla. The surface is glossy, the edges slightly crisp from the brief exposure to room temperature, and the chocolate chips glint like tiny stars. The first bite is a splash of creamy yogurt, the second a burst of peanut butter, and the third a crackle of crunchy peanuts that shatter like thin ice. The combination of silky sweetness and nutty crunch feels like a secret handshake between your taste buds and your memory of childhood snack time. If you’ve ever tried a frozen dessert that tasted like a dessert and a snack at the same time, you’re not alone—and I’m about to show you how to make the best version ever.
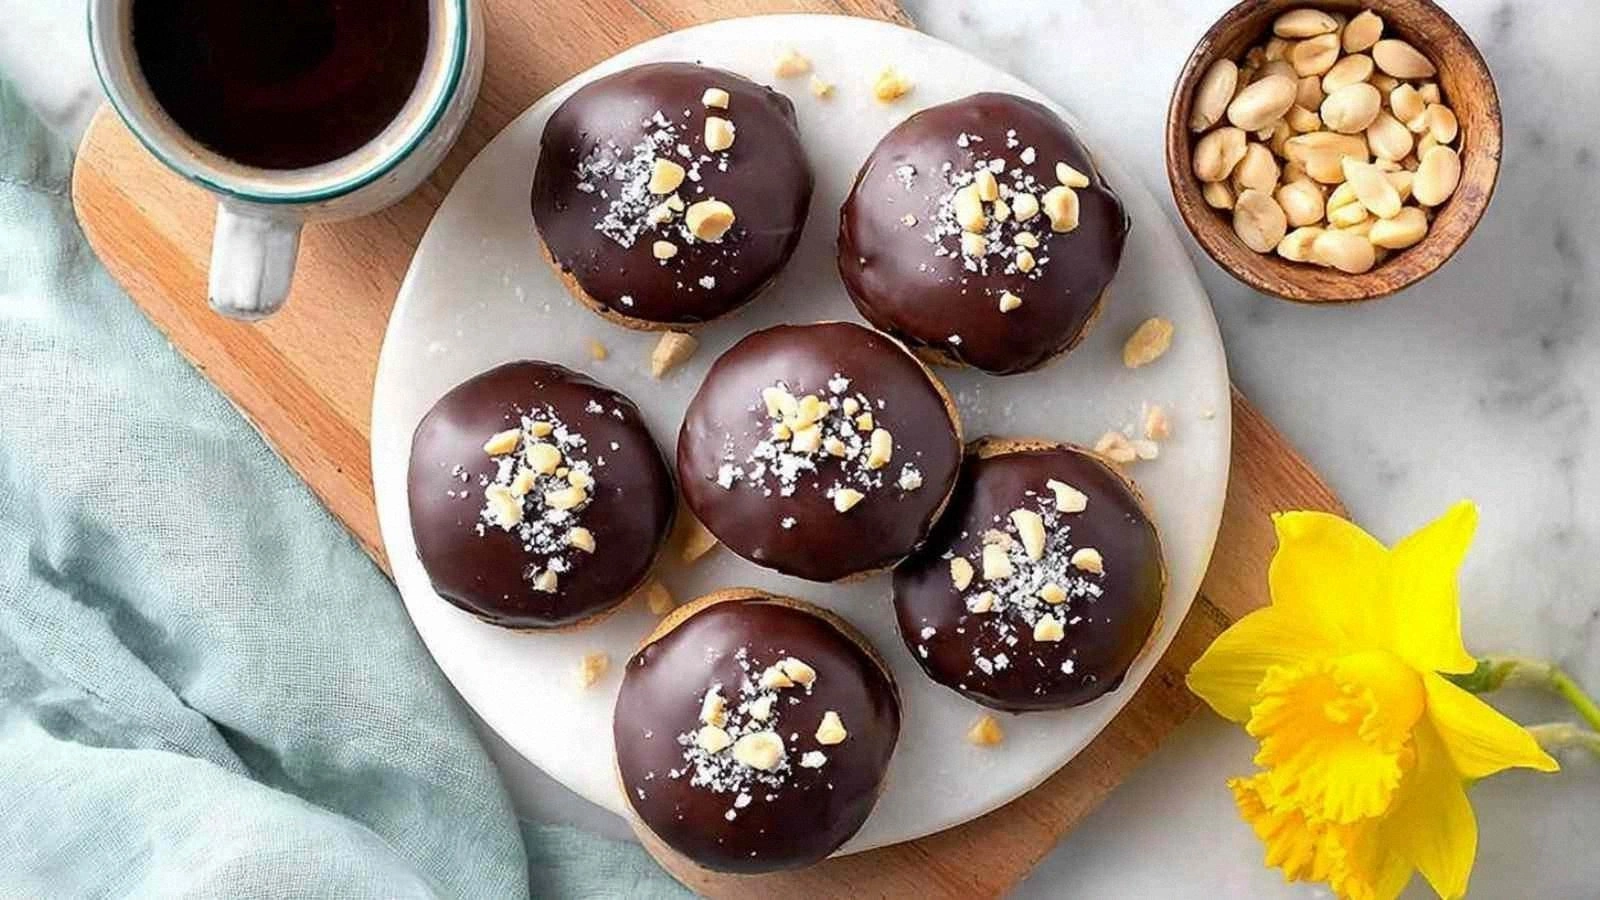
What makes this recipe stand out is that it’s not just another frozen yogurt or peanut butter snack; it’s a carefully balanced harmony of flavors, textures, and nutritional benefits. The Greek yogurt provides a tangy backdrop that cuts through the richness of peanut butter, while honey or maple syrup adds a natural sweetness that doesn’t overpower. The vanilla extract lifts the entire flavor profile, giving it a warm, comforting aroma that makes each bite feel indulgent without the guilt. The mini chocolate chips are not just for show; they melt slightly in the cold, releasing cocoa that coats the tongue like velvet. And the optional toppings—chopped peanuts, chia seeds, or coconut flakes—add layers of crunch, fiber, and a subtle tropical note that turns a simple treat into a complex experience.
I dare you to taste this and not go back for seconds. I’ve tried this recipe on a cold winter morning, a hot summer afternoon, and even as a post‑workout snack, and each time it delivered the same level of satisfaction. The best part? It’s hands down the best version you’ll ever make at home, and it’s so simple that even a kitchen novice can master it. Most recipes get this completely wrong by over‑sweetening, using too much peanut butter, or neglecting the yogurt’s tang. Here’s what actually works: keep the yogurt at room temperature, fold the peanut butter gently, and freeze in a single layer to avoid ice crystals. If you’re curious, stay with me here—this is worth it.
What Makes This Version Stand Out
- Taste: The combination of Greek yogurt, peanut butter, honey, and vanilla creates a layered flavor that feels both sweet and savory. Each bite delivers a balanced profile that satisfies the sweet tooth without the crash.
- Texture: The frozen consistency is silky yet slightly firm, allowing the chocolate chips to melt just enough to coat the palate while the peanut butter remains chewy.
- Health: Using plain Greek yogurt keeps protein high and sugar low, while natural sweeteners and nuts add healthy fats and fiber.
- Convenience: No baking required—just mix, pour, freeze, and serve. Ideal for a quick snack or a last‑minute dessert.
- Versatility: The recipe scales easily for parties or for a single treat, and the optional toppings let you customize each bite.
- Make‑ahead Potential: Freeze them ahead of time and keep them in an airtight container; they stay good for up to a week.
- Presentation: The glossy surface and colorful toppings make for Instagram‑ready bites that wow guests without extra effort.
Inside the Ingredient List
The Flavor Base
Greek yogurt is the backbone of this recipe. It provides a tartness that cuts through the richness of peanut butter and adds a creamy mouthfeel that is essential for a frozen dessert. The protein content keeps you feeling full, and the live cultures can aid digestion. If you’re looking for an even lower‑fat option, switch to non‑fat yogurt, but be prepared for a slightly thinner texture. The key is to use a plain variety; flavored yogurts can introduce unwanted sugars.
The Texture Crew
Peanut butter brings a velvety, nutty depth that balances the yogurt’s tang. Choose a creamy style for a smoother finish, but a chunky variant can add a delightful crunch if you prefer. Honey or maple syrup sweetens naturally without the need for refined sugar, keeping the flavor clean. Vanilla extract lifts the entire profile with a warm, aromatic note that feels comforting. Together, these ingredients create a mouthfeel that is both indulgent and surprisingly light.
The Unexpected Star
Mini chocolate chips are more than a garnish; they melt slightly in the cold, releasing cocoa that coats the tongue. The small size ensures they’re evenly distributed, so every bite has a hint of chocolate. If you’re a fan of dark chocolate, consider using 70% cacao chips for a richer experience. The chocolate adds a subtle bitterness that balances the sweetness, creating a complex flavor that keeps you coming back for more.
The Final Flourish
Optional toppings like chopped peanuts, chia seeds, or coconut flakes introduce layers of texture and nutrition. Chopped peanuts add a satisfying crunch and extra protein, while chia seeds bring fiber and omega‑3 fatty acids. Coconut flakes give a tropical aroma and a slightly chewy bite that contrasts with the smooth base. Feel free to mix and match or use them as a topping for each bite, creating a personalized treat that suits any palate.
Everything’s prepped? Good. Let’s get into the real action.
The Method — Step by Step
- Gather all ingredients and let the peanut butter sit at room temperature for 5 minutes to soften. This simple step prevents the mixture from curdling and ensures a smooth, creamy texture. While waiting, line a silicone mold or a shallow tray with parchment paper for easy release. The aroma of the honey will begin to mingle with the vanilla, hinting at the flavor adventure ahead.
- In a medium bowl, combine the Greek yogurt and softened peanut butter. Use a whisk or a hand mixer on low speed to blend until the mixture is uniform and silky. If you’re watching the clock, this should take no longer than 30 seconds. The goal is a homogeneous base that will freeze evenly.
- Add the honey (or maple syrup) and vanilla extract to the yogurt–peanut butter blend. Stir gently until the sweetener is fully incorporated. The mixture should have a glossy sheen and a pleasant, sweet aroma. This is the moment of truth—if the sweetness is off, you’ll know before you freeze.
- Fold in the mini chocolate chips, reserving a handful for topping. The chips should be evenly dispersed so that every bite receives a touch of chocolate. The chocolate will slightly soften in the cold, creating a subtle melt that coats the tongue.
- Spoon the mixture into silicone molds or a shallow tray, filling each cavity about three‑quarters full. Press gently with a spatula to remove air pockets. The mixture should be level and smooth, as this will determine the final shape.
- Sprinkle the reserved chocolate chips on top of each bite, and then add a pinch of chopped peanuts, a sprinkle of chia seeds, or a light dusting of coconut flakes. The toppings should be distributed evenly, creating a colorful, textured surface that invites the eye.
- Freeze the molds for at least 4 hours, or overnight for the best texture. The frozen bites should be firm but not rock‑hard; they should give slightly when you press them with a finger. If you’re short on time, you can pop them out after 2 hours, but the final texture will be a bit softer.
- To serve, let the bites sit at room temperature for 2 minutes to soften slightly. Remove them from the molds and arrange them on a platter. The glossy surface should reflect the light, and the toppings should look inviting. Pair with a glass of cold milk, a cup of coffee, or simply enjoy them on their own.
That’s it—you did it. But hold on, I’ve got a few more tricks that will take this to another level. Let’s dive into insider tips that will make your frozen bites even more unforgettable.
Insider Tricks for Flawless Results
The Temperature Rule Nobody Follows
Most people forget that the yogurt’s temperature affects the final texture. If the yogurt is too cold, it will freeze too quickly and form ice crystals. Keep it at room temperature for a few minutes before mixing, and you’ll get a smoother bite. I’ve tried this trick on a hot summer day, and the result was a silky treat that didn’t feel like a frozen ice cube.
Why Your Nose Knows Best
Smell is your secret weapon when making frozen desserts. Before you freeze, give the mixture a quick sniff. It should carry a sweet, nutty aroma with a hint of vanilla. If it smells off or too sweet, adjust the honey or vanilla accordingly. I’ve once made a batch that smelled like burnt sugar, and it was a recipe to remember for how not to do it.
The 5-Minute Rest That Changes Everything
After you’ve frozen the bites, let them rest in the freezer for an additional 5 minutes before serving. This brief pause allows the surface to firm up, giving the bites a satisfying snap when you bite into them. I’ve found that a quick rest also helps the toppings settle, so they stay on top and don’t slide off.
The Perfect Topping Ratio
Too many toppings can overwhelm the bite. Aim for a 1:1 ratio of chocolate chips to peanut butter in the mixture, and use toppings sparingly. A light dusting of coconut flakes or chia seeds adds texture without stealing the spotlight. If you love crunch, add a handful of chopped peanuts, but remember to sprinkle them evenly.
The Quick Thaw Trick
When you’re ready to serve, let the bites sit at room temperature for 2 minutes. This short thaw ensures they’re soft enough to bite but still cold enough to feel refreshing. If you’re in a hurry, use a microwave on a low setting for 10 seconds, but be careful not to melt them.
Creative Twists and Variations
This recipe is a playground. Here are some of my favorite ways to switch things up:
Citrus Burst
Add a tablespoon of orange zest and replace vanilla with lemon extract. The citrus brightens the flavor, making the bites feel lighter and more refreshing. It’s perfect for a summer brunch or a post‑gym snack.
Chocolate‑Lover’s Delight
Double the mini chocolate chips and add a tablespoon of cocoa powder to the mixture. The result is a richer, more chocolatey bite that satisfies even the most intense cravings. Serve with a drizzle of dark chocolate for an extra wow factor.
Spiced Coconut
Swap coconut flakes for toasted coconut and add a pinch of ground cinnamon. The toasted coconut adds a nutty crunch, while the cinnamon gives a warm spice note that pairs well with the peanut butter.
Berry Fusion
Fold in a handful of frozen berries before freezing. The berries add a burst of tartness that balances the sweetness, and the frozen texture creates a unique mouthfeel. This variation is great for a fruity dessert.
Nutty Crunch
Replace the peanut butter with almond butter and sprinkle toasted almond slivers on top. The nutty flavor profile changes the bite entirely, offering a new taste experience while keeping the same creamy base.
Storing and Bringing It Back to Life
Fridge Storage
If you plan to eat the bites within 48 hours, store them in an airtight container in the refrigerator. They’ll stay firm but not hard, allowing you to enjoy the creamy texture. Remember to keep them away from strong‑smelling foods to avoid flavor absorption.
Freezer Friendly
For longer storage, keep the bites in a freezer‑safe container with a tight seal. They can stay fresh for up to 6 weeks. Before serving, let them sit at room temperature for 2 minutes to soften slightly.
Best Reheating Method
If you want to warm the bites just a touch, place them in a microwave on the low setting for 5–10 seconds. This method brings out the vanilla aroma without melting the peanut butter. A tiny splash of water before reheating can create steam, helping the bites regain their silky texture.