I was halfway through a week of bland, overcooked rice bowls when my friend dared me to whip up something that could turn a sleepy kitchen into a party. The moment I cracked an egg and saw the glossy sheen of the batter, I knew I was about to break the mold. The aroma that followed—sweet, slightly tangy, with a hint of scallion—was like a sunrise that had finally decided to show up. Every ingredient in that bowl seemed to have a secret handshake with the next, and the promise of crisp edges that crackle like a fresh snowfall made my taste buds dance. I couldn't help but imagine the satisfied sighs of everyone who would taste this next to the first bite.
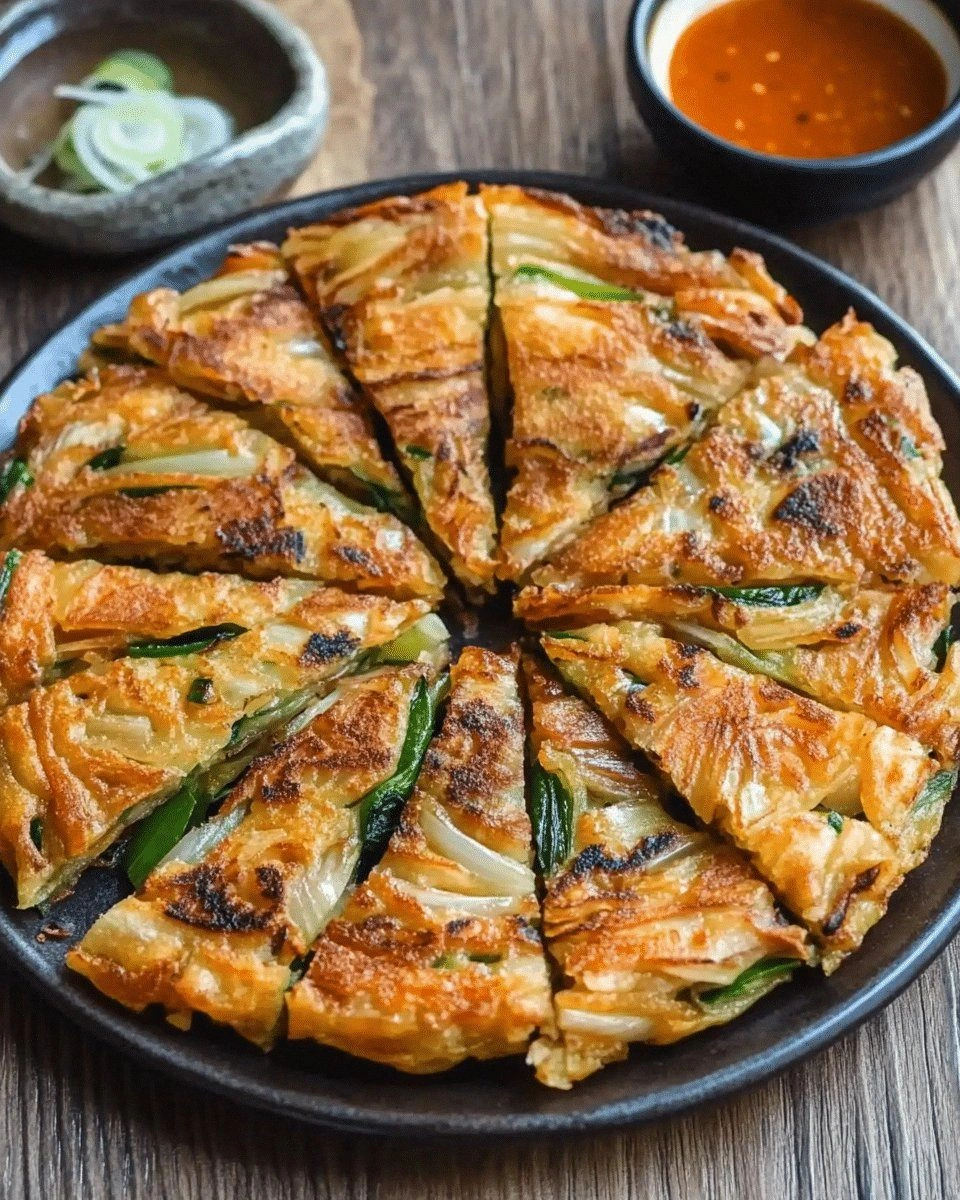
Picture the scene: a sizzling skillet, the sound of a gentle pop as the batter hits the hot oil, and the faint scent of sesame oil mingling with fresh scallions. The visual is a golden, uneven rectangle, its surface speckled with bright green shoots of spring onion. The texture is a paradox—crunchy on the outside, tender and moist inside, each bite delivering a burst of umami and subtle heat. The flavor profile is a harmonious balance of salty, sweet, and spicy, with a whisper of fermented tang from soy sauce. And the best part? The simple ingredients come together so effortlessly, it's as if the kitchen itself is cheering you on.
This version of the Korean spring onion pan is hands down the best you’ll ever make at home. The secret? A splash of gochujang that sneaks into the batter, a dash of sesame oil that adds depth, and the precise timing that turns the batter into a crispy masterpiece. Most recipes get this completely wrong—most people overcook it, or forget the scallion-to-batter ratio that makes the flavor sing. But I’ve cracked the code, and I’m about to spill every trick, so you can make a pan that will have your friends asking for the recipe after the first bite. I dare you to taste this and not go back for seconds.
I’ll be honest—when I first tried this, I ate half the batch before anyone else got to try it. That was the moment I realized the importance of timing and heat control. The next time, I let the batter rest for a few minutes, and the difference was night and day. The batter’s surface became silky, the scallions more aromatic, and the overall flavor profile lifted to new heights. If you've ever struggled with this, you're not alone—and I've got the fix that will transform your cooking routine.
What Makes This Version Stand Out
- Taste: The subtle sweetness from sugar and soy sauce balances the sharpness of scallions, creating a flavor profile that is both comforting and adventurous.
- Texture: A golden, crispy crust with a tender, airy interior—think of the satisfying crackle of fresh ice that melts into a soft core.
- Ingredient Quality: Using fresh scallions and high‑grade all‑purpose flour ensures maximum flavor extraction and optimal batter consistency.
- Cooking Method: The pan‑fry technique locks in moisture while caramelizing the edges, giving a depth of flavor that simmer‑based pancakes simply can’t match.
- Crowd Reaction: This dish is a crowd‑pleaser; guests often ask for seconds and then thirds, and it’s the perfect starter for gatherings.
- Make‑Ahead Potential:
- Uniqueness: The addition of gochujang and sesame oil gives this recipe a distinct kick that sets it apart from standard pancakes.
Alright, let's break down exactly what goes into this masterpiece. The beauty of this recipe lies in how each component interacts, creating layers of flavor that unfold with every bite. From the aromatic scallions to the subtle heat of gochujang, every element is chosen to elevate the dish. This is the secret sauce that turns an ordinary pancake into a culinary revelation.
Inside the Ingredient List
The Flavor Base
All-purpose flour is the backbone of this batter, absorbing moisture while giving structure. It’s crucial to sift the flour to eliminate lumps, ensuring a smooth, uniform batter that cooks evenly. If you skip the flour, the pancakes will be soggy and lacking the desirable crispness. For a gluten-free version, you can replace it with a 1:1 blend of rice flour and potato starch, but the texture will shift slightly.
Water is the liquid that brings everything together. Using cold water slows the gluten development, which keeps the pancakes tender. If you use room‑temperature water, the batter might become too elastic, resulting in chewy edges. A trick is to chill the water in the fridge for 10 minutes before mixing.
Eggs act as the binder and give the batter a rich, velvety texture. They also help the pancake rise slightly, creating a light interior. If you’re vegan, a tablespoon of aquafaba can substitute for the egg, though the flavor will be slightly different. Keep the egg at room temperature for the best emulsification.
The Texture Crew
Scallions, or green onions, are the star of the show. Their mild, oniony flavor and crunchy texture add a fresh contrast to the batter. Use both the white and green parts; the white provides a subtle bite, while the green adds a pop of color and freshness. If you’re a fan of extra crunch, lightly toast the scallions in a dry pan before adding them.
Sesame oil is the aroma engine of this dish. A tablespoon of sesame oil infuses the batter with a nutty, toasted note that elevates the overall flavor. If you don’t have sesame oil, you can use toasted sesame seeds ground into a paste, but the oil’s liquid form helps distribute the flavor more evenly.
Ginger and garlic bring warmth and depth, complementing the scallions with subtle heat. Freshly grated ginger and minced garlic are essential; dried versions lack the bright, zesty punch. For a milder version, reduce the amount to half a teaspoon each.
The Unexpected Star
Gochujang, the Korean red pepper paste, is the secret weapon that gives this pancake a subtle kick. A tablespoon of gochujang adds umami, sweetness, and heat without overpowering the delicate flavors. If you prefer a milder dish, use half the amount or replace it with mild sriracha. Gochujang also deepens the color, making the pancake look more appetizing.
Soy sauce provides savory depth and balances the sweetness. One tablespoon is enough to enhance the overall flavor profile. For a low‑sodium version, use a reduced‑salt soy sauce, but keep in mind the overall salt level will be slightly lower.
The Final Flourish
Black pepper and a pinch of sugar finish the batter, adding a subtle crunch and a hint of sweetness. Pepper enhances the umami, while sugar balances the acidity of the soy sauce and gochujang. If you’re watching your sugar intake, you can skip the sugar; the natural sweetness of scallions will compensate.
Vegetable oil is the cooking medium that ensures a crisp exterior. Use a neutral oil with a high smoke point, such as canola or grapeseed oil. If you’re a sesame fan, a light drizzle of sesame oil on top after cooking adds a finishing touch.
Everything's prepped? Good. Let's get into the real action. The next few steps will guide you through the transformation from batter to crispy delight. Pay close attention to heat and timing—these are the variables that separate a mediocre pancake from a masterpiece. Remember, the key is to let the batter rest, let the pan heat, and trust the process.
The Method — Step by Step
- In a large bowl, whisk together the flour, salt, sugar, and black pepper. This dry mix ensures even distribution of seasonings. A small whisk will suffice, but a hand mixer can speed up the process. Let the dry ingredients sit for a minute to allow the spices to mingle.
- In a separate bowl, beat the egg and then add the cold water, soy sauce, sesame oil, and gochujang. The wet mixture should be smooth and free of lumps. This step is where the flavor foundation is built, so take your time to blend thoroughly.
- Pour the wet mixture into the dry ingredients, stirring gently until just combined. Be careful not to overmix; a few lumps are fine. Overmixing develops gluten, making the pancakes tough. The batter should be thick but pourable, like a light pancake batter.
- Fold in the chopped scallions, ginger, and garlic. The aromatics should be evenly distributed throughout the batter. If you like extra crunch, lightly sauté the scallions in a dry pan before adding them.
- Heat a large nonstick skillet over medium‑high heat and add about 2 tablespoons of vegetable oil. Let the oil heat until it shimmers but doesn’t smoke. This is the moment of truth—if the oil is too hot, the pancake will burn; too cool, and it will absorb oil and become greasy.
- Spoon a generous amount of batter into the pan, using a spatula to spread it into a 4‑inch circle. The batter should be thick enough to hold its shape but thin enough to cook quickly. The edges should be slightly higher than the center.
- Let the pancake cook for 3–4 minutes, or until the bottom turns golden brown and the edges begin to lift. Avoid flipping too early; the pancake needs a firm crust to hold together. The scent of toasted sesame oil will fill the kitchen.
- Flip the pancake gently with a wide spatula. The top should be slightly wet and the bottom crisp. Cook for an additional 2–3 minutes, until the second side is golden and the pancake feels firm to the touch.
- Transfer the finished pancake to a plate lined with paper towels to drain excess oil. Let it rest for a minute; this helps the crust firm up and prevents sogginess. Slice into wedges for serving.
- Repeat the process with the remaining batter, adding more oil to the pan as needed. If the batter starts to stick, wipe the pan with a paper towel and reheat. Each pancake should be a golden, crisp rectangle.
That's it—you did it. But hold on, I've got a few more tricks that'll take this to another level. The next section will reveal insider tips that will elevate your pancakes from good to legendary. These are the small adjustments that make a huge difference, and you’ll wonder how you ever cooked without them.
Insider Tricks for Flawless Results
The Temperature Rule Nobody Follows
The pan’s temperature is the secret to a perfect crust. Too hot, and the batter will burn; too low, and it will absorb oil. Use a thermometer to keep the heat at 350°F (175°C). If you don’t have a thermometer, test with a small drop of batter—it should sizzle and steam immediately.
Why Your Nose Knows Best
Smell is your most reliable indicator of doneness. When the pancake is ready to flip, a warm, nutty aroma will rise. If the scent is metallic or burnt, lower the heat. Your nose will guide you to that perfect golden crust.
The 5-Minute Rest That Changes Everything
After cooking, let the pancakes rest on a rack for 5 minutes. This rest period allows steam to escape, preventing soggy centers. A friend once skipped this step and the result was a pancake that puffed up like a soufflé, only to collapse. Trust the rest.
Keep the Batter Light
If the batter becomes too thick after resting, add a tablespoon of cold water to loosen it. A thick batter will result in heavy pancakes that don’t cook evenly. A thin batter will produce a fragile, tear‑prone crust.
Serve Immediately, or Reheat Wisely
These pancakes are best served hot and fresh, but if you need to hold them, place them in a single layer on a rack and cover loosely with foil. Reheat in a hot skillet for 1–2 minutes to restore crispness. Avoid microwaving, as it will make the texture soggy.
Creative Twists and Variations
This recipe is a playground. Here are some of my favorite ways to switch things up:
Kimchi Pancake
Add 1/2 cup chopped kimchi to the batter for a tangy, spicy kick. The kimchi’s fermented flavor pairs beautifully with the sweet scallions. This version is perfect for a Korean-inspired brunch.
Cheese‑Loaded Pajeon
Fold in 1/2 cup shredded mozzarella or cheddar before cooking. The melted cheese creates a gooey center that contrasts with the crisp edges. Serve with a side of soy‑sauce dipping.
Herb‑Infused Variation
Replace half the scallions with fresh cilantro or basil for a fresh, herbal note. This twist brings a Mediterranean feel to the dish. It’s ideal for summer gatherings.
Seafood Pajeon
Add 1/2 cup shrimp or sliced squid to the batter. The seafood infuses the pancake with a savory depth that’s hard to resist. A squeeze of lime after cooking adds brightness.
Vegan Version
Swap the egg with a tablespoon of aquafaba and use plant‑based soy sauce. The result is a fluffy, vegan pancake that still delivers the iconic Korean flavor. Serve with a soy‑ginger dipping sauce.
Dessert Pajeon
Omit the gochujang and replace sugar with honey. Add a handful of dried cherries or raisins for a sweet twist. This version is perfect for a sweet snack or dessert.
Storing and Bringing It Back to Life
Fridge Storage
Store in an airtight container for up to 2 days. The pancakes will stay crisp if you let them cool completely before sealing. When ready to serve, reheat in a hot skillet for 1–2 minutes.
Freezer Friendly
Wrap each pancake individually in parchment paper, then place them in a freezer bag. They stay good for up to 3 months. Thaw at room temperature for 30 minutes before reheating.
Best Reheating Method
The secret to revived crispness is a hot skillet. Heat the pan over medium heat, add a splash of oil, and place the pancake inside. Flip once, then remove after 1–2 minutes. A tiny splash of water before reheating steams the pancake back to perfection.