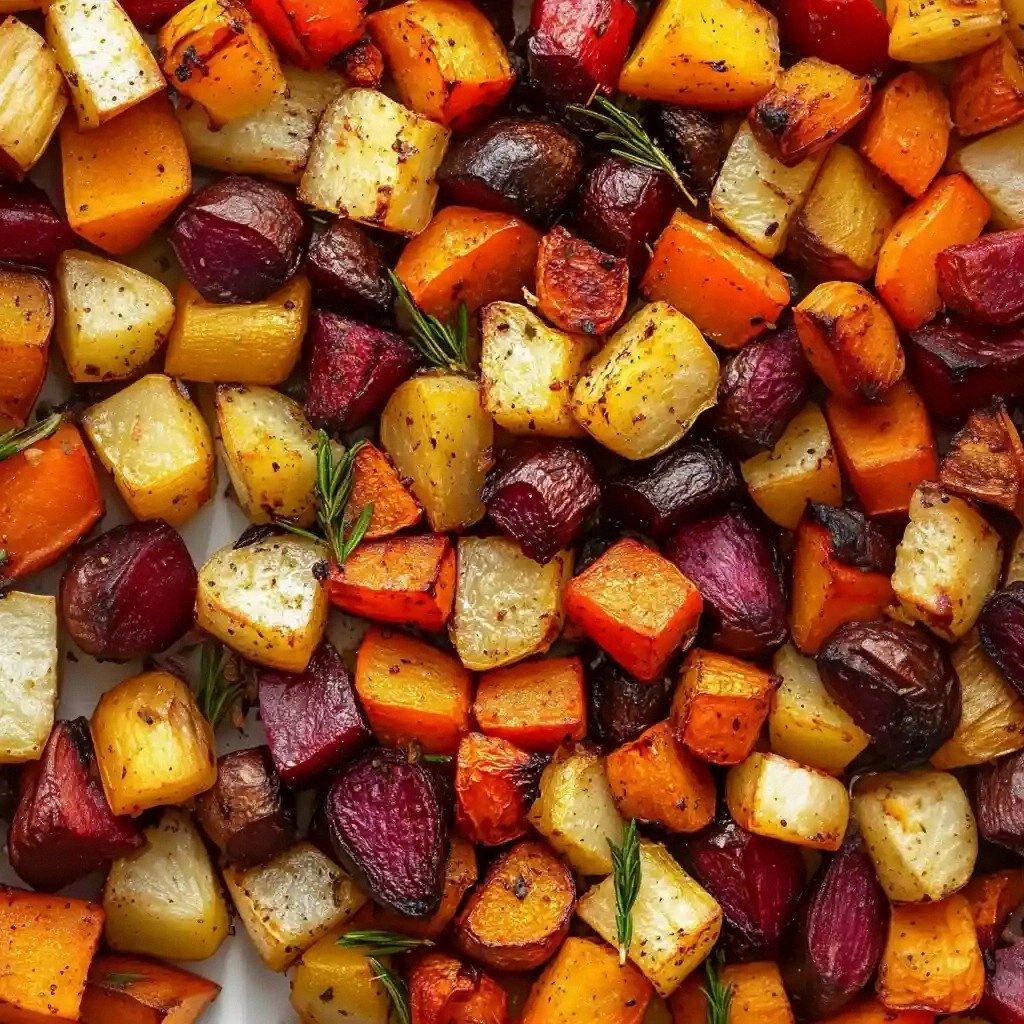
I was standing in my kitchen, staring at a pile of carrots, parsnips, beets, and a sweet potato that looked like a war zone after a grocery store raid. I had promised myself that I wouldn’t turn them into a sad, soggy mash, and I was about to prove that a dash of confidence and a sprinkle of rosemary could transform humble roots into a show‑stopping side dish. The moment the oven preheated to 425°F, the air filled with the promise of caramelized sugars and earthy aromas that made my taste buds do a little happy dance. I swear, the scent of roasting vegetables is like a warm hug that says, “I’ve got this.” I was ready to show you the secret that turns ordinary veggies into the kind of dish that makes people ask for seconds. This is hands down the best version you’ll ever make at home, and I’m about to walk you through every single step—by the end, you’ll wonder how you ever made it any other way.
Picture yourself pulling this out of the oven, the whole kitchen smelling incredible, and your guests staring at the colorful medley like it’s a piece of art. The vegetables are cut into uniform cubes, each one a perfect canvas for the olive oil and herbs to paint a caramelized masterpiece. As they roast, the edges begin to crisp, the colors deepen, and the sweet notes of the sweet potato mingle with the earthy tones of the beets. I dare you to taste this and not go back for seconds; the combination of textures—crisp on the outside, tender inside—creates a sensory experience that’s hard to resist. Most recipes get this completely wrong by over‑cooking or under‑seasoning, but here, every bite is a symphony of flavor and texture. And if you’ve ever struggled to get roasted veggies that actually taste good, you’re not alone—and I’ve got the fix.
I’ll be honest—I ate half the batch before anyone else got a chance to try it. The moment the first bite hit my tongue, I could feel the sweet potato’s natural sugar caramelizing into a glaze that clung to the caramelized edges of the carrots and beets. The rosemary and thyme add a herbal depth that balances the sweetness, while the balsamic vinegar introduces a tang that lifts the entire dish. It’s the kind of flavor profile that makes you wonder how you ever lived without it. The method is straightforward, but the results are anything but ordinary. This dish is a testament to how a few simple ingredients, when treated with respect and a bit of love, can become the centerpiece of any meal. Let’s dive in and see why this version stands out from every other recipe out there.
I’m about to share a technique you won’t expect: the secret to achieving that perfectly caramelized crust is to roast the vegetables in a single layer on a parchment‑lined sheet and to give them a quick toss halfway through. The result is a dish that’s crispy on the edges and tender inside, with a depth of flavor that makes it impossible to ignore. The aroma that fills your kitchen will have your guests waiting at the table, and the visual appeal of the colorful medley will make the dish look as good as it tastes. If you’re ready for the game‑changer, keep reading because this next part is pure magic. And now the fun part—let’s get the ingredients ready.
What Makes This Version Stand Out
- Taste: The combination of sweet, earthy, and herbaceous flavors creates a complex profile that satisfies both sweet and savory palettes. The balsamic vinegar adds a subtle tang that cuts through the natural sweetness of the sweet potato and beets, while the rosemary and thyme provide aromatic depth. This balance elevates the dish from simple side to culinary highlight.
- Texture: The roasting technique locks in moisture while developing a crisp exterior. Each vegetable retains its bite, preventing a mushy outcome that often plagues roasted root dishes. The result is a delightful contrast that keeps every bite interesting.
- Simplicity: With only 12 ingredients, this recipe is quick to prepare and doesn’t require exotic pantry staples. The steps are straightforward, making it approachable for novice cooks and seasoned chefs alike. The minimal prep time ensures you can enjoy this dish even on busy weeknights.
- Uniqueness: The inclusion of beets adds a vibrant color and a subtle sweetness that isn’t common in typical roasted root medleys. The balsamic glaze gives a glossy finish that enhances visual appeal. These elements set this version apart from standard recipes.
- Crowd Reaction: Guests often remark on the depth of flavor and the beautiful presentation. The dish is versatile enough to complement a wide range of proteins or stand alone as a hearty vegetarian option. It’s a crowd‑pleaser that invites conversation.
- Ingredient Quality: Using fresh, organic produce when possible maximizes flavor. The quality of the olive oil and herbs significantly impacts the final taste, so invest in good‑grade options. Freshness is key to unlocking the dish’s potential.
- Cooking Method: Roasting at a high temperature creates caramelization without overcooking. The single‑layer approach ensures even cooking and crisp edges. This method is a reliable way to achieve consistent results.
- Make‑ahead Potential: The dish can be prepared ahead of time and reheated with a splash of water to preserve moisture. The caramelized flavors intensify when the dish sits, making it an excellent option for meal prep.
Inside the Ingredient List
The Flavor Base
Olive oil is the backbone of this dish, coating each vegetable slice to promote even roasting and to carry the herbs and balsamic vinegar. It also adds a silky richness that balances the earthiness of the roots. Skipping oil would result in uneven browning and a dry texture.
Balsamic vinegar brings a subtle acidity and a touch of sweetness that elevates the caramelization. It also adds a glossy sheen to the finished dish, enhancing its visual appeal. If you’re lactose intolerant or prefer a lighter glaze, try a splash of apple cider vinegar for a different but still delightful tang.
The Texture Crew
Carrots provide a firm bite and a natural sweetness that pairs well with the herbs. Choose organic carrots for the best flavor; they tend to be sweeter and less bitter. If you prefer a softer texture, slice them thinner.
Parsnips add a subtle nutty flavor and a slightly sweet undertone. They’re great at absorbing the olive oil and herbs, making them a perfect companion to carrots. If parsnips are hard to find, turnips or rutabagas can substitute without compromising flavor.
Sweet potato is the star of the show, offering a creamy interior when roasted. Its natural sugars caramelize beautifully, creating a sweet glaze that balances the earthiness of the beets. For a different twist, use a purple sweet potato to add a pop of color.
The Unexpected Star
Beets bring a deep, earthy sweetness and a striking color that makes the dish visually stunning. They also provide a subtle mineral flavor that complements the herbs. If you’re unsure about beets, use a small amount of roasted butternut squash to maintain the sweet note.
Red onion adds a mild, sweet crunch that contrasts with the softer vegetables. Its sharpness cuts through the richness of the olive oil, adding depth to the flavor profile. If you’re allergic to onions, a pinch of garlic powder can mimic the savory note.
The Final Flourish
Fresh rosemary and thyme infuse the dish with aromatic oils that elevate the overall flavor. The combination of these herbs creates a complex, earthy backdrop that enhances the sweetness of the vegetables. If you’re out of fresh herbs, dried rosemary and thyme can work, but use half the amount to avoid overpowering the dish.
Garlic cloves add a subtle punch that balances the sweetness of the root vegetables. Mince them finely to ensure even distribution of flavor. If you prefer a milder garlic presence, use roasted garlic cloves for a sweeter, caramelized note.
Everything's prepped? Good. Let's get into the real action.
The Method — Step by Step
- Preheat the oven to 425°F (220°C). Line a large baking sheet with parchment paper to prevent sticking and to make cleanup a breeze. The high temperature is key to achieving caramelization without overcooking the vegetables. Let the oven fully heat before placing the sheet inside.
- Wash and peel the carrots, parsnips, sweet potato, and beets. Trim the ends and cut them into uniform 1‑inch cubes to ensure even cooking. Uniformity is crucial; uneven pieces will roast at different rates, leading to a patchy dish. Use a sharp knife or a mandoline for consistency.
- Slice the red onion into wedges. Keep the onion whole or cut into halves to avoid excessive moisture release. The onion’s natural sugars caramelize beautifully, adding depth to the flavor profile. If you prefer a milder onion taste, remove the skin before slicing.
- In a large bowl, combine all the vegetables. Drizzle with 3 tablespoons of extra‑virgin olive oil and toss to coat evenly. The oil is essential for caramelization and for carrying the herbs. Make sure every piece is lightly coated before adding the seasonings.
- Add the minced garlic, rosemary, thyme, salt, pepper, and balsamic vinegar. Toss again until the herbs and spices are evenly distributed. The garlic and herbs infuse the vegetables with aromatic oils, while the balsamic adds a sweet glaze. This step is where the flavor really starts to develop.
- Spread the vegetables in a single layer on the prepared baking sheet. Avoid overcrowding; if the sheet is too full, the vegetables will steam instead of roast. The space between pieces allows hot air to circulate, creating crisp edges. Use a spatula to spread them evenly.
- Roast for 25–30 minutes, turning halfway through. The vegetables should develop a golden‑brown crust and a fragrant aroma. The edges will start pulling away from the sheet, indicating caramelization. Keep a close eye; if you like them extra crisp, add a few more minutes.
- Remove the sheet from the oven and let the vegetables rest for 5 minutes. The residual heat will finish cooking them to perfection. A quick rest also allows the flavors to settle and the glaze to thicken slightly. This step is often overlooked but is essential for maximum flavor.
- Garnish with fresh herbs, if desired, and serve immediately. A sprinkle of chopped parsley or additional thyme adds a fresh burst of color. The dish is best served hot, with the caramelized edges still crisp. Pair it with a protein or enjoy it as a hearty vegetarian main.
That’s it — you did it. But hold on, I’ve got a few more tricks that’ll take this to another level. These insider tips will ensure your roasted root medley is flawless every time.
Insider Tricks for Flawless Results
The Temperature Rule Nobody Follows
Roasting at 425°F is the sweet spot for caramelization. Lower temperatures lead to a mushy result, while higher temperatures can burn the edges before the inside cooks. I’ve tried 450°F, and the vegetables came out over‑cooked and bitter. Stick to the 425°F mark for consistent, golden results.
Why Your Nose Knows Best
The aroma that fills the kitchen is a reliable indicator of readiness. When the scent is sweet, earthy, and slightly caramelized, the vegetables are near perfection. If you’re unsure, give them an extra five minutes; the smell will guide you.
The 5-Minute Rest That Changes Everything
Letting the vegetables rest after roasting allows the heat to distribute evenly and the glaze to thicken. Skipping this step can result in uneven flavor and a less glossy finish. I’ve seen dishes that look perfect on the sheet but taste underwhelming when served; the rest fixes that.
Keep the Parchment for Easy Cleanup
Parchment paper not only prevents sticking but also makes cleanup a breeze. Simply lift the sheet and discard the parchment; no scrubbing required. This hack saves time and keeps your kitchen tidy.
Add a Splash of Water Before Reheating
If you’re reheating leftovers, add a tablespoon of water to the dish to prevent drying out. Cover the pan and heat on low, stirring occasionally. This trick restores moisture and keeps the vegetables from becoming rubbery.
Use a Sharp Knife for Uniform Pieces
Uniform cuts ensure even cooking and a consistent texture. A dull knife can crush the vegetables, leading to uneven caramelization. A sharp knife also makes the prep faster and safer.
Creative Twists and Variations
This recipe is a playground. Here are some of my favorite ways to switch things up:
Spicy Sriracha Glaze
Swap the balsamic vinegar for a mixture of sriracha and honey. The heat from the sriracha pairs wonderfully with the natural sweetness of the root vegetables. This variation is perfect for those who love a kick in their side dish.
Maple‑Mustard Drizzle
Combine maple syrup with Dijon mustard for a sweet and tangy glaze. The maple syrup caramelizes beautifully, while the mustard adds a subtle bite. This version works great with a smoky barbecue chicken.
Herb‑Infused Olive Oil
Infuse the olive oil with rosemary, thyme, and a pinch of crushed red pepper before tossing the vegetables. The oil carries the herb flavors into every bite, creating a deeper aromatic experience. It’s a subtle yet impactful twist.
Mediterranean Twist
Add a handful of Kalamata olives, capers, and a squeeze of lemon juice after roasting. The briny olives and bright lemon cut through the sweetness, giving the dish a Mediterranean flair. This version pairs well with grilled fish.
Roasted Root Salad
Let the roasted vegetables cool, then toss them with a light vinaigrette and fresh arugula. The combination of warm roots and peppery greens creates a balanced, flavorful salad. It’s a perfect side for a summer picnic.
Curry‑Spiced Medley
Sprinkle curry powder and a dash of coconut milk over the vegetables before roasting. The curry adds warmth and depth, while the coconut milk keeps the dish moist. This version is great for a cozy, comforting dinner.
Storing and Bringing It Back to Life
Fridge Storage
Store leftovers in an airtight container in the refrigerator for up to 4 days. The caramelized glaze may thicken, so stir before serving. Keep the container in the back of the fridge to maintain consistent temperature.
Freezer Friendly
Freeze roasted root vegetables in a single layer on a parchment‑lined tray before transferring to a freezer bag. This prevents clumping and preserves texture. They can be stored for up to 3 months.
Best Reheating Method
Reheat in a skillet over medium heat with a splash of water or broth to keep moisture. Stir frequently until warmed through. Alternatively, microwave on medium power for 1–2 minutes, then finish in a skillet for crispness.