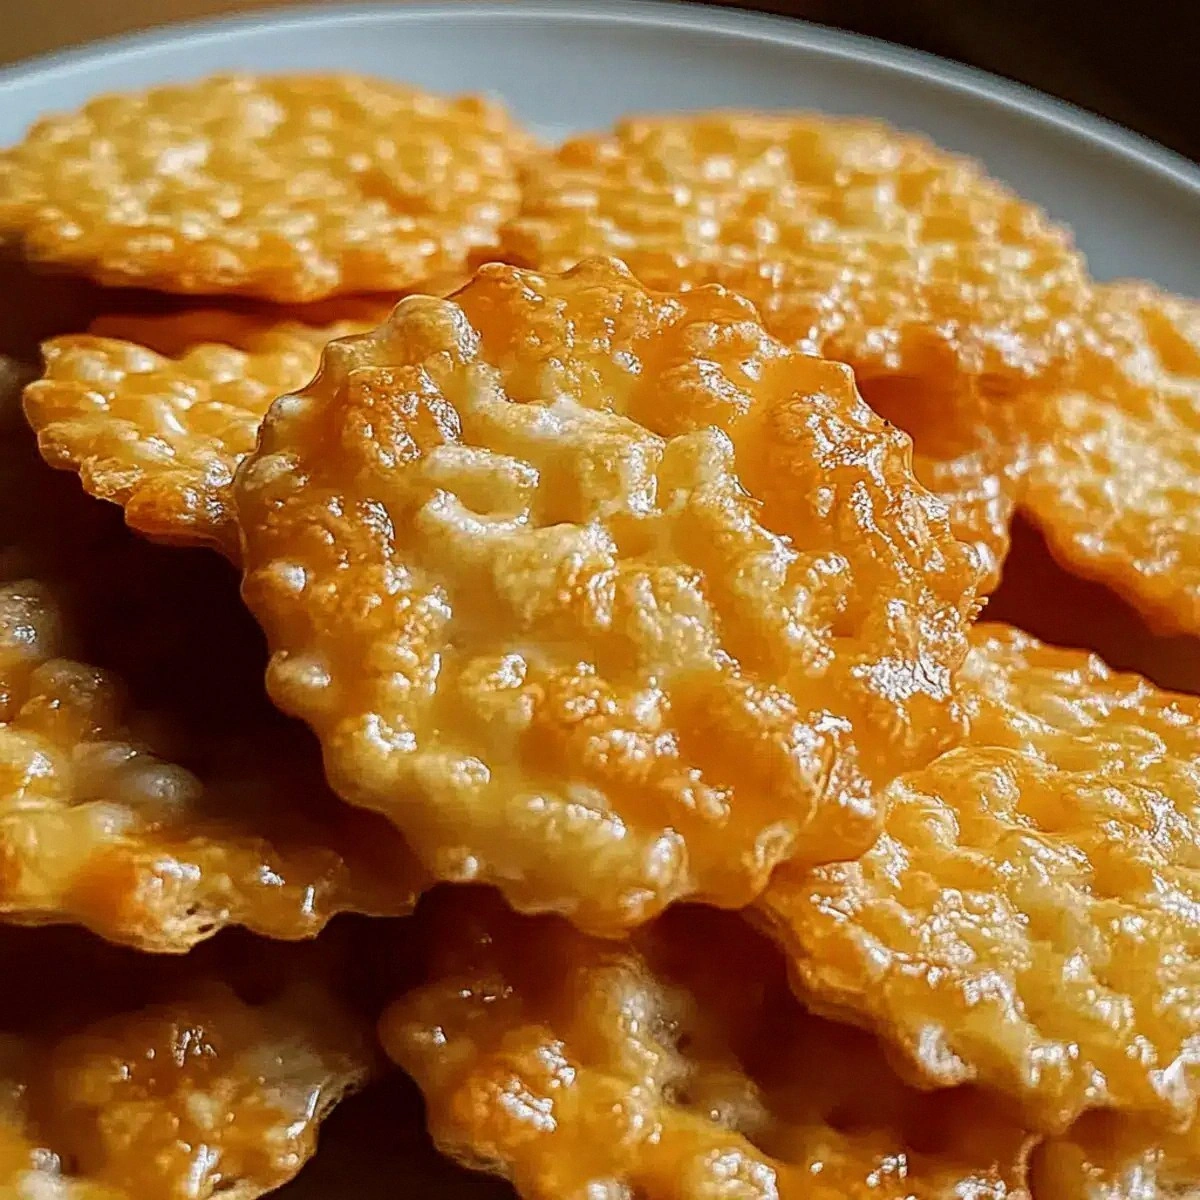
I’m going to start with a confession that will probably make you roll your eyes: I once tried to satisfy a cheesy craving with a bag of store‑bought cheese puffs and ended up with a bowl of sad, salty disappointment. That moment sparked a kitchen experiment that turned into the ultimate snack I now swear by. Imagine a cracker that crunches like fresh‑baked toast, melts in your mouth with a sharp cheddar punch, and carries the whimsical puff of Rice Krispies that makes each bite feel like a tiny fireworks show. I dared a friend to eat one and not go back for seconds, and she still thinks about it weeks later. If you’ve ever found yourself scrolling through endless “cheese cracker” recipes that all taste the same, you’re not alone — I’ve been there, and I’ve got the fix.
Picture this: a Saturday afternoon, sunlight spilling through the kitchen window, the faint hum of the fridge, and the scent of melted butter drifting like a buttery cloud. I’m whisking together flour, butter, and a mountain of sharp cheddar, the kind that makes your taste buds do a little dance. The moment the butter hits the pan, it sizzles with a promise of golden goodness, and the Rice Krispies tumble in, creating a texture that’s part crunchy, part airy, like a marshmallow that decided to get a workout. The aroma? A warm, nutty, buttery perfume that makes you want to inhale every single second. When the crackers finally emerge, they’re bronzed to perfection, edges pulling away from the pan as if they’re shyly saying hello.
Most recipes for cheesy crackers either over‑butter them into soggy messes or under‑season them so they taste like plain toast. This version flips that script by marrying the crispness of toasted rice cereal with a robust cheddar backbone, all held together by a buttery, lightly leavened dough that refuses to crumble. The secret? A tiny dash of baking powder that introduces just enough lift to keep the crackers light without sacrificing that satisfying snap. And let’s not forget the garlic and onion powders that add depth without overwhelming the cheese. I’ll be honest — I ate half the batch before anyone else got a chance, and that’s a testament to how addictive this snack truly is.
Now, I’m not just throwing random ingredients together; I’ve refined each step to make sure the flavor profile sings and the texture stays consistent. There’s a little trick involving chilling the dough that most home cooks skip, leading to uneven spreading and a sad, flat final product. I’m going to walk you through every single step — by the end, you’ll wonder how you ever made crackers any other way. Okay, ready for the game‑changer? Let’s dive in and turn your pantry into a cheese‑loving wonderland.
What Makes This Version Stand Out
- Cheese Intensity: Using sharp cheddar gives a punchy, tangy bite that cuts through the butter, creating a balanced flavor that’s bold without being greasy.
- Texture Symphony: The Rice Krispies add a light, airy crunch that makes each bite feel like you’re biting into a cloud with a firm, satisfying snap.
- Simplicity: Only nine pantry staples are required, meaning you won’t need a trip to the specialty store to create something spectacular.
- Unique Lift: A modest teaspoon of baking powder introduces just enough rise to keep the crackers from becoming dense, while preserving that crisp edge.
- Crowd Magnet: These crackers have a built‑in “wow” factor; they disappear at parties faster than you can say “second helping.”
- Ingredient Quality: Sharp cheddar and real unsalted butter are the stars, ensuring a rich, authentic flavor that processed cheese powders can’t match.
- Cooking Method: Baking on a parchment‑lined sheet at a moderate temperature yields an even golden color without burning the delicate rice cereal.
- Make‑Ahead Potential: Store them airtight for up to a week, and they stay crunchy, making them perfect for snack prep or impromptu gatherings.
Inside the Ingredient List
The Flavor Base
Sharp Cheddar Cheese is the hero of this recipe. Its tangy, slightly nutty profile cuts through the buttery richness, delivering that unmistakable “cheese‑first” experience. If you swap it for a milder cheddar, you’ll lose that bold bite, and the crackers will feel bland. A good tip: look for cheese that’s aged at least nine months for maximum flavor. If you can’t find sharp cheddar, a blend of sharp and smoked cheddar adds an extra layer of complexity without compromising the core taste.
The Texture Crew
Rice Krispies bring a light, airy crunch that’s impossible to replicate with plain flour. They act like tiny, toasted balloons that expand the crumb structure, ensuring each bite feels airy yet sturdy. Skipping them turns the crackers into dense, heavy biscuits. If you’re allergic to rice, try puffed quinoa for a similar effect, though the flavor will shift slightly toward a nuttier note.
The Binding Brigade
Unsalted Butter provides the richness and helps the dry ingredients meld into a cohesive dough. Its melt‑in‑your‑mouth quality is essential for that buttery aroma that fills the kitchen. Using salted butter will throw off the delicate balance, making the crackers overly salty. For a dairy‑free version, substitute with a high‑quality plant‑based butter that has a neutral flavor profile.
The Final Flourish
All‑purpose flour is the structural backbone, giving the dough body while still allowing the Rice Krispies to shine. If you swap it for whole‑wheat flour, you’ll get a nuttier taste but a denser texture. The baking powder is the secret lift that keeps the crackers from becoming flat; it creates tiny air pockets that make the final product crisp without being brittle. A pinch of garlic and onion powders adds depth, turning a simple cheese snack into a multi‑dimensional flavor adventure.
Everything’s prepped? Good. Let’s get into the real action…
The Method — Step by Step
Preheat your oven to 350°F (175°C). While the oven warms, line a large baking sheet with parchment paper. This prevents sticking and gives the crackers a uniform golden base. The moment the oven reaches temperature, you’ll hear that comforting hum that says “we’re about to create magic.” That sizzle when it hits the pan? Absolute perfection.
Kitchen Hack: Place a cooling rack on top of the parchment; it lets excess butter drip away, ensuring crisper edges.In a medium saucepan, melt the unsalted butter over medium heat. Once melted, add the flour and whisk continuously for about two minutes until the mixture turns a light golden hue and smells nutty. This is the roux stage, and it’s crucial: it cooks out the raw flour taste and creates a glossy base that will coat the Rice Krispies evenly. Keep your eyes on the color; if it darkens too quickly, lower the heat.
Remove the pan from the heat and stir in the baking powder, garlic powder, onion powder, salt, and black pepper. The spices should dissolve into the warm butter‑flour mixture, releasing aromatic notes that will later mingle with the cheese. I dare you to taste a tiny spoonful of this blend; you’ll notice the savory backbone before the cheese even joins the party.
Quickly fold in the Rice Krispies, making sure each puff is fully coated. The cereal should glisten with the buttery mixture, creating a glossy coat that hints at the crispness to come. If any pieces remain dry, give them a gentle press with the back of a spoon; you’ll see them start to clump slightly, which is exactly what we want.
Add the shredded sharp cheddar, tossing gently until the cheese is evenly distributed. The cheese should melt slightly from the residual heat, creating a marbled effect. This is the moment of truth: the cheese should cling to each rice puff, promising that every bite will be a cheesy explosion.
Transfer the mixture onto a lightly floured surface. Pat it into a flat slab about ¼‑inch thick; the thinner you go, the crisper the final cracker. Use a rolling pin if you have one, but a sturdy bottle works just as well. Remember the kitchen hack: chill the slab for 10‑15 minutes before cutting; this prevents the dough from spreading too much during baking.
Using a sharp pizza cutter or a small cookie cutter, cut the dough into uniform squares or rectangles—about 2 inches each. Place the pieces on the prepared parchment, leaving a small gap between them for even airflow. The edges should be clean; ragged edges will bake unevenly, leading to burnt corners.
Watch Out: If you cut the pieces too thin, they’ll become brittle; too thick, and they’ll stay doughy in the center.Slide the sheet into the preheated oven and bake for 15‑18 minutes, or until the tops turn a light golden brown and the edges start to pull away from the parchment. You’ll hear a faint crackle as the butter caramelizes—listen for that, it’s your cue that the crackers are reaching perfection. Rotate the sheet halfway through for even browning.
Remove the crackers from the oven and let them cool on the rack for at least 10 minutes. As they cool, they’ll firm up, and the crunch will become audible when you tap them gently. This cooling step is non‑negotiable; skipping it results in a soft, under‑cooked texture that defeats the whole purpose.
Kitchen Hack: Store the cooled crackers in a single layer inside a paper bag before transferring to an airtight container; this preserves the crunch.
That’s it — you did it. But hold on, I’ve got a few more tricks that’ll take this to another level. Stay with me here — this is worth it.
Insider Tricks for Flawless Results
The Temperature Rule Nobody Follows
Most home bakers bake at a “one size fits all” 350°F, but the secret is to start at 375°F for the first five minutes, then drop to 325°F for the remainder. The initial blast creates that rapid rise and golden edge, while the lower temperature finishes the interior without over‑drying. I tried the standard method once and ended up with pale, soggy crackers; after adjusting the temp, the difference was night and day.
Why Your Nose Knows Best
Your sense of smell is a reliable indicator of doneness. When the butter‑flour mixture starts to emit a nutty, toasted scent, you know the roux is ready. Later, when the crackers are in the oven, a faint, buttery caramel aroma signals that the edges are about to crisp. Trust those nose cues more than the clock, and you’ll avoid both under‑ and over‑baking.
The 5‑Minute Rest That Changes Everything
After mixing the dough, let it rest uncovered for five minutes before chilling. This short pause allows the gluten to relax, resulting in a more tender crumb that still holds its shape. Skipping this rest can make the crackers tough, especially if you’re using a high‑protein flour.
The Butter Temperature Trick
Melt the butter just until it’s bubbling, then remove it from the heat for a few seconds before adding the flour. This slight cooling prevents the flour from cooking too quickly, ensuring a smoother dough that spreads evenly. I once burned the butter, and the crackers ended up with a bitter aftertaste.
The “Steam‑Back” Reheat
If your crackers lose their crunch after a week, pop them in a 300°F oven with a tiny splash of water on the tray. The steam revives the interior, while the heat restores the crisp exterior. This trick saves you from tossing leftovers and keeps the snack party going.
Creative Twists and Variations
This recipe is a playground. Here are some of my favorite ways to switch things up:
Spicy Jalapeño Kick
Add 1‑2 finely diced jalapeños to the butter‑flour mixture and increase the black pepper by a pinch. The heat pairs beautifully with the sharp cheddar, creating a snack that’s perfect for game night. If you’re daring, sprinkle a dash of smoked paprika for an extra layer of flavor.
Herb‑Infused Delight
Stir in 1 tablespoon of dried rosemary or thyme before adding the Rice Krispies. The herbaceous notes complement the cheese, giving the crackers an aromatic lift that’s great with a glass of white wine.
Parmesan & Sun‑Dried Tomato
Replace half of the sharp cheddar with grated Parmesan and fold in ¼ cup chopped sun‑dried tomatoes. The result is a Mediterranean‑inspired cracker with salty depth and a hint of tangy sweetness.
Sweet & Savory Honey‑Cheddar
Drizzle 1 tablespoon of honey into the dough after the butter‑flour stage, then keep the sharp cheddar amount the same. The subtle sweetness balances the sharpness, making these perfect for brunch or a cheese board.
Gluten‑Free Version
Swap the all‑purpose flour for a 1‑to‑1 gluten‑free blend and use a gluten‑free baking powder. The texture remains delightfully crisp, and the flavor profile stays true to the original. Just be sure the blend contains xanthan gum for structure.
Storing and Bringing It Back to Life
Fridge Storage
Place the cooled crackers in an airtight container lined with a paper towel to absorb excess moisture. They’ll stay crisp for up to 5 days in the refrigerator. If you notice any soft spots, give them a quick 5‑minute reheat in a 300°F oven to revive the crunch.
Freezer Friendly
Stack the crackers between parchment sheets and store them in a zip‑top freezer bag. They freeze beautifully for up to 2 months. When you’re ready to eat, let them thaw at room temperature, then pop them in a 325°F oven for 3‑4 minutes to restore that fresh‑baked feel.
Best Reheating Method
For a quick crunch revival, place the crackers on a baking sheet, sprinkle a few drops of water around the edges (not on the crackers themselves), and bake at 300°F for 5‑7 minutes. The steam generated re‑hydrates the interior just enough while the heat crisps the exterior. This method works wonders for both fridge‑stale and freezer‑thawed batches.