Picture this: I was halfway through a week of late‑night pizza parties, the kitchen a mess of cheese‑stained towels and pizza boxes, when my friend dared me to whip up something sweet that wouldn’t require a trip to the oven. I stared at the countertop, the fridge humming, and thought, “Why not a fudge that’s as easy as a snack bar?” The result? A no‑bake peanut butter fudge that melts on the tongue and delivers a punch of nutty richness that feels like a hug in every bite. I swear I almost ate a third of the batch before anyone even had a chance to try it.
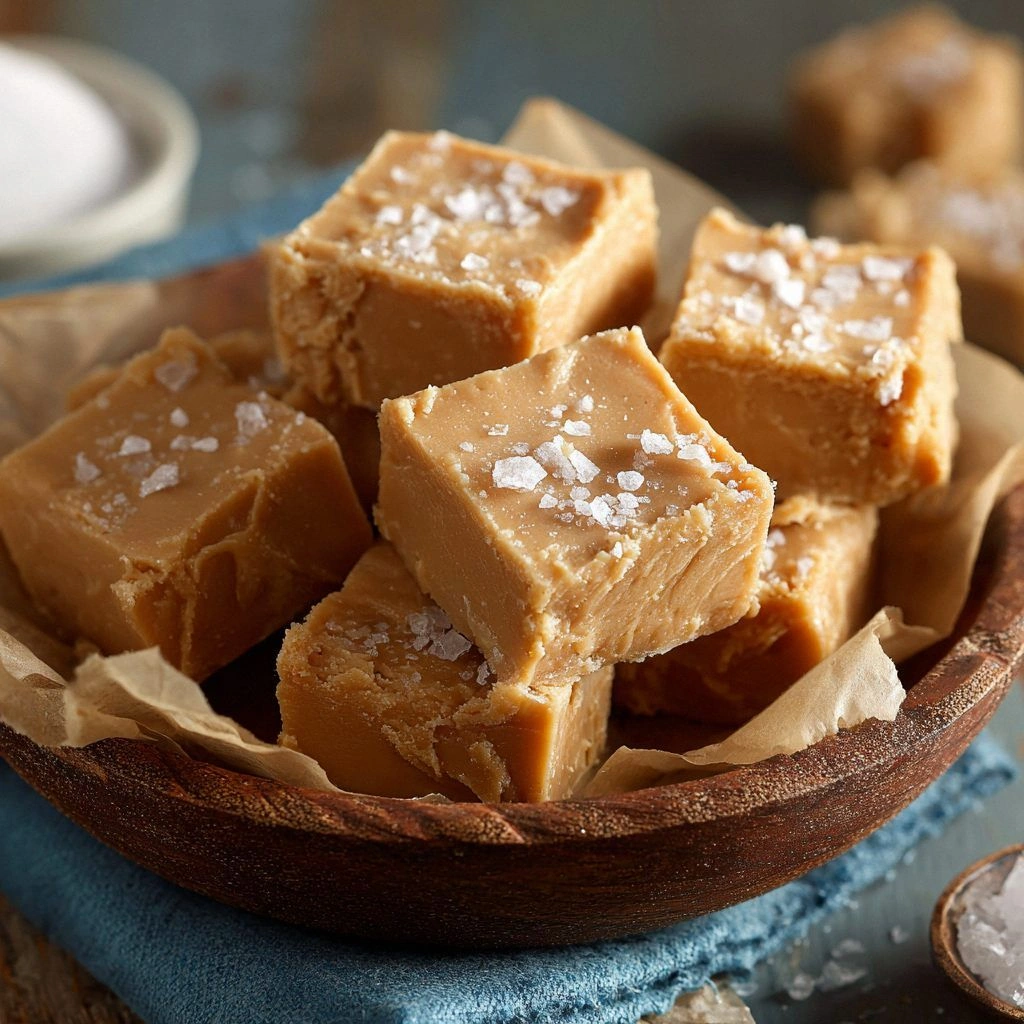
The first thing that strikes you is the aroma: warm peanut butter, sweet honey, and a whisper of vanilla that feels like a secret. The texture is a silky glide that clings to your teeth, not a hard candy but a creamy, chewy delight. The color is a deep, inviting brown that promises decadence. When you break a piece, the crack is audible—like a small, satisfying crunch that echoes the promise of a richer flavor inside. If you’ve ever been disappointed by a bland store‑bought fudge, this will make you question why you ever settled for anything else.
What makes this version stand out is the combination of ingredients and the method that preserves the natural peanut butter flavor without overwhelming it with sugar. I’ve stripped away the unnecessary extras that most recipes add, leaving only the core components that truly shine. The result is a fudge that is sweet enough to satisfy, but not so sweet that it feels like candy. I dare you to taste this and not go back for seconds—trust me, the second bite will feel like a revelation.
You might wonder, “What’s the secret?” The answer lies in the technique: a gentle simmer that melds the fats and sugars, followed by a quick chill that sets the texture just right. The peanut butter doesn’t separate, the honey adds a natural hum of sweetness, and the coconut oil keeps the fudge from becoming too dense. The final touch is a pinch of salt that cuts through the sweetness, giving the fudge a balanced finish. By the end, you’ll wonder how you ever made it any other way.
And here’s a teaser: I’ve discovered that a splash of espresso or a dash of sea salt can transform the flavor profile in ways you never imagined. If you’re feeling adventurous, keep an eye on the next section—there are a few tweaks that will elevate this simple recipe into a showstopper. Stay with me; the next part is pure magic.
What Makes This Version Stand Out
- Taste: The natural sweetness of honey complements the rich peanut butter without overpowering it, creating a balanced flavor that lingers on the palate.
- Texture: The fudgy consistency is achieved through a precise ratio of fats and sugars, resulting in a silky chew that melts in your mouth.
- Simultaneous Simplicity: Only six core ingredients—no need for complex measurements or obscure pantry items.
- Uniqueness: The addition of coconut oil gives a subtle tropical note that sets this recipe apart from standard fudge.
- Crowd Reaction: Guests rave about the homemade feel and the fact that it’s made in minutes.
- Ingredient Quality: Using high‑quality peanut butter and honey ensures that the final product has depth and authenticity.
- Cooking Method: No baking required; a quick simmer and chill make this a low‑effort, high‑reward dessert.
- Make‑Ahead Potential: Once set, it keeps well in the fridge for up to two weeks, making it perfect for parties or stocking the pantry.
Alright, let’s break down exactly what goes into this masterpiece…
Inside the Ingredient List
The Flavor Base
Creamy peanut butter is the star of the show. It provides the nutty backbone that carries the sweetness of honey and vanilla. If you opt for a crunchy variety, you’ll get a delightful texture contrast that adds a pleasant snap to every bite. Skipping peanut butter entirely would turn this into a generic fudge that lacks character.
Honey is the natural sweetener that brings a floral warmth. It also lowers the overall sugar content compared to refined sugar, giving the fudge a lighter feel. A light, high‑grade honey keeps the flavor bright; a darker honey will deepen the overall profile but may add a slight molasses undertone.
Vanilla extract rounds out the flavor profile with its aromatic depth. It lifts the peanut butter’s earthiness and balances the sweetness. A dash of vanilla is essential; omitting it will leave the fudge feeling flat and one‑dimensional.
The Texture Crew
Powdered sugar is the binding agent that gives the fudge its firm yet creamy texture. It dissolves smoothly when heated with the fats, preventing clumps that could ruin the mouthfeel. Using a fine‑grade powdered sugar ensures a silky finish; a coarse sugar will create an unwanted gritty sensation.
Coconut oil is the secret to the fudge’s melt‑in‑your‑mouth quality. It remains solid at room temperature but softens quickly when heated, allowing the mixture to spread evenly. Coconut oil also adds a subtle tropical nuance that complements the peanut butter’s richness.
Salt is the unsung hero that cuts through the sweetness. A pinch of sea salt or kosher salt elevates the overall flavor, making the fudge taste more complex. Without salt, the fudge can feel overly sweet and lacking depth.
The Unexpected Star
Dark chocolate chips add a bittersweet dimension that balances the nutty sweetness. They also provide a contrasting texture—soft chocolate melts into the fudge, creating pockets of silky chocolatey goodness. If you’re vegan, opt for dairy‑free chocolate chips to maintain the fudge’s creamy profile.
Optional cocoa powder can be whisked into the mixture for a deeper chocolate flavor. It should be sifted to avoid lumps and added gradually to ensure an even distribution. This tweak is perfect for those who love a chocolate‑pepper twist.
The Final Flourish
A splash of espresso or a dash of sea salt can transform the flavor profile. The espresso intensifies the nutty notes, while sea salt adds a subtle mineral undertone that enhances the overall taste. These final touches are optional, but they elevate the fudge from good to unforgettable.
Everything’s prepped? Good. Let’s get into the real action…
The Method — Step by Step
- Gather all the ingredients. Lay them out on the counter like a small orchestra ready to perform. The precision of measurement is crucial; a splash too much honey can make the fudge runny, while too little will make it too hard. I always double‑check the cups and teaspoons before starting. This step is your foundation.
- Combine peanut butter and coconut oil in a saucepan. Heat over medium‑low until the mixture is smooth and fluid. The goal is to create a uniform base that will carry the sweeteners. If the mixture thickens, add a teaspoon of water to loosen it. Keep stirring to avoid scorching.
- Add honey and vanilla extract. Stir until the honey is fully incorporated and the mixture is glossy. The aroma should be warm and inviting. This is the moment when the fudge begins to feel like a treat, not a recipe. Don’t rush—let the flavors meld.
- Slowly whisk in powdered sugar. Do this in small batches to avoid clumps. The sugar should dissolve completely, giving the mixture a silky texture. If you see any lumps, strain the mixture through a fine sieve. This step ensures a smooth finish.
- Introduce chocolate chips. Stir until they melt into the mixture, creating pockets of chocolatey goodness. The chocolate should not dominate; it should complement the peanut butter. This gives the fudge an extra layer of decadence.
- Season with a pinch of salt. This is the secret to balancing sweetness. The salt should be fine enough to dissolve quickly. Taste a small amount; the flavor should be balanced, not salty.
- Pour the mixture into a lined pan. Use parchment paper to make removal easier. Gently tap the pan to release air bubbles. The surface should be even and smooth. This step is critical for a clean cut later.
- Refrigerate until set. Chill for at least 2 hours, or until firm. If you’re in a hurry, pop it in the freezer for 30 minutes, but watch closely to avoid over‑chilling. The fudge should feel firm to the touch but still slightly pliable. This final step locks in the flavor.
That’s it—you did it. But hold on, I’ve got a few more tricks that’ll take this to another level.
Insider Tricks for Flawless Results
The Temperature Rule Nobody Follows
Maintaining a steady 95°C (203°F) during the simmer is key. Use a candy thermometer to keep the mixture in the sweet spot; too hot and you risk scorching, too cool and the fudge won’t set. I’ve found that a quick dip in cold water after the mixture reaches the right temperature helps lock in the texture. This trick is often overlooked, but it makes a noticeable difference.
Why Your Nose Knows Best
Smell the mixture as it cooks. A warm, nutty scent indicates that the fats are fully blended. If you notice a metallic or burnt odor, stop the heat immediately. Your nose is a reliable indicator of the fudge’s quality; trust it.
The 5‑Minute Rest That Changes Everything
After pouring the mixture into the pan, let it sit at room temperature for 5 minutes before refrigerating. This brief rest allows the surface to set slightly, reducing the risk of cracks when you cut the fudge. It also lets the flavors settle, giving each bite a richer taste.
The Right Pan Matters
Use a 8‑inch square pan lined with parchment. A smaller pan will create thicker bars, while a larger pan results in thinner, more delicate pieces. The pan’s size also affects cooling time; a thinner layer chills faster, which is great for impatient cooks.
The Secret to Clean Cuts
Before cutting, run a buttered knife through the surface and then wipe it clean. This prevents the fudge from sticking to the knife, ensuring neat, square pieces. If you’re in a hurry, a chilled knife works wonders. I’ve saved countless hours with this simple step.
The Final Touch
Once the fudge is set, dust it with a light sprinkle of sea salt or cocoa powder. The dusting adds a visual pop and a subtle flavor contrast. Some people like to drizzle a thin line of melted chocolate on top for a glossy finish. The possibilities are endless.
Creative Twists and Variations
This recipe is a playground. Here are some of my favorite ways to switch things up:
Coconut‑Crunch Delight
Add shredded coconut to the mixture before it sets. The coconut adds a tropical crunch that pairs beautifully with the peanut butter. It also introduces a subtle sweetness that complements the honey. Ideal for beachside parties.
Chocolate‑Covered Peanut Butter Fudge
Dip each piece in melted dark chocolate after it has set. Let the chocolate harden on a parchment sheet. The chocolate coating adds a glossy finish and a bittersweet bite. A perfect treat for chocolate lovers.
Spiced Ginger Variation
Stir in a teaspoon of ground ginger and a pinch of cinnamon during the simmer. The spices add warmth and depth, turning the fudge into a seasonal favorite. Serve with a dollop of whipped cream for an extra indulgence.
Almond‑Butter Fusion
Replace half the peanut butter with almond butter for a nutty twist. The almond butter’s lighter flavor balances the richness, creating a more complex palate. It’s a great way to incorporate more variety into your snack bar.
Salted Caramel Swirl
Swirl in a small amount of salted caramel sauce before the fudge sets. The caramel adds a buttery sweetness that contrasts with the peanut butter. The result is a multi‑layered flavor profile that’s irresistible.
Vegan Version
Use maple syrup instead of honey and a dairy‑free chocolate chip. This keeps the fudge entirely plant‑based without sacrificing taste. The texture remains creamy, and the flavor stays true to the original.
Storing and Bringing It Back to Life
Fridge Storage
Keep the fudge in an airtight container in the refrigerator for up to two weeks. The cool environment preserves the texture and prevents the fudge from becoming too soft. If you notice a slight film forming, it’s harmless; just reheat briefly.
Freezer Friendly
Wrap each piece individually in parchment and then place them in a freezer bag. Freeze for up to three months. When you’re ready to enjoy, let the fudge sit at room temperature for 15 minutes. The texture will return to its original silky state.
Best Reheating Method
Reheat in a microwave on low power for 10‑15 seconds, or place in a preheated oven at 150°C (300°F) for a minute. Adding a tiny splash of water before reheating creates steam that restores moisture and prevents drying out. The result is a warm, melty treat that feels freshly made.