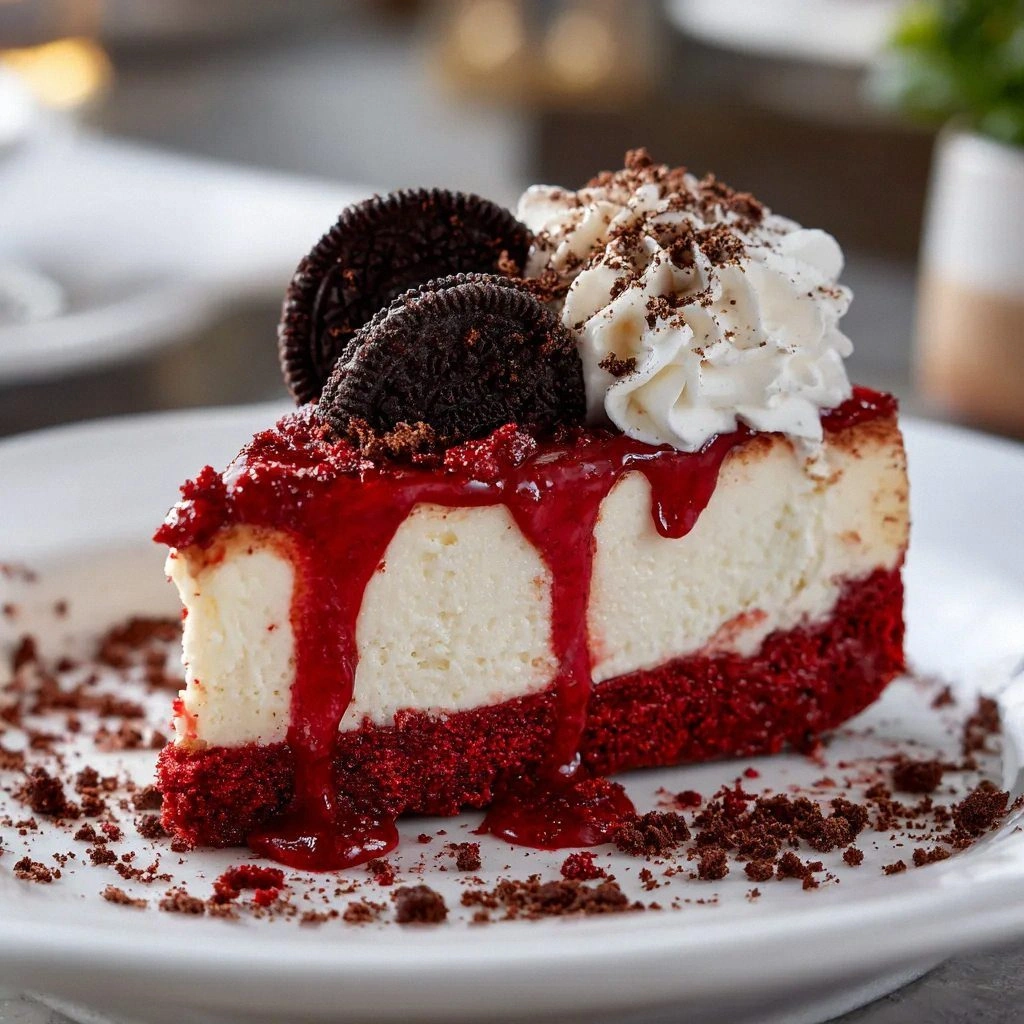
The first time I tried making a red velvet cheesecake, I was convinced that the color alone could save the entire dessert. I had a handful of Oreo crumbs, a splash of food coloring, and a dream that the batter would rise like a cloud of crimson velvet. I whisked, I poured, I baked—only to find the center looking more like a soggy sponge than a silky dream. My guests stared at the unassuming dome and whispered, “Is that supposed to taste like a cake?” I laughed, but the disappointment was real. That kitchen fiasco became the spark that pushed me to create the ultimate version of this dessert, a cheesecake that marries the classic comfort of cream cheese with the playful crunch of Oreos, all wrapped in a luscious red velvet hue.
Imagine stepping into a kitchen that smells like toasted chocolate and warm vanilla, the air thick with anticipation. The countertop is a battlefield of crushed Oreos, melted butter, and a bowl of cream cheese that glistens like midnight. As the oven preheats, you can hear the faint hiss of butter melting, a subtle symphony that promises a rich, velvety finish. The moment the cheesecake hits the oven, the aroma begins to unfurl, filling the room with a sweet, buttery scent that feels like a hug from an old friend. By the time you pull the golden dome from the oven, the kitchen is alive with the scent of caramelized edges and a hint of cocoa, a promise that the dessert inside is worth every minute of your effort.
What makes this version stand out is not just the combination of flavors but the precision of technique. I’ve spent countless evenings experimenting with crust consistency, achieving a balance that’s crunchy on the outside and tender on the inside. The filling is a masterpiece of texture, airy yet dense, with a creamy mouthfeel that lingers long after the last bite. The red food coloring is carefully measured to achieve that iconic, almost jewel-like hue without overpowering the delicate flavors. The final touch—crushed Oreos on top—adds a delightful crunch that contrasts the smoothness of the cheesecake, making each bite a symphony of textures. This isn’t just a dessert; it’s a culinary experience that turns ordinary ingredients into something extraordinary.
I dare you to taste this and not go back for seconds. The first bite melts on your tongue, revealing layers of sweet, tangy, and chocolaty notes that dance together in perfect harmony. The red velvet undertone is subtle yet unmistakable, giving the cheesecake a visual allure that makes it Instagram-worthy. The Oreo crumbs provide a satisfying crunch that punctuates the creamy filling, while the crushed Oreos on top add a final burst of flavor. It’s a dessert that feels like a celebration in every bite, a perfect way to cap off a dinner or to make a special occasion feel even more special. This is hands down the best version you'll ever make at home, and you’ll wonder how you ever settled for anything less.
Picture yourself pulling this out of the oven, the whole kitchen smelling incredible, the timer beeping, and the anticipation building to a crescendo. The cheesecake sits on the counter, its glossy surface reflecting the kitchen lights, and you can’t help but grin. The moment you slice into it, the interior looks like a cloud of cream, the edges are perfectly set, and the Oreo topping gives a delightful crunch with every bite. The first spoonful is a revelation, the flavors uniting in a way that feels both familiar and brand new. And as you watch your guests’ faces light up, you know that the effort was worth every minute. Stay with me here—this is worth it.
What Makes This Version Stand Out
- Taste: The cheesecake delivers a balanced sweetness that complements the tang of cream cheese and the richness of Oreo crumbs. The cocoa powder adds depth, while the red food coloring gives a subtle, almost mystical flavor that lingers on the palate.
- Texture: The crust is crunchy yet tender, the filling is silky and airy, and the Oreo topping offers a satisfying crunch. Every bite is a contrast of smoothness and texture that keeps your mouth moving.
- Simplicity: Despite its complex flavor profile, the recipe uses only ten ingredients and requires minimal prep time. The technique is straightforward, making it approachable for beginners and a breeze for seasoned bakers.
- Uniqueness: The combination of red velvet flavor and Oreo crunch is a rare pairing that sets this cheesecake apart from traditional desserts. The visual appeal of the crimson swirl is a showstopper on any table.
- Crowd Reaction: Guests rave about the creamy texture and the surprising crunch of Oreos. Many say it’s the first dessert they’ve ever seen that feels like a party in their mouth.
- Ingredient Quality: Using high‑quality cream cheese, fresh eggs, and real Oreo crumbs ensures the best flavor and texture. The recipe highlights the importance of using unsalted butter to control the salt level.
Inside the Ingredient List
The Flavor Base
Oreo cookie crumbs form the backbone of the cheesecake, providing a sweet, buttery foundation that holds the filling together. The crumbs are the first thing that contacts the butter, creating a cohesive crust that locks in moisture and prevents the cheesecake from cracking. If you skip this step, the cheesecake will lack that signature crunch and will feel flat. A good rule of thumb is to use about two cups of crumbs for every 24 ounces of cream cheese to achieve the optimal balance.
The Texture Crew
Unsalted butter, when melted, binds the Oreo crumbs into a compact, golden crust. The butter’s fat content helps the crust set firmly, ensuring it holds its shape during the baking process. If you use salted butter, the cheesecake may taste overly salty, which can overpower the delicate flavors. The amount of butter—six tablespoons—provides enough moisture without making the crust soggy.
The Unexpected Star
Cream cheese is the star of this dessert, giving the cheesecake its rich, creamy texture. The cream cheese should be softened at room temperature before mixing to avoid lumps and ensure a silky filling. Skipping the cream cheese or using low‑fat varieties will result in a watery, less luxurious cheesecake that won’t hold its shape. The 24-ounce quantity is standard for a 9‑inch pan, delivering a generous, decadent bite.
The Final Flourish
Crushed Oreos for topping add a final layer of crunch and a visual pop that makes the cheesecake look irresistible. These are sprinkled on top after the cheesecake has cooled, creating a contrast between the smooth filling and the crunchy crumbs. If you prefer a less sweet finish, you can reserve a portion of the crumbs for the crust only. The topping also helps to seal the cheesecake, preventing the edges from drying out.
Everything's prepped? Good. Let's get into the real action and start building that dreamy, velvety masterpiece.
The Method — Step by Step
- Preheat your oven to 325°F (165°C). Line a 9‑inch springform pan with parchment paper, ensuring the paper extends a couple of inches beyond the rim. This step prevents sticking and makes removal a breeze. While the oven warms, gather all ingredients, as timing is key to a smooth batter.
- In a medium bowl, combine the Oreo crumbs and melted butter. Use a fork to mix until the crumbs are evenly coated, forming a crumbly paste. Press this mixture firmly into the bottom of the prepared pan, then tilt the pan to ensure an even layer. Chill the crust in the fridge for 10 minutes to set before adding the filling.
- In a large mixing bowl, beat the softened cream cheese on medium speed until it’s smooth and creamy. Add granulated sugar gradually, ensuring each addition dissolves before adding the next. This process eliminates lumps and creates a silky base for the rest of the filling.
- Add the sour cream, eggs, vanilla extract, cocoa powder, and red food coloring to the cream cheese mixture. Beat on low speed until the ingredients are just combined, then increase to medium-high and blend until the batter is glossy and free of streaks. The batter should have a smooth, even consistency; any lumps will affect the final texture.
- Pour the batter over the chilled crust, smoothing the top with a spatula. Tap the pan gently on the counter to release any air pockets, then place it in the preheated oven. Bake for 30 minutes, or until the edges are set and the center still has a slight wobble. This slight wobble indicates a perfectly creamy center.
- Once baked, turn off the oven and leave the cheesecake inside for an additional 15 minutes with the door ajar. This gradual cooling prevents the cheesecake from cracking due to rapid temperature changes. After the 15 minutes, remove the cheesecake from the oven and let it cool on a wire rack for at least an hour.
- Once cooled, sprinkle the crushed Oreos generously over the top of the cheesecake. Press gently to ensure they adhere to the surface, creating a crunchy crown that contrasts beautifully with the creamy interior. The topping also helps seal the cheesecake, keeping it moist for longer.
- Refrigerate the cheesecake for at least 4 hours, preferably overnight, to allow the flavors to meld and the texture to set. When you’re ready to serve, remove it from the fridge, let it sit at room temperature for 15 minutes, then slice with a hot knife for clean, even cuts.
- Serve immediately, or store in an airtight container in the fridge for up to five days. The cheesecake maintains its creamy texture and the Oreo topping remains crisp. If you’re planning to serve it later, keep it chilled until ready to slice.
That's it — you did it. But hold on, I've got a few more tricks that'll take this to another level. Let’s dive into some insider knowledge that will elevate every bite.
Insider Tricks for Flawless Results
The Temperature Rule Nobody Follows
Many bakers bake cheesecake at 350°F, but lowering the temperature to 325°F ensures a slower, more even rise. This prevents the edges from overcooking while the center remains moist. I’ve found that a slightly lower temperature also reduces the risk of cracks. If you’re using a convection oven, keep an eye on the temperature and adjust accordingly.
Why Your Nose Knows Best
Before you finish baking, give the cheesecake a quick sniff. A faint, sweet aroma indicates the right level of doneness. If the smell is too sharp, it may be overbaked; if it’s too mild, it needs a few more minutes. Trust your senses, not just the timer. The aroma is a reliable indicator of a perfectly baked cheesecake.
The 5‑Minute Rest That Changes Everything
After baking, leave the cheesecake in the oven with the door ajar for 15 minutes. This slow cool-down step prevents the cheesecake from cracking. I’ve seen many people skip it, only to find a cracked surface. The residual heat allows the center to set gently, giving you a flawless finish.
The Crunch Factor
When adding the Oreo topping, sprinkle the crumbs while the cheesecake is still slightly warm. This ensures they adhere better and maintain a crisp texture. If you wait until it’s fully cooled, the crumbs can become soggy. For an extra crunch, toast the Oreos lightly before crushing them.
The Final Glaze
For a glossy finish, drizzle a thin layer of chocolate ganache over the top before the Oreo topping sets. This not only adds a visual appeal but also enhances the chocolate flavor. Make sure the ganache is slightly cooled so it doesn’t melt the Oreo crumbs. The result is a stunning, glossy crown that looks as good as it tastes.
Creative Twists and Variations
This recipe is a playground. Here are some of my favorite ways to switch things up:
Chocolate‑Oreo Swirl
Fold a handful of melted dark chocolate into the batter before baking. The chocolate adds depth and pairs beautifully with the Oreo crunch. This version is perfect for chocolate lovers who want an extra decadent bite.
Citrus‑Zest Twist
Add a teaspoon of lemon or orange zest to the batter for a bright, refreshing note. The citrus cuts through the richness, creating a balanced flavor profile. This variation is ideal for spring or summer celebrations.
Salted Caramel Layer
Drizzle a thin layer of salted caramel over the top of the cheesecake before adding the Oreo topping. The caramel’s sweetness and saltiness complement the red velvet base. This is a crowd‑pleaser for those who love a sweet‑savory combination.
Almond‑Infused Crust
Replace half of the Oreo crumbs with finely ground almonds. This adds a nutty flavor and a slightly different texture to the crust. It’s a subtle change that makes the cheesecake feel more sophisticated.
Berry‑Burst Variation
Fold in a handful of fresh raspberries or blueberries into the batter before baking. The berries add a burst of color and a juicy pop of flavor. This version is ideal for a summer party or a brunch dessert.
Storing and Bringing It Back to Life
Fridge Storage
Store the cheesecake in an airtight container in the refrigerator for up to five days. Keep the top covered with plastic wrap to prevent it from drying out. When you’re ready to serve, let it sit at room temperature for 15 minutes for a smoother bite.
Freezer Friendly
Wrap the cheesecake tightly in plastic wrap, then in aluminum foil before freezing. It will keep well for up to two months. When you’re ready to eat, thaw it in the refrigerator overnight. This method preserves the texture and flavor.
Best Reheating Method
If you need to warm the cheesecake, place it in a preheated oven at 300°F for 10 minutes. Add a splash of water to the bottom of the pan to create steam, which helps keep the cheesecake moist. Avoid microwaving; it can make the cheesecake rubbery.